Week 17:
Day 1

Understanding Words

Language / Literacy

Large Group

Skill and Goal

Oral language, Letter knowledge
Children will understand basic information, including the meaning of several novel words, presented in a book read aloud. Children will also identify the name and sound of the letter P.

Materials
Needed

  • *Letter P card
  • Book of your choice for this week’s repeated reading
  • Chart paper
  • Marker
    *Printables provided

Key
Concepts

New:

  • 1–2 words (see Be Prepared)

Be Prepared: This is the first of three repeated readings of a book with children. Today’s reading focuses on children’s understanding of basic information presented in the book. In advance of the session, identify all novel words in the book you intend to define for children across three days of reading the book. Select one or two important words to define for children today, especially words that are essential to understanding the book. See the Language/Literacy section of the ELM User Guide: 3–5 Years for additional information. Write the following at the top of the chart paper: Words We Understand.

BEGIN:

Large Letter P Card[Display letter P card.]

The word “pattern” begins with this letter. What is the name of this letter?

Letter P says /p/, just like in the word “pattern.” /p/, /p/, pattern. Let’s together say /p/, /p/, pattern.

Who would like to tell us another word that begins with the letter P?

EXPLAIN:

Now let’s read a book!

[See Week 3, Day 1 of Language/Literacy for a description and examples of how to approach today’s book reading. Key aspects are summarized below:

  • Display book cover and encourage children to discuss what the book might be about.
  • Explain that reading a book is a good way to learn new words. We will talk about some words each time we read the book this week. Remind children of the Words We Understand chart.
  • Read title of book as you point to each word. Point to and say the names of the author and illustrator.
  • Introduce and provide child-friendly descriptions of two novel words included in today’s book. Write words on the chart as you point to and say each again.
  • Point to the first text word and explain this is where we begin reading the book. Read the book verbatim. Pause to discuss words, events, or characters that seem confusing to children. Point to and describe illustrations directly related to book text.
  • After reading the book, engage children in recalling main parts of the book and novel words emphasized today:
    • What is our book about?
    • Who were the main characters?
    • What happened first? What happened next?
  • Engage children in a brief discussion of novel words emphasized today. Display and discuss book pictures that pertain to each word.
    • What does each word mean?
    • How was each word used in today’s book?]
Week 17:
Day 1

Counting Things

Mathematics

Large Group

Skill and Goal

Number knowledge
Children will recognize the numeral nine. Children will also strengthen their recognition of numerals 1–8.

Materials
Needed

  • *Large numeral cards 1–9
  • *2–3 sets of small numeral cards 1–9 (one numeral per card and one card per child)
  • Music CD
  • Music player
    *Printables provided

Key
Concepts

New:

  • Nine

Also
Promotes

  • Self-Regulation

BEGIN:

We are learning what some numbers look like.

[Display large numeral cards 1–8.]

There is a number on each of these cards. When I hold up a card, please hold up the number of fingers that is the same amount as the number on the card. If I hold up the number two, how many fingers should we hold up?

[Display each card, one at a time. Observe children to see if they have mastered each numeral displayed. Hold up fingers with them, if necessary. Display cards in random order if all children in your group have mastered each numeral.]

EXPLAIN:

Today we will learn what another number looks like. It is the number that comes after eight.

ASK:
  • What number might it be?
    [Hold up nine fingers.]
  • How many fingers am I holding up? I am holding up nine fingers! Let’s count them.


EXPLAIN:

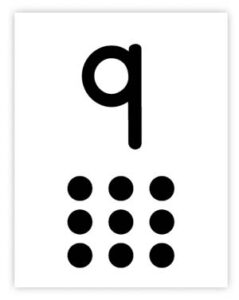
Number nine looks like this.

[Display a large numeral nine.]

The number nine means there are nine of something. Let’s count together the dots on the number card.

[Point to each dot on the numeral card as you count. Encourage children to count with you.]

Please hold up nine fingers. Let’s count them together.

Now let’s take a closer look at the number nine. It looks very similar to another number we know.

[Display a large numeral six next to the numeral nine.]

ASK:

What number is similar to number nine? (six)

[Point to numerals six and nine as you discuss curved or straight lines.]

EXPLAIN:

Number nine has a curved line on the top, and number six has a curved line on the bottom.

[Trace numeral nine and numeral six as you describe each numeral.]

ACT:

Now we are going to play a game that will help us practice our numbers. The game we will play today is like the game Musical Chairs.

First we need to put our chairs in a circle.

[Invite children to bring a chair to a designated area and help them to form a circle with their chairs facing inward. On the seat of each chair, place a small numeral card with a numeral 1–9 on it.]

When the music plays, we will walk around the circle. When the music stops, please sit in a chair close to you. Each person will have a chair to sit in.

We will pick up the number card in our chair before we sit down. I will say a number after we are all sitting in our chairs. If I say the number that is on your card, hold up the card.

Then we’ll stand up again, put the number card back on the chair we sat in, and play again!

[Play as long as time permits. Attempt to say each of the nine numerals so each child has an opportunity to identify and hold up a numeral.]

RECAP:

Today we learned what the number nine looks like. We also played a game of Musical Chairs that helped us practice our numbers. We are becoming number experts!

Scaffolding tips

Scaffolding Tips

Extra support

  • If children have difficulty identifying the numeral on their chair, help by describing the number you call out or displaying the large numeral card for the number you call. You may also wish to hold up the corresponding number of fingers when asking the numeral name.
  • Some children may benefit from a review of numerals 1–9 before playing the game. Place the number cards in numerical order and review the names and characteristics of each numeral. Also, count the number of dots shown on each, if necessary.

Enrichment

  • Rather than saying the name of the number, describe the number chosen and trace it in the air. Example: “This number has two straight lines; one line that goes across the top and one line that goes from the top to the bottom. What is the number?” (seven)
Mathematics

Center Activity

Provide a deck of cards with face cards (queen, king, etc.) removed. Invite children to match numerals of different suits (hearts, diamonds, etc.). Encourage children to put all of the twos in a pile, all of the threes, etc.

Family Child Care

Family Child Care

School-age children in your setting may enjoy playing a card game that focuses on numerals. Examples: Crazy 8’s, Uno®, Skip-Bo®.

Week 17:
Day 1

Paying Attention

Self-Regulation

Large Group

Skill and Goal

Concentrate
Children will strengthen their understanding of how to concentrate on their bodies and breathing.

Materials
Needed

  • *1 picture as shown
  • Small stuffed animal or toy—1 per child
    *Printables provided

Key
Concepts

New:

  • Starfish

Review:

  • Concentrate

BEGIN:

Today we will do an activity where we concentrate on our breathing. We know that when we concentrate, we pay close attention to something. This will help our mind to calm down and our body to be more relaxed.

We will concentrate on our breathing by pretending we are a starfish.

ASK:

What is a starfish?

EXPLAIN:
Starfish
Gavin White/flickr.com/(CC BY -NC-ND 2.0)

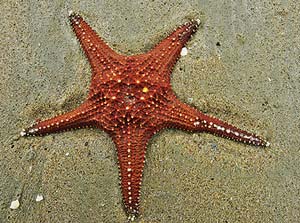
A starfish is an animal with five legs that lives in the ocean. Let’s look at a picture of a starfish.

[Display picture of a starfish.]

Let’s together count the starfish legs.

[Lead children in counting the starfish legs as you point to each leg in the picture.]

The legs of a starfish come together in the center of its body.

[Point to the center of the starfish body.]

ACT:

Let’s point to the center of our own body.

EXPLAIN:

Let’s find a place on the floor to spread out like a starfish. When we find a place to lie down on our backs, we will spread out our arms, legs, and neck like a starfish. We need to make sure our body is not touching someone else.

ACT:

[Dim the lights or turn them off, if possible, as children concentrate on their breathing.]

Let’s close our eyes and concentrate on our breathing. Let’s take a deep breath while stretching out our arms, legs, and neck on the floor like a starfish. Let’s relax our arms, legs, and necks while we breathe out.

[Invite children take a deep breath while stretching out their arms, legs, and neck like a starfish. Encourage children to relax their arms, legs, and neck as they exhale. Continue this exercise five more times as children practice stretching and relaxing and concentrating on their breathing.]

Now let’s bring our arms in to our sides and our legs together and then lie still on the floor. Let’s keep our eyes closed and concentrate on our breathing; in and out, in and out.

I am going to gently place a stuffed animal on the center of your body. Keep concentrating on breathing in and out. The animal on your stomach will slowly move up and down.

[Gently place a stuffed animal or other small toy on each child’s stomach. Walk slowly and talk quietly and calmly as you explain how the animal or toy on our stomach helps us concentrate on our breathing.]

Notice how the animal (toy) goes up on your stomach when you breathe in and down on your stomach when you breathe out. Let’s pretend our stomach is rocking the stuffed animal or toy to sleep by breathing in and out. Let’s concentrate on our breathing as we quietly rock our animal (toy) to sleep.

We may breathe slower when we concentrate on our breathing. Let’s relax as we think about our animal rocking to sleep on our stomach.

[Continue this activity as long as children are appropriately engaged. Encourage them to think about rocking the animal to sleep as they breathe in and out.]

RECAP:

Today we pretended to be a starfish while we concentrated on our breathing. We also pretended to rock our animals (toys) to sleep while we breathed slowly in and out, in and out. Concentrating on our breathing and body can help our mind to calm down and our body to relax.

Scaffolding tips

Scaffolding Tips

Extra support

  • If children have difficulty concentrating on their breathing while lying quietly on the floor, encourage them to think how their spread-out body is like a starfish and how their body might feel different when they move in their arms and legs.
  • For children who might be struggling to calm down, try putting your hand gently on their forehead as you speak in a low, calm voice.
  • It is okay if some children do not want to close their eyes. They can still do the activity effectively.

Enrichment

  • If children are easily able to concentrate on their breathing and rocking their stuffed animal, encourage them to imagine how the stuffed animal or toy might feel being rocked to sleep. Encourage children to think about each movement of the stomach and whether it makes the animal or toy feel more relaxed.
Self-Regulation

Center Activity

In a quiet area of the room, hang a sheet to be used as a sort of tent. Play quiet, peaceful music and invite children to place a stuffed animal on their stomach and practice concentrating on their breathing.

Family Child Care

Family Child Care

Encourage all children in your setting to try a breathing exercise outdoors that may help them to better calm themselves. Invite children to sit in a quiet place on the ground and close their eyes. Encourage children to breathe in through their nose and out through their mouth as they pretend to smell a flower. Encourage children to take deep breaths as they pretend to smell the flower, and then think of the flower as they exhale. Continue to practice for several minutes. If children need help with calming themselves during the day, remind them to stop and smell the flowers.

Week 17:
Day 1

Making Music

Creative Expression

Large Group

Skill and Goal

Knowledge of creative processes
Children will understand how air makes the sounds of some musical instruments.

Materials
Needed

  • *6 pictures as shown
  • My First Orchestra Book CD
  • Music Player
    *Printables provided

Key
Concepts

Review:

  • Musician
  • Air
  • Volume

Also
Promotes

  • Science

BEGIN:

We know that different kinds of musical instruments make different sounds. We also know that a person who plays a musical instrument is called a musician.

[Display pictures of a flute and a trombone from Week 16. Point to each instrument as you name it.]

Last week we listened to the sound of each of these two instruments.

EXPLAIN:

The sound of these instruments is made by air. Remember, air is all around us. We need air to breathe. Air goes into and out of our body when we breathe.

Flute
‏‏‎ ‎
Trombone
FlamM/wikimedia/(CC BY-SA 3.0)
Playing flute
‏‏‎ ‎
Playing the trombone
‏‏‎ ‎
ACT:

Let’s feel the air that comes out of our body when we breathe. Let’s hold our hand in front of our mouth and blow air onto our hand.

EXPLAIN:

Musicians blow air from their bodies to make music with some instruments.

[Display pictures of a musician playing a flute and a musician playing a trombone. Name each instrument as you describe the picture. Children are not expected to remember the names of instruments.]

The musicians in these pictures are blowing air into their instruments to make a sound.

These pictures also show us where the air goes into the musical instrument.

ASK:

What part of their body are the musicians using to blow air into their musical instrument? (mouth)

EXPLAIN:

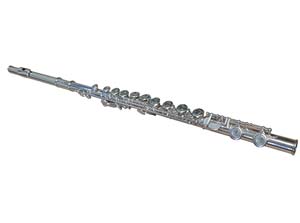
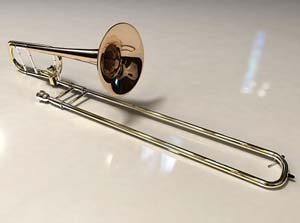
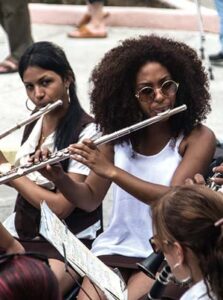
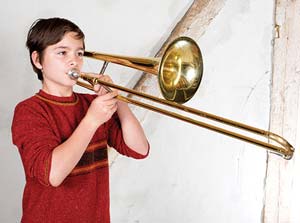
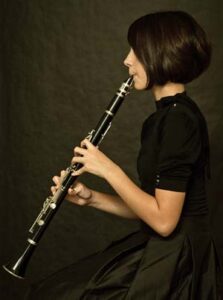
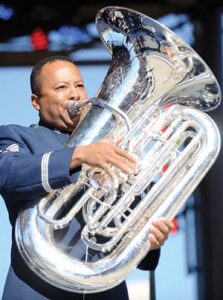
Here are pictures of musicians playing two other instruments. These instruments also make a sound when a musician blows air into them.

[Display pictures of a musician playing a clarinet and a musician playing a tuba.]

Playing the clarinet

Playing the tuba
Master Sgt. Adam M. Stump/usafband/Public Domain

My First Orchestra Book Cover

ASK:
  • What differences do you see in these two instruments? (size, straight vs. curved, color)
  • Do you think the instruments make the same kind of sound? Why/why not?
EXPLAIN:

Let’s listen to the sound of the smaller instrument. This instrument is called a clarinet. We can pretend we are playing the clarinet when we listen to the music made by a clarinet.

ACT:

[Display the photo of a musician playing a clarinet as you play Track 20 on the CD included in My First Orchestra Book. Be sure to identify the clarinet sound.]

Now let’s listen to the sound of the bigger instrument. It is called a tuba. We can pretend we are playing the tuba when we listen to the music made by a tuba.

[Display the photo of a musician playing a tuba as you play part of Track 30 on the CD included in My First Orchestra Book. Be sure to identify the tuba sound.]

ASK:

What did you notice about the sounds of these two instruments? (one sounds high, one sounds low)

EXPLAIN:

Small instruments make higher sounds. Bigger instruments make lower sounds.

Instruments make different sounds because they are made out of different materials and have different shapes.

[Use the pictures to remind children of differences in the shapes of the clarinet and the tuba.]

A musician can change the volume of these instruments by changing the amount of air that is blown into it. Remember, volume is how loud or quiet a sound is.

Let’s hold up our hand in front of our mouth again. When I say “blow hard,” we will blow very hard on our hands. “Blow hard.”

ACT:

[Demonstrate and encourage children to blow very hard on their hand.]

Did you feel a lot of air blowing on your hand when you blew hard?

Now let’s do it again. This time when I say “blow softly,” blow very softly on your hand. “Blow softly.”

[Demonstrate and encourage children to blow very softly on their hand.]

ASK:
  • Did you feel just a little bit of air on your hand when you blew softly?
  • Do you think a musician should blow hard or blow softly to make the instrument sound quiet? (blow softly)
RECAP:

Today we learned that the air inside our body can be used to make sounds on a musical instrument. The air makes music when it moves through the instrument. A musician can change the volume of the instrument by changing how much air is blown into the instrument. A lot of air goes into the instrument when the musician blows hard. The sound will be louder.

Scaffolding tips

Scaffolding Tips

Extra support

  • Point to your lips to remind children of the name of this part of a body.
  • If possible, display one or more of the actual instruments included in the plan. Consider inviting a musician who plays one of the instruments to visit your classroom with his/her instrument to demonstrate and describe how it works. Another option is to show a short video of a musician playing one of the instruments.

Enrichment

  • Encourage children to think of reasons why the larger instrument would have a lower sound. Point out the path the air has to take in a tuba to get to the end of the instrument. The further the air moves, the lower the sound of the instrument.
  • Explain (with pictures) that there are holes in a clarinet, flute, and tuba. The musician covers different holes with his/her fingers to get different sounds.
Creative Expression

Center Activity

Provide My First Orchestra Book and CD in the listening center. Encourage children to again listen to the CD as they look through the pages of the book. Draw children’s attention to a musician’s fingers playing the instrument (covering holes in the instrument; see Enrichment tip).

Family Child Care

Family Child Care

Invite a school-age child in your family or neighborhood who is learning to play a musical instrument to show and describe how the instrument works.