Oral language, Print knowledge Children will understand how Janell Cannon uses illustrations in her books to help readers learn that it is important to be kind to other people.
Materials Needed
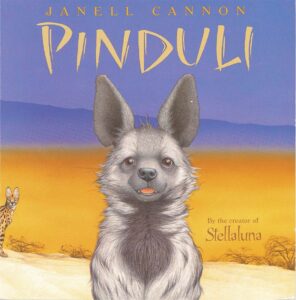
Pinduli by Janell Cannon
Clipboards—1 per child
Paper—1 per child
Drawing tools—1 per child
Key Concepts
Review:
Sketch
Also Promotes
Social-Emotional
Creative Expression
BEGIN:
We are learning about Janell Cannon and the books she writes. She writes books about animals. Ms. Cannon gets ideas for her stories as she sketches and draws. Remember, a sketch is a rough drawing. It is not finished.
EXPLAIN:
[Display book cover.]
Yesterday we read Pinduli. Today we are going to look more carefully at the illustrations. We are also going to do some drawing.
ASK:
What animals were in this story? (Pinduli the hyena, lion, zebra, dogs, fox, owl)
EXPLAIN:
All of the animals in the story made fun of Pinduli. They said mean things about how she looked.
ASK:
How do you think this made Pinduli feel? (sad, bad)
How would we feel if somebody made fun of how we look?
EXPLAIN:
Pinduli felt so bad that she rolled in the mud and the dust to try to make herself look different. The other animals thought she was a ghost! They were scared! They didn’t know it was really Pinduli.
ASK:
[Turn to the page that begins: “As she headed back to the rocky den . . .” Focus on the opposite page.]
How do the drawings in the book help us to understand that the animals felt scared? (big eyes, lion crouched down, running away)
EXPLAIN:
Then the animals ran away, but they ran into a place where they couldn’t get out. They were trapped. The animals explained that they had said something to hurt Pinduli’s feelings because someone had been mean to them.
The animals apologized to Pinduli and each other. The animals learned that mean words can hurt someone’s feelings.
ASK:
Do you think it is okay to say mean things to someone because someone else has been mean to you?
How does our book help us remember that it is important to be kind to other people? (by telling us how Pinduli’s feelings were hurt when other animals made fun of her)
EXPLAIN:
Drawings are a very important part of Janell Cannon’s stories. Ms. Cannon wants the drawings in her book to help us understand what is happening in the story. She says that she gets the ideas for her stories when she sits quietly and draws what she sees.
Let’s practice doing what Ms. Cannon did to get ideas for her books. Each of us can make a sketch of something that interests us. It can be a sketch of a tree or another child or a toy or something else you want to draw. It does not need to be an animal. Each of us can do a sketch of something different. Remember, a sketch is a rough drawing. It is not finished. We looked at some sketches in Ms. Cannon’s books.
Each of us will get a piece of paper, a pencil, and a clipboard. Move to the part of our classroom (or outside) where you want to make a sketch of something. I will put your name on your paper when you are done.
ACT:
[Put children’s names on their work and keep their sketches for use on Day 5.]
RECAP:
Today we talked about how Ms. Cannon used illustrations and a story to remind us that it is important to be kind to other people. We learned how Ms. Cannon used sketches and drawings to help tell a story. We also drew our own sketches.
Scaffolding Tips
Extra support
Remind children that when we apologize, we let someone know we feel bad about something we’ve done or for causing a problem. (Social-Emotional Week 23, Day 3).
Some children may benefit from looking again at examples of Ms. Cannon’s sketches in Pinduli.
Enrichment
Display the book’s back cover. Invite children to describe the drawings. (animals sitting together) What do the drawings tell us about how the animals felt at the end of the story? (getting along with each other, not saying mean things)
Center Activity
Provide copies of Ms. Cannon’s other books for children to look at and enjoy. Encourage children to look closely at her illustrations and try to determine what the story is about.
Family Child Care
School-age children in your setting might enjoy helping you read Pinduli to other children.
Week 45:
Day 3
Counting Things
Mathematics
Large/Small Group
Skill and Goal
Number knowledge Children will practice comparing groups of different amounts.
Materials Needed
Plastic cups—1 per child (see Be Prepared)
Pom-poms (see Be Prepared)
Key Concepts
Review:
More
Fewer
Equal
Option 1:
Offer the Week 13, Day 1 activity to review comparing groups of different amounts.
Option 2:
Engage children in comparing different amounts of pom-poms in plastic cups. This option involves children determining how many more items would be needed to make groups equal, when the groups are not equal.
Be Prepared: Fill plastic cups with groups of 1–10 pom-poms. The number of pom-poms should vary across cups. Keep a set of nine pom-poms for your use in the activity.
Arrange children in a circle. Explain that each of us will get a plastic cup with a group of pom-poms. Our cups have different amounts of pom-poms. We will compare groups of pom-poms to determine which group has more. Remind children that when something has more, it has a larger (or bigger) number of something. Explain that sometimes our two groups of pom-poms may be equal. Remind children that equal means things are the same.
Invite two children sitting next to each other to go first. Give each child a cup of pom-poms. Invite the two children to dump the pom-poms out of their cups, with each child keeping his/her pom-poms in a small group (do not combine the two cups of pom-poms). Invite one of the children to lead children in counting aloud his/her pom-poms. Invite the other child to do the same with his/her pom-poms.
Ask the two children whether one of the groups has more pom-poms. If the answer is “yes,” ask two follow-up questions:
Which group has more, and
How many pom-poms would the group with fewer pom-poms need to make the two groups equal?
As part of the last question, it may be helpful to ask the two children to point to the group that has fewer pom-poms. Also, for demonstration purposes, offer your collection of pom-poms to the child with the smaller group. Encourage the child to add the appropriate number of pom-poms to his/her group, so the two groups are equal. Describe for all children what the child is doing with your collection of pom-poms and how the two groups are equal after he/she adds the appropriate number of pom-poms to the group with fewer pom-poms.
Invite the two children to return the pom-poms to their cups and give the cups to you. Continue the process described above until all children have had a turn to dump a cup of pom-poms and compare the two groups. Move systematically around the circle, inviting the next two children sitting next to each other to take a turn. Omit the demonstration of adding more pom-poms to the group with fewer pom-poms if a child readily responds to the question of how many more pom-poms are needed to make the groups equal.
Week 45:
Day 3
Getting Along With Others
Social-Emotional
Large Group
Skill and Goal
Relationship skills
Children will strengthen their understanding of taking turns.
Materials Needed
Upbeat music
Music player
Key Concepts
New:
Audience
Review:
Take turns
Share
Personal space
Also Promotes
Physical / Health
Self-Regulation
Option 1:
Offer the Week 3, Day 3 activity to review taking turns.
Option 2:
Support children in taking turns dancing on a pretend dance floor.
Be Prepared: Use tape to define a “dance floor” where one-third of children can dance. Make sure the space is large enough for children to move around without bumping into each other. Space is needed for the other two-thirds of children to sit near the “dance floor.”
Open the session by pointing to the space marked by tape and inviting children to pretend it is a dance floor. Explain that we will take turns being dancers. Remind children that taking turns is one way to share. Children who are waiting for a turn to dance will pretend to be the audience. An audience is a group of people who watch a show or performance. Our audience will watch the dancers. Audience members can clap to the beat of the music. We will take turns being in the audience.
When we are in the dancing group, we need to stay inside the tape line. We also need to stay in our personal space. Our personal space is the area around our body that is empty and open for us to use. Explain that when the music plays, the dancing group will dance on the dance floor.
Organize children into three groups. Gather a dancing group on the “dance floor.” Make sure the audience group is outside of the tape line. Play the music and encourage the dancers to dance and the audience members to watch and clap. Stop the music after several minutes. When you stop the music, remind children we are taking turns today. Invite children to describe what will happen next. (another group of dancers moves to the “dance floor,” the audience watches the dancers and can clap when the music is playing) Repeat the process as time and interest permit.
Week 45:
Day 3
Exploring Earth and Space
Science
Large Group
Skill and Goal
Knowledge of earth and space
Children will understand that water can help a rock look more colorful.
Materials Needed
Magnifying glass
4 small rocks
4 pebbles
Tray or large plate
5 cups of water
Key Concepts
New:
Pebble
Review:
Rock
Be prepared: Pebbles are a useful form of rock for children to know, but may pose a choking hazard for younger children. Only a staff member should touch the pebbles used in this activity.
BEGIN:
We are learning about rocks. We know that a rock is a hard object that makes up part of the earth.
[Display magnifying glass.]
EXPLAIN:
Yesterday we used a magnifying glass to look at our rocks.
ASK:
What did a magnifying glass help us do? (look more closely at our rock, make rock look bigger)
EXPLAIN:
We could see characteristics of our rocks better when we used a magnifying glass.
Today we will learn how putting water on a rock can make it easier to see characteristics of a rock.
[Display two rocks and a cup of water.]
I am going to dip one of these two rocks in the cup of water so the rock gets wet. I will leave the other rock dry.
ACT:
[After dipping one of the rocks in water, put the two rocks next to each other for children’s ease in comparing. Point to the wet rock and the dry rock as you ask about each.]
How does the wet rock look different than the dry rock? (darker, more colorful)
[Follow-up prompt, if needed: “Can we see things in the wet rock that we do not see in the dry rock?”]
Let’s compare two more rocks.
[Display two more rocks. Guide a volunteer child in dipping one of the rocks in the water and then putting the wet rock next to the dry rock. Point to the wet rock and dry rock when you invite children to compare.]
What differences do you see between the wet rock and the dry rock?
EXPLAIN:
Putting a little water on a rock can help us see a rock’s colors, spots, and lines. Some rocks look darker when they are wet.
Let’s find out what happens when we put water on a small rock, called a pebble.
A pebble is a small rock that is round and usually smooth. Pebbles can be found near sand and water, like an ocean, lake, or river. The water and sand rub against a pebble and, over time, can make a pebble very smooth.
ACT:
[Display four dry pebbles on a large plate or tray. Point to and describe several of their differences.]
These are pebbles. They are all small and round. There are some differences between the pebbles.
These pebbles are dry. I will dip two of the four pebbles in water so we can find out what pebbles look like when they are wet.
Do we see things in the wet pebbles that we do not see in the dry pebbles? (coloring, markings, lines, spots)
RECAP:
Today we put water on a rock and compared a wet rock to a dry rock. We also put water on small rocks called pebbles. Putting water on a rock can help us see a rock’s colors, spots, and lines.
Scaffolding Tips
Extra support
If the pebbles are big enough, dip half of each into water to provide a stronger contrast between wet and dry.
Enrichment
Provide magnifying glasses so children can find out whether they can see more characteristics of a wet rock with a magnifying glass. Some children may wish to compare wet and dry rocks with and without a magnifying glass.
Center Activity
Provide four rocks and a balance scale. Invite children to use the rocks to try to balance the two sides of the scale. Encourage children to look for similarities and differences in the rocks.
Family Child Care
If you live near a creek, river, or lake, consider taking children on a rock hunt near the water. Can they see the differences between the wet and dry rocks near the shore?
 [Display book cover.]
Getting Along With Others
Social-Emotional
Skill and Goal
Relationship skills
Children will strengthen their understanding of taking turns.
Materials
Needed
Key
Concepts
New:
Review:
Also
Promotes
Offer the Week 3, Day 3 activity to review taking turns.
Support children in taking turns dancing on a pretend dance floor.
Open the session by pointing to the space marked by tape and inviting children to pretend it is a dance floor. Explain that we will take turns being dancers. Remind children that taking turns is one way to share. Children who are waiting for a turn to dance will pretend to be the audience. An audience is a group of people who watch a show or performance. Our audience will watch the dancers. Audience members can clap to the beat of the music. We will take turns being in the audience.
When we are in the dancing group, we need to stay inside the tape line. We also need to stay in our personal space. Our personal space is the area around our body that is empty and open for us to use. Explain that when the music plays, the dancing group will dance on the dance floor.
Organize children into three groups. Gather a dancing group on the “dance floor.” Make sure the audience group is outside of the tape line. Play the music and encourage the dancers to dance and the audience members to watch and clap. Stop the music after several minutes. When you stop the music, remind children we are taking turns today. Invite children to describe what will happen next. (another group of dancers moves to the “dance floor,” the audience watches the dancers and can clap when the music is playing) Repeat the process as time and interest permit.