Week 40:
Day 3

Understanding Words

Language / Literacy

Large Group

Skill and Goal

Oral language

Letter knowledge

Children will strengthen their comprehension of information presented in a book read aloud and increase the number of novel words they understand. Children will also identify and name the letter U.

Materials
Needed

  • *Letter U card
  • Book of your choice for this week’s repeated reading
  • Words We Understand chart from Day 1
    *Printables provided

Key
Concepts

New:

  • 4–6 words (see Be Prepared)

Review:

  • 1–2 words in book introduced on Day 1

Be Prepared: This is the second of three repeated readings of a book with children. Today’s session focuses on children’s comprehension of information presented in the book, especially connections to children’s experiences. The session also helps children understand more novel words. From the list of novel words you identified prior to your first reading of the book, select 4–6 words to define for children today. Remember, it is okay to select words that a few children may know if you anticipate most children do not understand the word’s meaning. See the Language/Literacy section of the ELM User Guide: 3–5 Years for additional information on how to select and define novel words.

BEGIN:

[Display letter U card.]

What is the name of this letter?

[Point to the uppercase letter U on the letter card.]

Am I pointing to the uppercase or to the lowercase letter U?

EXPLAIN:

Now let’s spend some time with our book.

[See Week 3, Day 3 of Language/Literacy for a description and examples of how to approach today’s book reading. Key aspects are summarized below:

  • Display book cover and say book title. Engage children in describing what they remember about the book:
    • What is our book about?
    • Who were the main characters in our book? 
    • What happened first? What happened next?
  • Remind children that reading a book is a good way to learn new words. Point to and say words introduced on Day 1 that are listed on the Words We Understand chart. Invite children to talk about what they recall about each of the words. Remind children of the meaning of each novel word.
  • Point to where to begin to read on the first text page of the book. Pause during reading to briefly define words identified for today’s session. Use the following approach:
    • Read the sentence with the novel word. Repeat the novel word.
    • Repeat the sentence in which the word is used.
    • Define the novel word and connect the definition to the book.
  • After the book reading, engage children in a discussion of each novel word targeted for today with one or more of the following strategies (plus writing the word on the chart):
    • Ask children to describe a picture related to the word.
    • Define a word without naming it and ask children to identify the word.
    • Encourage children to think about a novel word in another context. 
  • Encourage children to connect the book information to their own experiences. Below are some examples:
    • “Our book today was about worms. Have you ever seen or touched a worm? What was it like?”
    • “Our book today talked about roots. Roots are part of a plant that grow into the dirt. Have you ever seen the root of a plant? What was it like?” 
    • “Today we talked about the word squeeze. We squeeze something by pressing things very close together. What kinds of things have you squeezed? How about a tube of toothpaste? How about a package or bottle of ketchup? Show us how you squeeze something.”]
Week 40:
Day 3

Counting Things

Mathematics

Large/Small Group

Skill and Goal

Number knowledge

Children will strengthen their understanding of subtract and add.

Materials
Needed

  • *Number list—1 per pair of children
  • *Spinner—1 per pair of children
  • Counter—1 per pair of children
    *Printables provided

Key
Concepts

Review:

  • Subtract
  • Add

Option 1:

Offer the Week 33, Day 1 activity to review subtracting and adding.

Option 2:

Engage pairs of children in moving a counter on a number list in response to results of spinning a two-option number spinner (1, 2).

Display the number list. Point to each numeral as you lead children in saying each numeral aloud. Then display and describe the spinner. Demonstrate how the spinner lands on number 1 or 2.

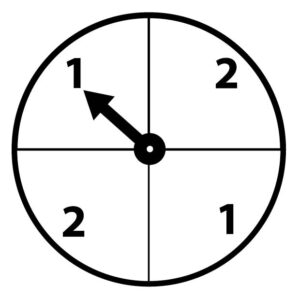
Demonstrate and describe today’s activity by placing a counter above number five on the number list. Spin the spinner and move your counter the number of spaces the spinner lands on (1 or 2). Explain the following:

  • We begin with our counter on number five on our number line.
  • The first time we spin the spinner, we add to number five the number the spinner lands on. If our spinner stops at number two, we move our counter two spaces on the number line to number seven. Five and two equal seven.
  • The second time we spin the spinner, we subtract the number our spinner lands on from the number where our counter is sitting. If our spinner stops at number one, we move our counter (currently on number seven) to number six on the number line. We have six when we take away one from number seven.
  • We will work with a partner and take turns spinning the spinner and moving our counter.
  • Remind children that when we add, our number gets larger. When we subtract, our number gets smaller. We take away when we subtract.

Form pairs of children. Give each pair a number list, a counter, and a spinner. Invite children to put their counter on number five on their number list. Then encourage children to take turns with their partner, spinning the spinner. Remind children that we add with the first spin and we subtract with the second spin.

If children readily move their counters in appropriate ways, encourage pairs to continue beyond the second spin. The next (third) time we spin the spinner, we add the number the spinner lands on. The following (fourth) time we spin the spinner, we subtract the number our spinner lands on. Alternate add and subtract with each spin.

Week 40:
Day 3

Exploring Where We Live

Social Studies

Large Group

Skill and Goal

Knowledge of social and physical environments

Children will understand basic characteristics of automobiles.

Materials
Needed

  • *7 pictures as shown
    *Printables provided

Key
Concepts

New:

  • Automobile
  • Trunk
  • Engine
  • Motor

BEGIN:

Today we will learn about a kind of transportation called an automobile. An automobile usually has four wheels and can carry a small number of people. The words car and automobile mean the same thing. Let’s together say automobile: au-to-mo-bile.

EXPLAIN:

Most of us have been in an automobile. Automobiles travel on land. Remember, yesterday we put our picture of a car under the picture of a road.

There are different kinds of automobiles. Let’s look at some pictures of automobiles.

[Display picture of car with open doors.]

Some automobiles can hold four or five people. Here is a picture of a car with its doors open. Two people can sit in the front seats. Two or three more people can sit in the back seat.

[Display picture of minivan.]

Some automobiles hold more people. The automobile shown in this picture is called a minivan. It can hold seven or eight people. There is a third row of seats in this automobile.

[Display picture of second and third rows of minivan.]  

ASK:
  • Here is a picture of the second and third rows of seats in a minivan. How many people can sit in the third (back) row? (three)
  • What do we always wear when we sit in an automobile? (seat belt)
  • Why do we always wear a seat belt? (to keep safe)
EXPLAIN:

Most automobiles have a trunk. A trunk is a place to carry things like bags of groceries. Here is a picture of the trunk of a car.

[Display picture of open trunk of car.]

ASK:

Have you ever helped put things in the trunk of a car?

[Display picture of back of a minivan with seats folded.]

EXPLAIN:

The back seats in minivans can be folded or taken out. This gives more space for carrying things.

ASK:

What kinds of things could a family put in the space shown in this picture?

EXPLAIN:

All automobiles have an engine or a motor. An engine or motor is a machine that moves things. The engine or motor in an automobile moves the wheels. The wheels make the automobile go places.

The engine in most automobiles uses gas to move things. People go to a gas station to get gas for their automobile. Some cars use electricity for their motors. People go to a place called an electric power station to charge a car that uses an electric motor.

[Display two pictures side by side: car getting gas, car at electric charging station. Point to and describe the electric charging station as part of the discussion.]


ASK:

What do you see happening in these two pictures?

EXPLAIN:

Some cars use both gas and electricity.

Automobiles come in different shapes and different sizes. They also come in different colors.

ASK:

What does your family’s automobile (or an automobile you know) look like?

[Encourage children to describe the family auto’s size, shape, and/or color. If the family vehicle is a truck, explain that we will talk about trucks tomorrow.]

EXPLAIN:

Today we talked about automobiles. What is another name for an automobile? (car) There are different kinds of automobiles. Some hold more people than others. The space for holding things in an automobile can be different. Some automobiles use gas. Other automobiles use electricity, or both gas and electricity.

Scaffolding tips

Scaffolding Tips

Extra support

  • In the discussion of the back seats of a minivan, point to and lead children in counting the number of seats.

Enrichment

  • Explain that an automobile that uses both gas and electricity is called a hybrid.
  • Explain that cars that use electricity store the electricity in a battery.
Social Studies

Center Activity

Fill the water table or a tub with soil or sand. Supply cars for children to “drive” in the soil or sand. Encourage children to play with the cars and draw their attention to tracks made in the soil or sand. You may also wish to provide a car mat and traffic signs in the block center. Encourage children to take the cars on a trip or drive them on the mat. Encourage the use of traffic signs and discuss what the signs mean.

Family Child Care

Family Child Care

Ask family members during drop-off or pickup time if the children can explore the family’s automobile. Encourage children to look for things that are the same and different in each automobile (number of doors, seats, what can it hold, what fuel it uses). If exploration of the automobile is not practical, invite the family member to describe their automobile.

Week 40:
Day 3

Exploring Earth and Space

Science

Large Group

Skill and Goal

Knowledge of earth and space

Children will understand basic characteristics of the fall and winter seasons.

Materials
Needed

  • Fall items (see Be Prepared)
  • *5 pictures as shown
    *Printables provided

Key
Concepts

New:

  • Fall
  • Autumn
  • Winter

Review:

  • Snow

Optional
Reading

The Seasons of Arnold’s Apple Tree by Gail Gibbons

Be Prepared: Wear fall clothing, such as a jacket, and carry a leaf rake (if possible) for today’s activity.

BEGIN:

Yesterday we talked about the season of summer and made a class book of things we like to do in the summer.

Today I am wearing something that we might wear during the season that comes after summer. I also have something for raking leaves. What season do you think we will talk about today? (fall)

EXPLAIN:

At the end of the summer, in some places, the weather begins to get cooler and a different season begins. The season that comes after summer is called fall. Another word for fall is autumn.

ASK:

Why would we wear a jacket in the fall? (to keep warm because the air gets cooler)

EXPLAIN:

In some places, leaves on trees and other plants turn to different colors in the fall. The leaves fall off of the trees and other plants.

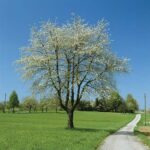
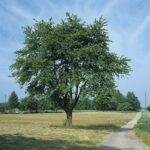
[Display pictures of same tree in summer and in fall. Point out which picture is summer and which picture is fall.]

Let’s look at pictures of the same tree in the summer and in the fall.

ASK:
  • How does our tree look different in the fall compared to the summer? (leaves are green in summer, leaves are darker in color in fall, fewer leaves in fall)
  • I’m carrying a rake today. What can we do with a rake in the fall? (get leaves off the ground)
  • Have you ever raked leaves into a pile and jumped in them?
EXPLAIN:

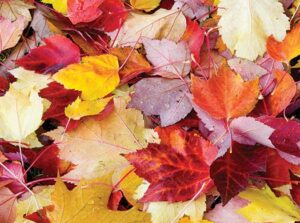
Let’s look at some pictures of leaves in the fall.

[Display picture of fall leaves.]

ASK:

What are some of the colors we see in the leaves in this picture? (orange, yellow, brown, red)

EXPLAIN:

We know that trees and other plants need sunlight to make their own food. Trees and other plants cannot make their own food in the fall because the air is cool and there is less sunlight during the daytime.

Now let’s talk about the coldest season of the year. Winter is the coldest season of the year. All places have a winter season. Winter does not feel the same everywhere. Winter is colder in some places than in other places. Some places have snow in the winter, and other places do not have snow.

ASK:

What is winter like where we live?

[Help children describe your winter season.

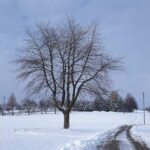
Display pictures of the same tree in fall and winter seasons. Point out which picture is fall and which picture is winter.]

How does our tree look different in the winter compared to the fall? (no leaves)

EXPLAIN:

In the winter, water can freeze into ice. Many other things can also freeze. In some places there can also be a lot of snow in the winter. Remember, snow happens when water that falls from heavy clouds goes through very cold air. The water freezes into small snowflakes.

Let’s look at our four pictures of our tree in each season and compare them.

[Display four pictures of the same tree in each season.]

ASK:

How is each picture different?

[Encourage children to discuss differences in each tree and why they occur. Example: “Our tree in the spring has flowers. In some places, new leaves and flowers begin to grow.]

RECAP:

Today we learned about the seasons of fall and winter. Leaves begin to change colors in the fall. Winter is the coldest season of the year. Some places are colder than other places in the winter. Each picture of our tree is different in each season. Which season is your favorite?

Scaffolding tips

Scaffolding Tips

Extra support

  • Review the meaning of the word “after” if children seem confused with the description of fall as a season that comes after summer.

Enrichment

  • In the discussion of how trees and other plants need sun to make their own food, children may be ready to learn the word “photosynthesis.” Explain that photosynthesis is the process plants go through to make food for themselves. Plants need sunlight to do this. Photosynthesis stops in the fall because there is less sunlight.
  • Remind children about the coldest place on earth. (South Pole) Explain that each day in the South Pole is like winter. You may wish to briefly review information about the South Pole introduced in Science Week 32, Day 3.
Science

Center Activity

Supply finger paints in fall colors (brown, red, yellow, orange). Invite children to create their own fall picture. You may also wish to supply shaving cream in a tub. Invite children to use the shaving cream to pretend it is wintertime and they are playing in snow.

Family Child Care

Family Child Care

Collect items of clothing that can be worn in each season. Hold up each clothing item, one at a time, and ask children to name the season most appropriate for the clothing item. Some clothing items, such as a jacket, might be worn in more than one season.