New:
Review:
Review:
[Take children outside on a shape hunt. As they find items and identify the shape, ask how they know it is a circle or square. Describe the shape after they’ve identified it. Example: “Julie found a nut that is the shape of a circle. A circle is round with curved edges.” The goal of the walk is to identify items in the shape of a circle or square. If a child shows interest in another type of shape, support the child’s curiosity by naming and describing the shape. Example: “This is in the shape of an oval. An oval has curved edges like a circle, but it is longer and not round.”]
Review:
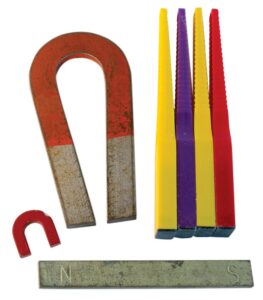 [Display magnets.]
There are different kinds of magnets. Some magnets are very strong and some magnets are not very strong.
We know that magnets can hold paper or pictures on a refrigerator. Most magnets on a refrigerator can hold up 1–2 pieces of paper or pictures. Some magnets can hold up even more paper or pictures! A strong magnet can hold a lot of paper or pictures.
We have different types of magnets. Some (or one) of our magnets may be stronger than other magnets (or another magnet).
 Extra support
Enrichment
Getting Along With Others
Social-Emotional
Skill and Goal
Relationship skills
Children will broaden their understanding of how to cooperate with each other.
Materials
Needed
*Printables provided
Key
Concepts
New:
Review:
Also
Promotes
Self-Regulation
We are learning that cooperation means we work together. On Day 2 we played Musical Chairs. How did we cooperate when we played Musical Chairs? (shared a chair)
Another way we can cooperate with each other is to take turns. Who can tell us about a time you shared by taking turns with someone? (playing with a toy, playing a game)
[Display picture of quilt.]
What can you tell us about the quilt in this picture? (different colors, many pieces, etc.)
[Put quilt frame (paper) on the floor for all children to see. Position the item so children can work on the quilt from each side. Put coloring tools in one or several containers. Provide a limited supply to promote sharing of coloring tools.]
Let’s look at what we will use to make our quilt. The large piece of paper on the floor is made up of smaller squares. We can use the crayons, colored pencils, and markers to color the squares. We can work from any side of the paper to color our squares.
There are many ways we will cooperate (work together) in making our quilt.
[Invite all children to a large group discussion. Make sure all children can see the finished quilt. Below are some suggested areas to discuss:]
Scaffolding Tips
Extra support
Enrichment
Center Activity
Invite children to do a “partner painting.” Pair children with one piece of paper and encourage them to cooperate in painting a picture together. If you anticipate that this approach to “partner painting” might be too challenging for some pairs of children, provide one sheet of paper with tape down the middle. Encourage children to paint on either side. This arrangement may lead to two different paintings on a divided piece of paper but it promotes cooperation in sharing a page and materials. Also, some children may benefit from your providing a simple picture of an item to paint such as a flower. Before children begin, encourage members of each pair to discuss what they would like to paint together. Encourage discussion of which parts of the painting each child will do.
Family Child Care
Invite preschool-age and school-age children in your setting to make an Family Child Care family quilt. Send larger squares of paper home with children and invite families to work together on their own family square. When each square has been completed, tape or glue them together to create a family quilt. Hang the quilt somewhere where families can see it.