Week 30:
Day 3

Understanding Words

Language / Literacy

Large Group

Skill and Goal

Oral language, Letter knowledge
Children will interpret information presented in a book read aloud and increase the number of novel words they understand. Children will also identify the name of the letter L.

Materials
Needed

  • *Letter L card
  • Book of your choice for this week’s repeated reading
  • Words We Understand chart from Day 1
    *Printables provided

Key
Concepts

New:

  • 4–6 words (see Be Prepared)

Review:

  • 1–2 words in book introduced on Day 1

Be Prepared: This is the second of three repeated readings of a book with children. Today’s session focuses on children’s comprehension of information presented in the book, especially connections to children’s experiences. The session also helps children understand more novel words. From the list of novel words you identified prior to your first reading of the book, select 4–6 words to define for children today. Remember, it is okay to select words that a few children may know if you anticipate most children do not understand the word’s meaning. See the Language/Literacy section of the ELM User Guide: 3–5 Years for additional information on how to select and define novel words.

BEGIN:

Large Letter L Card[Display letter L card.]

  • What is the name of this letter?
  • Pop up if you have the letter L in your name!
EXPLAIN:

Now let’s spend some time with our book.

[See Week 3, Day 3 of Language/Literacy for a description and examples of how to approach today’s book reading. Key aspects are summarized below:

  • Display book cover and say book title. Engage children in describing what they remember about the book: 
    • What is our book about? 
    • Who were the main characters in our book? 
    • What happened first? What happened next?
  • Remind children that reading a book is a good way to learn new words. Point to and say words introduced on Day 1 that are listed on the Words We Understand chart. Invite children to talk about what they recall about each of the words. Remind children of the meaning of each novel word.
  • Point to where to begin to read on the first text page of the book. Pause during reading to briefly define words identified for today’s session. Use the following approach: 
    • Read the sentence with the novel word. Repeat the novel word.
    • Repeat the sentence in which the word is used. 
    • Define the novel word and connect the definition to the book.
  • After the book reading, engage children in a discussion of each novel word targeted for today with one or more of the following strategies (plus writing the word on the chart): 
    • Ask children to describe a picture related to the word. 
    • Define a word without naming it and ask children to identify the word. 
    • Encourage children to think about a novel word in another context.
  • Encourage children to connect the book information to their own experiences. Below are some examples: 
    • “Our book today was about worms. Have you ever seen or touched a worm? What was it like?” 
    • “Our book today talked about roots. Roots are part of a plant that grow into the dirt. Have you ever seen the root of a plant? What was it like?” 
    • “Today we talked about the word squeeze. We squeeze something by pressing things very close together. What kinds of things have you squeezed? How about a tube of toothpaste? How about a package or bottle of ketchup? Show us how you squeeze something.”]
Week 30:
Day 3

Counting Things

Mathematics

Large Group

Skill and Goal

Number knowledge, Measurement knowledge
Children will collect, organize, and present measurement information on a chart.

Materials
Needed

  • String (see Be Prepared)
  • Ruler
  • 3 index cards
  • Large prepared chart (see Be Prepared)
  • Tape
  • Crayon or marker

Key
Concepts

New:

  • Shortest
  • Least
  • Longest

Review:

  • Measure
  • Inch
  • Most

Be Prepared: Cut string into three different lengths: three inches, six inches, nine inches. Prepare a chart with three columns and 12 sections (rows) at the top of each column as shown in the activity plan.

BEGIN:

Today we will make another chart. We will measure the length of three different strings and then organize what we learn about the strings on a chart.

ASK:

What does it mean to measure something? (to find out what size it is)

EXPLAIN:

[Display three different lengths of string. Emphasize the differences in length.]

First we will collect information about the three strings by measuring the length of each one. We need two volunteers to help measure the first string.

We will use a ruler to measure the strings.

[Display a ruler. Point to the inches on the ruler when you describe them.]

We will place the end of the ruler at the end of a string. We will count the number of inches of each piece of string. We know that the length of the space from one number to the next number is called an inch.

ACT:

[Strings may be measured in random order. Invite a volunteer child to hold the first string end to end on the floor. Encourage a second volunteer child to use a ruler to measure the length of the string. When children have finished measuring, invite them to join other children.]

How long is our first string? I will write the length on this card and place the card above the string, so we will remember its length.

[Write the number of inches of the first string on the index card. Say aloud the number of inches as you write the numeral. Put aside the string with the index card placed above it.]

Now we will measure our second string.

[Invite a volunteer child to hold the second string end to end on the floor. Encourage a second volunteer child to use the ruler to measure the length of the string. When children have finished measuring, invite them to join other children.]

How long is our second string? I will write the length on this card and place it above the string, so we will remember its length.

[Write the number of inches of the second string on the index card. Say aloud the number of inches as you write the numeral. Put aside the string with the card placed above it.]

Now we will measure our third string.

[Invite a volunteer child to hold the third string end to end on the floor. Encourage a second volunteer child to use the ruler to measure the length of the string. When children have finished measuring, invite them to join other children.]

How long is our third string? I will write the length on this card and place it above the string, so we will remember its length.

[Write the number of inches of the third string on the index card. Say aloud the number of inches as you write it. Lay all three strings in random order, with corresponding index cards above each, next to each other on the floor.

Hang the chart on a wall or another visible area.]

This is the chart we will use to organize and present the information we collected about the three strings. We will put the strings here.

Yarn Graph[Point to center.]

We will color in the sections at the top of the chart to match the number of inches of each string. If a string is three inches long, we will color three sections of our chart.

[Point to top.]

We will put the cards with the length of each string at the bottom of our chart.

[Point to bottom.]

We have measured each of the strings. Now we want to figure out which string is the shortest. Shortest means it is smaller than the others. Let’s look at the numbers on the cards above each string. I see number three, number six, and number nine.

[Point to each as you say the number.]

We are going to find the number that is the least. Least means it has the smallest amount. Which number is the least? The shortest string has the card with the number that is the least. Let’s hang the shortest string under the first section of our chart.

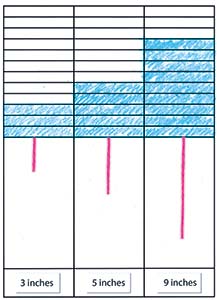
[Tape the shortest string below the first section on the chart. Tape the corresponding index card below the string at the bottom of the chart as shown in the picture.]

Now let’s color the number of sections on our chart that matches the number of inches of the shortest string. The shortest string is three inches, so we will color three sections of our chart above the shortest string.

[Color in three sections of the chart, above the shortest string. Color each section one at a time. Point out that each section means one inch.]

Which number is the most? We know that the most means it is more than any of the others. The longest string has the card with the number that is the most. Longest means it is bigger than the others. Let’s hang this string under the last section of our chart.

[Tape the longest string below the third section of the chart. Tape the corresponding index card below the string at the bottom of the chart as shown in the picture.]

Now let’s color the number of sections on our chart that matches the number of inches of the longest string. The longest string is nine inches.

How many sections should we color above our longest string? (nine)

[Color in nine sections of the chart, above the longest string. Remember to color one section at a time. Point out each section means one inch.]

Which string will go in the middle of our chart?

What number is on the card for the string that will go in the middle of our chart? This number is more than the first number and less than the third number.

[Tape the string below the second section of the chart. Tape the corresponding index card below the string at the bottom of the chart as shown in the picture.]

Now let’s color the number of sections on our chart that matches the number of inches of the string in the middle. The middle string is six inches.

How many sections should we color above our middle string? (six)

[Color in six sections on the chart, above the middle string. Remember to color one section at a time. Point out each section means one inch.]

Let’s talk about what we’ve learned from the information presented on our chart.

ASK:

[Point to pertinent parts of the chart as you ask the following questions:]

  • Which string is the longest?
  • How long is it? (nine inches)
  • Which string is the shortest?
  • How long is it? (three inches)
RECAP:

Today we made a chart that organizes and presents information about the length of three different strings. First we used a ruler to measure the length of each string.

Then we put each string, and information about each string, on our chart. Our chart is organized from shortest to longest string (point to each). Three parts of our chart tell us about each string.

[Point to each as you describe the parts:]

  • The string hanging on the chart.
  • The sections we colored in.
  • The card that says the length of the string.

[Display this chart in the classroom. It will be used again in Day 5.]

Scaffolding tips

Scaffolding Tips

Extra support

  • As children measure each string, help with counting inches if necessary.
  • Add one hash mark for each inch when you write the number of inches on an index card.
  • If children need help in determining which number is the least and which number is the most, use a number line.
  • If children seem uncertain about the characteristics and uses of a ruler, incorporate into today’s activity pertinent information from Math Week 25.
  • In the final activity segment, where you ask about the longest and shortest strings, point to and count each section above a string. Remind children that each section means one inch.

Enrichment

  • After displaying the ruler, invite children to demonstrate how to use a ruler when measuring something in inches. Example: Lining up the end of the ruler with the end of the item being measured, counting the number of inches to the other end of the item.
Mathematics

Center Activity

Provide *individual charts and cups of colored craft sticks. Limit the number of colors to 3–4, with one color per cup. Invite children to choose a cup and then collect information by sorting the craft sticks by color. Encourage children to organize the number of craft sticks in each color (group) from least to most on the chart.
*Printables provided

Family Child Care

Family Child Care

Use items from a park or playground to develop a chart with children. Use today’s chart as a model. Invite each child to collect a specified number (up to five) of the same type of item (rocks, leaves, sticks, etc.). Example: Child one collects two items, child two collects four items. Count the number of items in each group and arrange them in order from least to most. Invite each child to color the corresponding number of sections on a chart for his/her group of items

Week 30:
Day 3

Understanding Feelings

Social-Emotional

Large Group

Skill and Goal

Emotion knowledge, Perspective-taking
Children will consider what a person who appears to be upset about something might think or feel when another person offers a response.

Materials
Needed

  • *3 pictures as shown
    *Printables provided

Key
Concepts

Review:

  • Empathy
  • Embarrassed

Be Prepared: Today’s activity explores reactions children might have to different offers of help. The intent of the activity is to help children consider what another child might feel or think when someone recognizes what the child may be thinking or feeling. There are no right or wrong answers because children and situations are different. Encourage children to communicate and respect a range of ideas.

BEGIN:

We are learning to understand how someone else is feeling. What do we call this? (empathy)

EXPLAIN:

Today we will talk about what we might say to someone who seems upset about something.

Picture of Brianna drinking milk[Display picture of Brianna drinking her milk.]

This is a picture of Brianna. We learned last week that Brianna spilled her milk at a restaurant. She felt embarrassed. Remember, we feel embarrassed when we feel foolish in front of other people.

We talked about some things we might say to help Brianna feel better. One idea is to ask Brianna if we can help clean up the spilled milk.

ASK:

How do you think Brianna might feel if someone said to her, “May I help you clean up the milk?”

[Follow-up prompt, if needed: “Do you think Brianna would feel better about spilling her milk if someone offered to help clean up the milk? Why?”]

EXPLAIN:

Another idea is to tell Brianna that other people sometimes spill their milk, too.

ASK:

How do you think Brianna might feel if someone said to her, “I spilled my milk before. It’s okay.”

[Follow-up prompt, if needed: “Do you think Brianna would feel less embarrassed if people told her they had spilled their milk, too? Why?”]

EXPLAIN:

Angry looking boy looking at the toys[Display picture of children playing with Waffle Blocks™.]

You may remember this picture of children playing with Waffle Blocks™. One of the children looks upset. We talked about what he might be feeling. Maybe he is frustrated about the blocks. Or maybe he is angry that he cannot get the blocks to fit together.

We talked about what we might say if we wanted to help. One idea is to ask the boy who appears upset if he’d like help with the blocks.

ASK:

How do you think the boy might feel if someone asked, “Would you like me to help you put the blocks together?”

[Follow-up prompt, if needed: “Do you think the boy might feel better or worse if someone offered to help him with the blocks? Why?”]

EXPLAIN:

Another idea is to tell the boy that the blocks can be hard to put together.

ASK:

What do you think the boy might feel if someone said, “Those blocks are hard to put together. It looks like you’re trying really hard.”

[Follow-up prompt, if needed: “Do you think the boy might feel better, or worse, if someone told him the blocks were hard to put together? Why?”]

EXPLAIN:

picture of a sad girl with a friend[Display picture of girl looking with concern at a girl who appears upset.]

You may remember this picture, too. One girl looks upset. The other girl looks like she is worried about the girl who seems upset.

We talked about some things we might say to the girl who seems upset.

ASK:
  • How do you think the girl might feel if someone said, “I wish you weren’t sad. I would really like to play with you.”
    [Follow-up prompt, if needed: “Do you think the girl would feel better if someone let her know she looks sad?”]
  • What are some other things we might say to the girl who looks upset?
RECAP:

Today we talked about what we might say to children who seem upset about something. We talked about what the children might think or feel if different things were said to them.

Scaffolding tips

Scaffolding Tips

Extra support

  • Each of the three situations presented in this activity includes discussion of two different offers of help. If children find it too challenging to consider two different offers of help, limit the discussion to one offer of help per situation.
  • It may be helpful to provide more of a reminder of the children depicted in the three situations. The children were introduced as follows: Brianna in Week 29, Day 3; the child upset with the blocks in Week 28, Day 3; the girl who seems upset in Week 29, Day 2.

Enrichment

  • Encourage children to compare the two possible things to say to the boy who appears upset about the blocks. One option is to help the boy with the blocks. The other option is to simply tell the boy that he’s been working hard on blocks that are hard to put together. How do these two different options involve the child who is upset?
Social-Emotional

Center Activity

Provide puzzles. Encourage children to engage in role-play with the puzzles. One child can pretend to be upset about the hard-to-do puzzle, and one or several children can pretend to offer different types of help. Adult guidance is needed.

Family Child Care

Family Child Care

Invite school-age children to describe situations they have observed or experienced that are similar to those offered in today’s activity. What type of help was offered to a child who seemed upset? How did the child react to an offer of help?

Week 30:
Day 3

Doing Drama

Creative Expression

Large/Small Group

Skill and Goal

Knowledge of creative processes, Skills that support creative expression
Children will pretend to participate in different activities.

Materials
Needed

  • *Activity cube (see Be Prepared)
    *Printables provided

Key
Concepts

Review:

  • Pretend

Also
Promotes

  • Physical / Health

Be Prepared: Cut out and fold the provided activity cube template. You may wish to make two for use with the Enrichment tip.

BEGIN:

[Arrange children in a circle.]

This week we are pretending to be animals and other people. Remember, when we pretend, we act as if something is true or real when it is not.

EXPLAIN:

Today we are going to pretend to do different activities as we play a game with an activity cube. The activity cube is different than the one we have used before.

Activity Cube
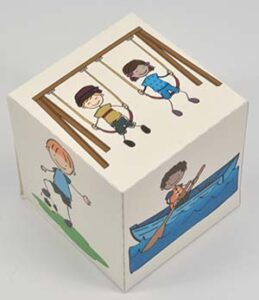
[Display activity cube.]

Let’s look at the pictures on the activity cube and talk about each activity before we begin playing our game.

[Point to each picture, one at a time, and encourage children to discuss the activity in the picture and how they might pretend to do the activity.]

We will take turns rolling the cube when we play the game. When the cube stops, a picture of one of the activities will be on top of the cube. Whoever rolled the cube can tell us what the activity is and then pretend to do the activity. Then we can pretend to do the activity together! I’ll roll first and show you how to play.

ACT:

Cube Game Cutout With Activities[Demonstrate how to roll the cube and wait for it to stop. Look at the picture on top of the cube. Then say the name of the activity and pretend to do the activity as you encourage all children to join you.

Invite children to take turns rolling the cube, naming the activity that is on the top of the cube, and then pretending to do the activity. Encourage remaining children to pretend to do the activity as well.]

ASK:
  • Did we pretend to do each activity in the same way?
  • How did we do the activities differently?
RECAP:

Today we pretended to do different activities. We rolled our cube and pretended to do the activity shown on the top of the cube. Pretending can be a fun way to imitate someone or something else!

Scaffolding tips

Scaffolding Tips

Extra support

  • Assist children in identifying the activity on top of the cube and/or pretending to do the activity, if appropriate.

Enrichment

  • Invite children to roll two activity cubes and pretend to do both activities, one after the other. Example: Pretend to swim and then play soccer.
Creative Expression

Center Activity

Blank Game Cube Example
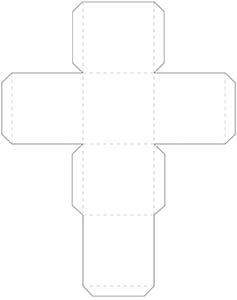
Provide *activity cubes and encourage children to continue to pretend as they play. Invite children to also make up other activities and imitate them. Or provide *blank activity cube templates and drawing tools, and encourage children to create their own activity cubes.
*Printables provided

Family Child Care

Family Child Care

Play Follow the Leader outside. Encourage children to take turns leading other children in pretending to move as if they are doing different activities.