Week 6:
Day 1

Understanding Words

Language / Literacy

Large Group

Skill and Goal

Oral language, Phonological awareness
Children will understand basic information, including the meaning of several novel words, presented in a book read aloud. Children will also strengthen their awareness of rhyming words.

Materials
Needed

  • *Twinkle, Twinkle, Little Star poster
  • Book of your choice for this week’s repeated reading
  • Chart paper
  • Marker
    *Printables provided

Key
Concepts

New:

  • 1–2 words (see Be Prepared)

Review:

  • Rhyme
  • Understand

Be Prepared: This is the first of three repeated readings of a book with children. Today’s reading focuses on children’s understanding of basic information presented in the book. In advance of the session, identify all novel words in the book you intend to define for children across three days of reading the book. Select one or two important words to define for children today, especially words that are essential to understanding the book. See the Language/Literacy section of the ELM User Guide: 3–5 Years for additional information. Write the following at the top of the chart paper: Words We Understand.

BEGIN:

Let’s say the “Twinkle, Twinkle, Little Star” nursery rhyme together. Remember, nursery rhymes help us learn about rhyming words. Let’s raise one of our hands when we say a rhyming word.

[Lead children in reciting “Twinkle, Twinkle, Little Star” in unison as you display the poster. Lead children in raising a hand when they say a rhyming word.]

EXPLAIN:

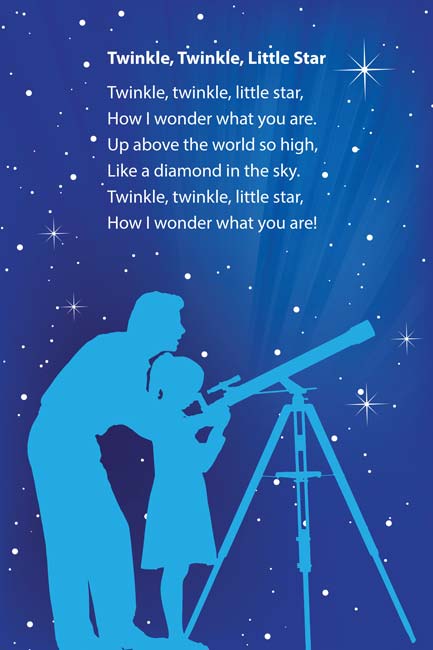
Now let’s read a book!

[See Week 3, Day 1 of Language/Literacy for a description and examples of how to approach today’s book reading. Key aspects are summarized below:

  • Display book cover and encourage children to discuss what the book might be about.
  • Explain that reading a book is a good way to learn new words. We will talk about some words each time we read the book this week. Remind children of the Words We Understand chart.
  • Read title of book as you point to each word. Point to and say the names of the author and illustrator.
  • Introduce and provide child-friendly descriptions of two novel words included in today’s book. Write words on the chart as you point to and say each again.
  • Point to the first text word and explain this is where we begin reading the book. Read the book verbatim. Pause to discuss words, events, or characters that seem confusing to children. Point to and describe illustrations directly related to book text.
  • After reading the book, engage children in recalling main parts of the book and novel words emphasized today:
    • What is our book about?
    • Who were the main characters?
    • What happened first? What happened next?
  • Engage children in a brief discussion of novel words emphasized today. Display and discuss book pictures that pertain to each word.
    • What does each word mean?
    • How was each word used in today’s book?]
Week 6:
Day 1

Counting Things

Mathematics

Small Group

Skill and Goal

Geometric and spatial knowledge, Number knowledge
Children will create groups of four or five items that match an illustrated sample.

Materials
Needed

  • Paper plates—1 per child
  • Approximately 60 squares and 60 triangles (pattern blocks)

Key
Concepts

New:

  • Group of five

Review:

  • Group of four

Optional
Reading

  • One Big Building by Michael Dahl

Be Prepared: Prepare one paper plate per child with 4–5 squares or triangles drawn on each. Each plate should contain one kind of shape. All children in each small group will be working from one pile of shapes (both squares and triangles). Place the pile of shapes in the middle of the group of children.

BEGIN:

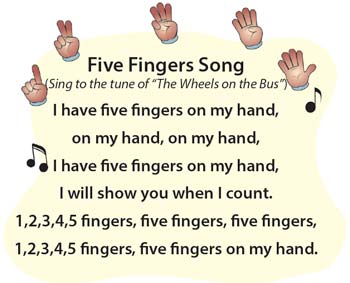
[Sing the “Five Fingers Song” introduced on Day 1 of Week 1.]

How many fingers do you have on your hand? How do you know?

EXPLAIN:

Today we will make groups of four or five items. A group of five has five things.

ASK:

How many things does a group of four have? (four)

ACT:

Let’s show a group of three fingers on one of our hands. Now let’s show a group of two fingers on our other hand. Now let’s show a group of five fingers.

EXPLAIN:

I will give each one of you a shape plate. On your shape plate there will be a group of four or five shapes. The shapes will be squares or triangles. Some of you may get a plate with four shapes, and some of you may get a plate with five shapes. We will have different kinds of plates. When you get your plate, please look at the shapes and tell us how many are in your group. Then we will find the same kind of shapes in our pile of shapes and match them to the shapes on our plates.

ACT:

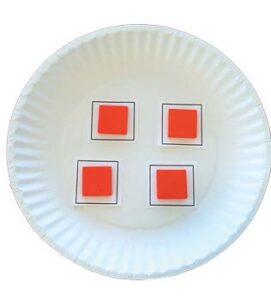
Let me show you first. I have a plate with four squares. I know this because when I look at four squares, I remember that it’s four. I could also count the squares to find out. Let’s count them together. 1, 2, 3, 4.

Now, I need to look through our pile of shapes to find a group of four shapes that match the shapes on my plate.

  • I have four squares on my plate. What shape do I need to find in our pile of shapes? (squares)
  • How many squares do I need? (four)

[Look through the pile of shapes. As you look, describe for children the number of shapes you found and how many more shapes you need. Example: “I found two squares, but is that enough for my plate? No, I need four squares. I need to keep looking. Here’s another square! Now I have three. But that is still fewer than four. I need to look for another square. Here’s one more square! Now do I have enough? Yes, I have four squares.”]

After you’ve found your group, put the shapes on your plate. We will share when everyone is done.

[Give each child a plate. Ask each child to say how many are in the group of shapes on his/her plate. Also ask what shape is on his/her plate. Observe and assist children as they look for their groups. If time permits after all children have finished, invite each child to tell the shape on his/her plate and how many shapes he/she found.]

RECAP:

Today we looked for groups of four and five shapes. We found the number of shapes that matched the group of shapes on our plate. We are learning a lot about numbers and shapes!

Scaffolding tips

Scaffolding Tips

Extra support

  • Observe and help children as they make a group of five fingers, if needed.
  • If children have difficulty making groups up to five, give them a plate with a smaller number of shapes.
  • Another option is to use a plate that is divided into three sections. Ask children to put one shape in each of the three sections.

Enrichment

  • The activity can be made more challenging by providing plates with a mixed assortment of triangles and squares. Example: two triangles, three squares.
Mathematics

Center Activity

Provide *small dot cards 1–5. Place the cards in a basket. Ask children to pull out a card and determine the number of dots on the card. Ask children to clap or stomp as many times as the number they’ve chosen. Example: If a child chooses a card with five dots, the child would clap or stomp five times.

*Printables provided

Family Child Care

Family Child Care

Invite children to pretend to visit the “Groups of four and five Restaurant.” In the housekeeping area, encourage children to pretend to order food in groups of four and five. Example: “I would like four apples, please.” Encourage children to take turns ordering and placing the orders on a plate. As preschool-age children take turns ordering and making groups of four and five, encourage school-age children to take turns ordering and making larger groups of food items.

Week 6:
Day 1

Using Self-Control

Self-Regulation

Large Group

Skill and Goal

Self-control
Children will understand some different ways to wait patiently.

Materials
Needed

  • Toy
  • 2 dolls or stuffed animals

Key
Concepts

Review:

  • Patient

Optional
Reading

  • Waiting Is Not Easy by Mo Willems

BEGIN:

We are learning how to use self-control so we can make good choices. Today we will learn how to use self-control while we are waiting for something..

EXPLAIN:

We do a lot of waiting in our classroom and with our families. We wait to take our turn to talk during circle time and in using things in our classroom. We wait while we are getting ready to go outside. We wait for our food to be ready at a restaurant.

ASK:

It can be very hard to wait for something.

  • Do you remember a time when it was hard to wait while taking a turn or waiting for something else?
  • What was it like to wait?
EXPLAIN:

It is important to be patient when we are waiting for something. Remember, when we are patient we wait our turn without getting upset and without complaining.

ASK:
  • Would it be fair if we took a toy from someone instead of waiting our turn? How would the other person feel if we took away a toy?
  • Would it be fair if we didn’t want to wait our turn at the computer station and made another person leave before his/her turn was over? How would the other person feel if we made him/her leave early?
  • Would it be fair for another person to start talking while we were talking during circle time?
EXPLAIN:

None of these things would be fair. This is why we need to be patient while we wait. I want to tell you a story about someone who had a hard time waiting for something. Please raise your hand if you know about Cookie Monster.

ASK:

What does Cookie Monster love to do? (eat cookies)

EXPLAIN:

One time Cookie Monster had to wait for a cookie. It was very hard to wait because Cookie Monster loves cookies! Cookie Monster thought of some things that could help him wait.

ASK:

Have you ever tried singing or humming while you are waiting your turn to play with a toy?

ACT:

Cookie Monster found that singing or humming was a great thing to do while waiting for a cookie. Let’s try it!

I am going to pretend that I really want to work at the computer station. Other children are working there and their time at the computer is not up. It’s hard to wait. I will try singing to help me wait

[Place dolls or stuffed animals in the chairs at the computer station to represent all computers are currently in use. Demonstrate singing as a way to help you wait. Sing a song that is familiar to children so they can hum or sing along if they wish. Or sing the “Wiggle Rhyme” that is used later in this activity.]

I sang the whole time I was waiting for my turn at the computer! I did not think about the computer station while I was singing. I was thinking about my song. I thought about the words of the song and I sang a song that I really like to sing. It was fun to sing. Singing or humming can be a great thing to do when waiting for something.

Another thing Cookie Monster did while he was waiting for the cookie was to play with a toy. Watch me while I play with a toy. I am going to play with a toy while I wait for my turn at the computer.

[Pretend that you are playing with a toy. Do not look at the computer station. Focus on the toy.]

Playing with a toy can be a great thing to do to help us wait!

Cookie Monster found that it is much easier to wait if we do something while we are waiting.

EXPLAIN:

There are times when we wait in a line. We might be waiting to get a drink at the water fountain or waiting to use the restroom or waiting to go outside. When we are waiting in line we usually need to be quiet so we would not be able to sing like Cookie Monster did. It might be okay to sing in a whisper. We also would not have another toy to play with while we are in line.

ACT:

[If time permits:]

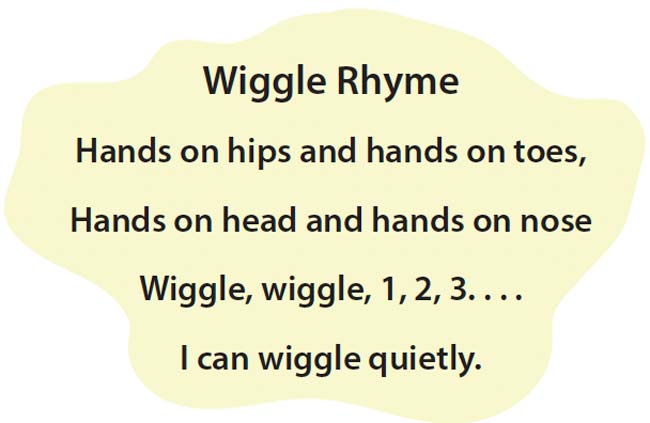
We could quietly say a rhyme to ourselves while we are waiting in line. Let me show you.

[Demonstrate the adjacent rhyme while doing the motions:]

Let’s practice together.

[Invite children to do the rhyme with you as you demonstrate the motions.]

RECAP:

Waiting for something is part of what we do in our classroom and in our family. Today we learned how Cookie Monster waited for a cookie. Cookie Monster thought of some things to do while he waited for the cookie. Who can tell us about one of the things we learned to do while we wait? (singing, playing with another toy, saying a quiet rhyme) We can wait patiently, just like Cookie Monster!

Scaffolding tips

Scaffolding Tips

Extra support

  • If children find it difficult to quietly do an activity while waiting, refer to the inside/outside voices chart used in Week 2, Day 1. Remind children of the different options while waiting if they are having difficulty coming up with something.

Enrichment

  • Ask children to think about a time when they’ve had to wait with their family in a restaurant. Why do they think they needed to wait? (other people are in line before them, it takes the food time to cook, etc.)
Self-Regulation

Center Activity

Invite children to play a board game, such as Candy Land® or Chutes and Ladders®. If time is limited, quicker games, such as Connect Four® or Go Fish® or Memory®, may be better options. Use a reduced deck of cards with Go Fish® or Memory®. Encourage patient waiting as children take turns.

Family Child Care

Family Child Care

Play Ready, Set, Go! with preschool-age children to practice self-control. Invite children to line up next to each other. Say, “Ready, Set, _____.” The last word may be “go” or another word that sounds like “go,” such as “blow” or “grow.” When children hear the word “go” they may move quickly to another area. If the last word said is not “go” they must remain at the line. Remind children to use their listening ears to listen carefully for the word “go.” School-age children will enjoy playing another version of the game as they listen for different actions to perform. Example: “Ready, Set, Hop!”

Week 6:
Day 1

Creating Art

Creative Expression

Small Group

Skill and Goal

Skills that support creative expression
Children will understand how artists use tools to create art.

Materials
Needed

  • Watercolor paints
  • Tempera paint
  • Paintbrushes (see Be Prepared)
  • Sponges (see Be Prepared)
  • Straws—1 per child and staff
  • Paper—1 per child and staff

Key
Concepts

New:

  • Tool
  • Paintbrush
  • Sponge
  • Straw

Be Prepared: Today’s activity is a demonstration and discussion of different tools for creating art. Secure several different types of paintbrushes, such as narrow, wide, fanned, and flat. Also secure several sponges with different textures that you cut into several shapes of your choice.

BEGIN:

Today we will learn about some tools that people can use to create art. A tool is an item that helps us do something. There are many different kinds of tools. Today we will see how paintbrushes, sponges, and straws can be used as art tools.

EXPLAIN:

Our first tool is a paintbrush. A paintbrush is used to put paint on something. Let’s look at some different kinds of paintbrushes.

[Display different kinds of paintbrushes. Describe and point to some of the differences (small, big, wide, narrow, etc.).]

Some paintbrushes are wide and others are narrow. Some paintbrushes are more rounded and others are flat.

ASK:

[Display two paintbrushes of high contrast, such as narrow and wide. Point to each brush as you ask about it.]

  • I am going to put some paint on paper with each of these brushes. What do you think the paint will look like with this brush?
  • What do you think the paint will look like with the other brush?
ACT:

[Use watercolor to demonstrate painting with each of the two brushes. Describe differences in how the paint looks (a lot of paint, not much paint). Emphasize how the brush characteristics make different kinds of art. Ask children if they are surprised at how the brushes do different things with paint.]

EXPLAIN:

[Display several sponges.]

Our next tool is a sponge. Usually we use a sponge to clean things or soak up something we might spill. A sponge can also be used as a tool to create art.

[Display the different sponges and pass them around for children to feel.]

An artist might dip the sponge into the paint and press it onto paper or cloth.

ACT:

[Demonstrate dipping the sponge in paint and pressing the sponge onto the paper. Show children how the shape of the sponge is now on the paper.]

EXPLAIN:

Our last tool is a straw. A straw is something we can drink with. We can also use a straw as an artist’s tool. Instead of sucking in and getting my drink through the straw, I am going to blow air through the straw. The air will move the paint on the paper.

We can blow paint with a straw and create art when we use it as an artist tool.

ACT:

[Place a small amount of thinned tempera paint on the paper and blow the paint to make a design on the paper.]

I used the straw and blew the paint around on the paper to create art. Now we can all try it!

[Provide each child with a straw and piece of paper. Encourage children to use the straw to create art on the paper.]

RECAP:

Today we learned about some tools artists may use to create art. Remember, a tool is something that helps us do something.

Scaffolding tips

Scaffolding Tips

Extra support

  • In the discussion of the straw, encourage children to put a hand in front of their mouth and blow out. Explain that air from the mouth is what pushes the paint.

Enrichment

  • Encourage children to share times when they have used some of the different tools that you are demonstrating.
  • Ask children to think about how their fingers can be tools when creating art. (finger painting, making sculptures, etc.)
Creative Expression

Center Activity

Provide paintbrushes and sponges demonstrated today in the art center. Encourage children to engage with as many tools as they would like to create their art.

Family Child Care

Family Child Care

Collect a variety of materials, such as feathers, marbles, and old plastic lids, for children to use in painting and creating art.