Week 36:
Day 1

Understanding Words

Language / Literacy

Large Group

Skill and Goal

Oral language, Letter knowledge
Children will understand basic information, including the meaning of several novel words, presented in a book read aloud. Children will also say the sounds of letter K.

Materials
Needed

  • *Letter K card
  • Book of your choice for this week’s repeated reading
  • Chart paper
  • Marker
    *Printables provided

Key
Concepts

New:

  • 1–2 words (see Be Prepared)

Review:

  • Sentence

Be Prepared: Brief sentences are used in Days 1, 3, and 5 as opportunities for children to identify letters, especially lowercase letters. The sentences suggested in each plan focus on recent content in Self-Regulation, Social-Emotional, or Social Studies. You may wish to prepare a different set of sentences related to some aspect of your classroom’s current activities. If you prepare your own sentence, be sure to include the set of letters being reviewed this week in words that use the letter sound introduced in the curriculum, including short vowel sounds. There are opportunities later in the curriculum to introduce other sounds of letters, including long vowel sounds.

The second segment of the plan is the first of three repeated readings of a book with children. Today’s reading focuses on children’s understanding of basic information presented in the book. In advance of the session, identify all novel words in the book you intend to define for children across three days of reading the book. Select one or two important words to define for children today, especially words that are essential to understanding the book. See the Language/Literacy section of the ELM User Guide: 3–5 Years for additional information. Write the following at the top of the chart paper: Words We Understand.

BEGIN:

Let’s practice finding a letter we know by looking for it in a sentence. Remember, a sentence is a group of words that gives us information or tells us what to do. A sentence can also ask a question.

ACT:

[Write the following sentence on a chart or whiteboard. Read each word as you write the sentence:

We are responsible when we make good choices.]

We want to find the lowercase letter k in our sentence.

[Display letter K card. Point to the lowercase k on the card.

Encourage a volunteer child to look for and point to the lowercase letter k in the sentence as you display the letter K card.] Letter K

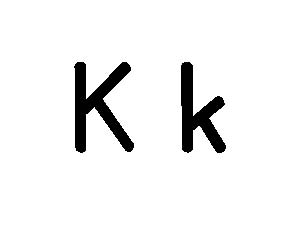
What sound does the letter K make?

Yes! Letter K says /k/. Let’s together say the sound of the letter K: /k/.

EXPLAIN:

Now let’s read a book!

[See Week 3, Day 1 of Language/Literacy for a description and examples of how to approach today’s book reading. Key aspects are summarized below:

  • Display book cover and encourage children to discuss what the book might be about.
  • Explain that reading a book is a good way to learn new words. We will talk about some words each time we read the book this week. Remind children of the Words We Understand chart.
  • Read title of book as you point to each word. Point to and say the names of the author and illustrator.
  • Introduce and provide child-friendly descriptions of two novel words included in today’s book. Write words on the chart as you point to and say each again.
  • Point to the first text word and explain this is where we begin reading the book. Read the book verbatim. Pause to discuss words, events, or characters that seem confusing to children. Point to and describe illustrations directly related to book text.
  • After reading the book, engage children in recalling main parts of the book and novel words emphasized today:
    • What is our book about?
    • Who were the main characters?
    • What happened first? What happened next?
  • Engage children in a brief discussion of novel words emphasized today. Display and discuss book pictures that pertain to each word.
    • What does each word mean?
    • How was each word used in today’s book?]
Week 36:
Day 1

Counting Things

Mathematics

Large/Small Group

Skill and Goal

Number knowledge
Children will collect, organize, and present information on a chart.

Materials
Needed

  • Prepared chart (see Be Prepared)
  • *Boy and girl cutouts (see Be Prepared)
    *Printables provided

Key
Concepts

New:

  • Neither

Be Prepared: Organize a simple, four-column chart as shown. Include a cutout of a boy, a cutout of a girl, and a cutout of both a boy and a girl.

If time is limited, put tally marks on the chart after each group stands up rather than invite each child to put his/her mark on the chart. Describe the process. Example: “Five children are standing because they have a brother only. I will put five tally marks on our chart. I will put the marks in the section that says ‘Brother.’”

BEGIN:

[Display prepared chart and point to its parts as you describe them.] Brother and sister chart

Today we will use a chart to show how many of us have brothers and sisters. Let’s take a look at our chart.

ACT:

[Adjust the “stand up” requests below to include more than one brother only or more than one sister only, if appropriate for children in your classroom. Example: “Stand up if you have a brother or brothers only.”]

  • Stand up if you have a brother only.
  • Stand up if you have a sister only.
  • Stand up if you have both a brother and a sister.
  • Now, stand up if you do not have a brother or a sister.

Please come to our chart and put a mark under brother, sister, both, or neither when I call your name. Neither means you do not have a brother or a sister.

[Invite children, one at a time, to put a tally mark under brother, sister, both, or neither.]

ASK:
  • How can we find out how many of us have a brother only? (count the marks under brother)
  • How can we find out how many of us have a sister only? (count the marks under sister)
  • How can we find out how many of us have both a brother and a sister? (count the marks under both)
  • Are there any of us who have neither? Remember, neither means we do not have a brother or a sister.
ACT:

Let’s count the marks together for each group.

[Lead children in counting the marks, pointing to each one as you count.]

  • How many of us have a brother only?
  • What does the number __ look like? I will write that number under the word “brother” on our chart.
  • How many of us have a sister only?
  • What does the number __ look like? I will write that number under the word “sister” on our chart.
  • How many of us have both a brother and a sister?
  • What does the number __ look like? I will write that number under the word “both” on our chart.
  • How many of us have neither?
  • What does the number __ look like? I will write that number under the word “neither” on our chart.
  • Which group has the most marks?
  • Which group has the fewest marks?
RECAP:

Today we made a chart about the number of brothers and sisters we have. How many of us have neither a brother or a sister? Were any of our groups equal?

Scaffolding tips

Scaffolding Tips

Extra support

  • As you count each group, touch each mark to help children understand that when we count to find out how many, the last number counted is the total number in the group.

Enrichment

  • Ask children the following questions: “What number would we put on our chart if there were no marks for a group?” (zero) “What does zero mean?” (none) ”Do most of us in our classroom have a brother(s) only, a sister(s) only, both a brother(s) and sister(s), or neither?”

Mathematics

Center Activity

Fill a small tub with various colored items. Invite children to sort the items by color.

Family Child Care

Family Child Care

To extend this activity, invite children to draw a picture of their brothers and sisters. If they have neither, invite them to draw their parents.

Week 36:
Day 1

Focusing & Remembering

Self-Regulation

Large Group

Skill and Goal

Executive function
Children will regulate their behaviors in response to different oral and visual prompts.

Materials
Needed

  • Classroom musical instruments—1 per child
  • Baton or stick

Key
Concepts

Review:

  • Orchestra
  • Conduct

Be Prepared: If time permits, offer Sleeping, Sleeping, All the Children Are Sleeping from Week 34, Day 2 as a second game. If the game described below is too challenging for a majority of children, stop at an appropriate place and offer Sleeping, Sleeping, All the Children Are Sleeping from Week 34, Day 2. The game for today may be less challenging when offered again at a later point.

BEGIN:

Today we will play Conducting an Orchestra. This game helps us to concentrate on what we need to do.

ASK:

How do we play Conducting an Orchestra?

EXPLAIN:

We know that an orchestra is a group of people who play certain kinds of musical instruments together.

ASK:

What does someone do when they conduct an orchestra? (lead it)

EXPLAIN:

So, when someone conducts an orchestra, they lead a group of people playing certain kinds of musical instruments.

ACT:

[Give each child a musical instrument. Instruments may include drums, bells, triangles, rhythm sticks, etc. Provide children with a few moments to play their instruments.]

I will be the conductor, and you will be the orchestra. When I wave the baton, we will play our instruments slowly or quickly.

What should we do when I stop waving the baton? (stop playing instrument)

Let’s try it.

[Wave the baton as children play the instruments slowly or quickly. Continue for several minutes as children practice playing quickly or slowly and stopping while watching the baton.]

Now we are going to change the game a little. This time when I wave the baton quickly, we will play our instruments loudly. When I wave the baton slowly, we will play our instruments quietly. When I stop waving the baton, we will stop playing.

  • What should we do when I wave the baton quickly? (play our instruments loudly)
  • What should we do when I wave the baton slowly? (play our instruments quietly)
  • What should we do when I stop waving the baton? (stop playing our instruments)

[Wave the baton quickly and encourage children to play their instruments loudly. After a few seconds, begin waving the baton slowly and encourage children to play their instruments quietly. Stop waving the baton and wait until all children have stopped playing their instruments. Continue practicing with the rule changes for several minutes.]

RECAP:

Today we again played Conducting an Orchestra. We changed the rules of the game.

  • What part of our body did we use to pay close attention during this game? (eyes)
  • What changed during the game? (played instruments loudly when baton moved quickly, played instruments quietly when baton moved slowly, stopped playing instruments when baton stopped moving)
  • What would happen if we didn’t watch carefully during the game? (we wouldn’t know when to play our instruments loudly, quietly, or stop playing our instruments)
Scaffolding tips

Scaffolding Tips

Extra support

  • Say aloud the words “fast” or “slow” if children need an additional oral reminder of the action to be completed when the rules have been changed.
  • If children seem unclear about the baton movements, use your arm in an expansive way to communicate the prompt.

Enrichment

  • If children easily grasp the rule change, shorten the length of time between playing quickly and slowly.
  • Invite children to try another rule change for Conducting an Orchestra: Play instruments quietly when the baton moves slowly, and play instruments loudly when the baton moves quickly. Then do the opposite.
Self-Regulation

Center Activity

Invite children to continue playing Conducting an Orchestra. Encourage children to take turns waving the baton. Ensure the baton does not have a pointed or sharp tip. A soft stick-like item may be used as a baton.

Family Child Care

Family Child Care

Try using the baton during cleanup time. When you move the stick fast, encourage children to clean up quickly. When you move the stick slowly, encourage children to clean up slowly.

Week 36:
Day 1

Creating Art

Creative Expression

Large Group

Skill and Goal

Knowledge of creative processes, Skills that support creative expression
Children will understand that shapes can be found in some art.

Materials
Needed

  • * 3 pictures as shown
  • Felt shape cutouts—1 set per child (see Be Prepared)
  • Flannel board with felt shapes that match children’s shapes
    *Printables provided

Key
Concepts

Review:

  • Shape

Also
Promotes

  • Math

Be Prepared: Provide a set of felt shape cutouts in a clear ziplock bag for each child. Each felt set should include two circles, two squares, two triangles, and two rectangles.

BEGIN:

Last week we learned how artists can use lines to create art. We looked at pictures of paintings with different types of lines. We learned that lines can be placed up and down, side to side, or on a diagonal in art. Lines can be thick or thin.

EXPLAIN:

ShapesToday we will find out how some art includes shapes. We work with shapes a lot in our classroom. Last week we played a game with shapes called Wiggle Worm Shapes.

Let’s quickly remind ourselves of the names of some shapes.

[Display circle, square, rectangle, and triangle cutouts, one at a time. Invite children to name each.]

Some art is made with shapes. Some art includes items that look like shapes.

ACT:
Painting of red balloon
Paul Klee [Public domain], via Wikimedia Commons

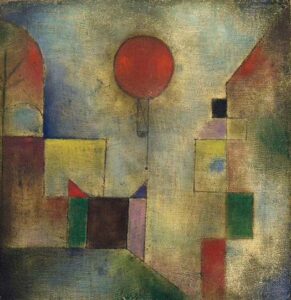
Let’s look for shapes in some pictures of paintings.

[Display the three pictures of paintings, one at a time. Encourage children to look closely at each picture.

  • Ask children what shapes they see in the picture. Reinforce children’s identifications by pointing to and describing each identified shape.
  • If the picture has two or more of the same shape,Painting with colored squares 
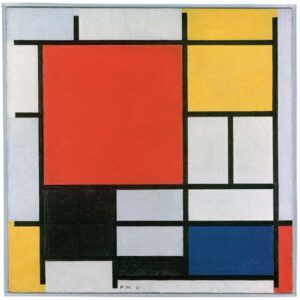
ask if the shapes are the same or different. If different, how are they different? (size)]
EXPLAIN:
Tiny house painting
Tracy Booth/flickr/(CC BY-ND 2.0)

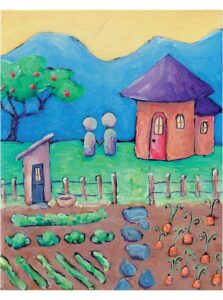
We can be creative with shape cutouts and make something with some shapes. Please watch how shapes can be used to make a picture of something.

[On the flannel board, place a felt triangle on top of a felt square to form a house. Identify each shape and how it contributes to what you made. Example: triangle is a roof.

Expand the demonstration by indicating you want the sun to be part of your creation. Ask children what shape you could use to show the sun. Where should the shape be placed?]

ACT:

[Give each child a set of felt shapes.]

Now it is your turn to make something from shapes. You can make whatever you want with the shapes.

[Encourage children to describe what they are making and what shapes they are using.]

RECAP:

Shapes can be used to make art. Some art shows things that look like shapes. We found shapes in some pictures of paintings. Each of us made something with shape cutouts. Shapes are a part of art.

Scaffolding tips

Scaffolding Tips

Extra support

  • If children have difficulty finding shapes in the pictures of paintings, provide a pertinent shape cutout for children to use in locating a shape in the picture.
  • Invite several volunteer children to trace and describe a shape found in the pictures of paintings.
  • For additional ideas of what can be made with basic shapes, see Math Week 9, Day 3.

Enrichment

  • Display all three pictures of paintings. Ask children to identify and describe the picture that is made with shapes and the pictures that show things that look like shapes.
  • Encourage children to describe the kinds of lines used in the paintings.
Creative Expression

Center Activity

In the art center, place examples of four basic shapes next to the easel or other painting station. Encourage children to include different shapes in their paintings.

Family Child Care

Family Child Care

Invite children to look for shapes in pictures and artwork that is available in your setting.