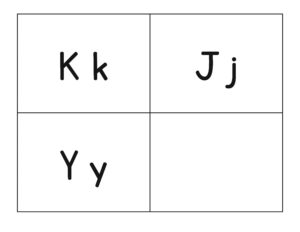
Week 36:
Day 2

Understanding Letters

Language / Literacy

Small Group

Skill and Goal

Letter knowledge
Children will identify, name, and say the sounds of letters K, J, and Y.

Materials
Needed

  • *Letter mats (K, J, Y)—1 per child
  • *Letter K card
  • *Letter J card
  • *Letter Y card
    *Printables provided

Key
Concepts

Review:

  • Letter

BEGIN:

We are learning about letters. We know that a letter is a special mark used to make words. In the past few weeks, we have learned about letters K, J, and Y.

[Display letter cards K, J, and Y. Point to and name each uppercase and lowercase letter. Example: “Remember, this is an uppercase J, and this is a lowercase j.” After you name a letter, invite children to pop up if the letter is in their name.]

EXPLAIN:

Today we will use a letter mat to help us remember the letters we are learning.

[Display letter mat.]

Our letter mat contains the uppercase and lowercase letters we have learned so far. We will each use our own letter mat for this activity.

ACT:

[Pass out a letter mat to each child.]

I am going to mix up the letter cards and then show them to you one at a time. When we see a letter card, we will point to the same letter on our letter mat.

[Hold up letter K card.]

Let’s find this letter on our letter mat.

[Lead children in looking for, pointing to, and saying letter K on their letter mat. Explain how you found the letter K. Example: “This letter has a straight line down and then a slanted line up and a slanted line down.”]

The letter K says /k/. Let’s together say the letter sound: /k/.

Now let’s find another letter!

[Hold up remaining letter cards, one at a time. Invite children to first point to the matching letter on their letter mat. Then ask children to repeat the letter name and the letter sound.]

RECAP:

Today we learned more about letters K, J, and Y. We used our letter mats to find the letter that matched our letter card. Then we said the name and sound of the letter.

Scaffolding tips

Scaffolding Tips

Extra support

  • When you introduce the letter mat, point to and name each letter in the order letters appear on the mat.
  • If children need assistance finding the matching letter on their letter mat, describe the letter as you point to the letter card. Example: “We are looking for a letter with a straight line down and a curve at the bottom. Can you find a letter with a straight line down and a curve at the bottom?”

Enrichment

  • Ask children to describe how they know the letter they point to on their mat is the same letter as the uppercase letter on the letter card. Example: “This letter has a straight line down and then a slanted line up and a slanted line down.”

Center Activity

Provide two sets of *small letter cards K, J, and Y. Invite children to mix up cards and place them face down. Encourage children to play a memory game by taking turns to turn over two cards to see if they are a match.

*Printables provided

Family Child Care

Family Child Care

Hang *letter cards K, J, and Y in random order on a wall. Dim or turn off lights and ask children to use a flashlight to find a letter you say. Example: “Sandra, can you use the flashlight to find the letter Y on our wall?”

*Printables provided

Week 36:
Day 2

Counting Things

Mathematics

Small Group

Skill and Goal

Number knowledge
Children will strengthen their understanding of counting, including the use of counting on.

Materials
Needed

  • Prepared chart (see Be Prepared)
  • *Boy and girl cutouts (see Be Prepared)
  • Masking tape
  • 20 index cards (see Be Prepared)
    *Printables provided

Key
Concepts

Review:

  • Add

Optional
Reading

  • Two Ways to Count to Ten by Ruby Dee

Be Prepared: Organize a simple, two-column chart as shown. Include a cutout of a boy and a girl. Also, with masking tape and index cards, make a number line on the floor. Write a numeral from 1–20 on each of 20 index cards and tape them in proper sequence along the line of masking tape. See picture in activity plan.

BEGIN:

Let’s count the number of boys and girls in our group today. Boy and Girl chart

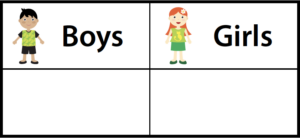
[Display chart and point to its parts as you describe them.]

EXPLAIN:

We will count how many boys and how many girls are in our group. Then we will add to see how many children we have all together in our group.

ACT:

[Lead children in counting the number of boys by gently tapping each boy as you count. Then put a tally mark on the chart for each boy. Lead children in counting the tally marks for boys by touching each mark as you count. Write the number of boys on the chart.]

I will write the total number of boys next to the word “boys.”

Now let’s count the number of girls in our group today.Number Line

[Lead children in counting the number of girls by gently tapping each girl as you count. Then put a tally mark on the chart for each girl. Lead children in counting the tally marks for girls by touching each mark as you count. Write the number of girls on the chart.]

I will write the total number of girls next to the word “girls.”

Let’s add to find out how many children we have all together. Remember, when we add items to a group, the group gets bigger. Let’s begin with the biggest number and then count on to find the total number of boys and girls all together.

[Lead children in adding the two groups together. Start with the biggest group and count on to find out how many children there are all together.]

EXPLAIN:

Now let’s do some more counting. Let’s count to 20 by using a number line on the floor. Numbers 1–20 are lined up on the floor. We will step on each number as we count to 20 when it is our turn. We need to be sure to look at each number as we count, so we can make sure we are stepping on the correct number. I will go first.

ACT:

[Step on numeral one and begin counting aloud to 20 as you step on each numeral. Encourage each child to take a turn walking and counting slowly to 20. Continue until each child has had a turn.

If time permits:

After all children have stepped on each number and counted aloud to 20, ask children to find specific numerals. Example: “Sarah, please stand on number 15.”]

RECAP:

Today we added to find out how many children are in our group. We also used a number line on the floor to practice counting and finding numbers. We are number experts!

Scaffolding tips

Scaffolding Tips

Extra support

  • If children have difficulty counting while stepping on each number, walk beside them and encourage them to count and walk slowly as you count and walk together.
  • Reduce the challenge of the walking-and-counting activity by asking children to count to a number you say that is less than 20.

Enrichment

  • Invite children, if they are able, to walk from five to one or 10 to one while counting backward.
  • Invite a child to stand on a given number on the number line. Then invite two more children to stand on two different numbers on the number line. Ask children to determine which of the two children is closest to the first child on the number line. Example: “I see Brynlynn is closer to Bria than Sasha is.”
Mathematics

Center Activity

Place a smaller version of the floor number line on a table. Invite children to say the name of each numeral as their fingers “walk” the number line.

Family Child Care

Family Child Care

Use the number line throughout the day. Examples: Invite each child to sit on a specific numeral for snack time, invite children to count the number of toys they have and stand on the corresponding numeral, etc.

Week 36:
Day 2

Focusing & Remembering

Self-Regulation

Large Group

Skill and Goal

Executive function
Children will remember and carry out actions in response to aural and oral prompts.

Materials
Needed

  • Classroom drum

Key
Concepts

Review:

  • Practice

Be Prepared: If time permits, offer Conducting an Orchestra from Week 36, Day 1 as a second game. If the game described below is too challenging for a majority of children, stop at an appropriate place and offer Conducting an Orchestra from Week 36, Day 1. The game for today may be less challenging when offered again at a later point.

BEGIN:

Today we will play a game we’ve played before that will help us to be good listeners and remember what to do. We will need to listen carefully. What part of our body do we use to listen? (ears) The game will help us practice how to remember things. We know that when we practice something, we do it many times so we can get better at it!

EXPLAIN:

The game is called Drum Beats. Remember, beats on the drum will tell us how to move our body.

ASK:

Who remembers what we did when we played this game several weeks ago?

ACT:

Remember, I will use the drum to tell you how to move your body. Let’s begin by walking when I beat the drum. Please walk slowly when I beat the drum slowly. Keep walking slowly until you hear me beat the drum quickly. Please walk quickly when I beat the drum quickly. Watch as I show you.

[Ask another adult to help. Beat the drum slowly, then pause as the other adult walks slowly. Then beat the drum quickly, and have the other adult walk quickly.]

Now let’s try it together.

[Beat the drum slowly as children walk slowly. Then beat the drum quickly as children walk quickly. Then stop and wait for children to stop walking. Continue with several rounds of beating the drum slowly and quickly, while waiting for children to walk slowly and quickly on cue. Shorten or lengthen the amount of time you beat the drum, based on how quickly children respond to the prompts. Say “stop” to indicate that children should stop walking.]

Now we will change our game a little bit. This time when I beat the drum slowly; we will dance slowly. Keep dancing slowly until you hear me beat the drum quickly. When we hear quick drumbeats, we will begin to dance quickly. When I say “stop,” we stop. Watch as I show you.

[Ask another adult to help. Beat the drum slowly, as the adult dances slowly. Then beat the drum quickly, as the adult dances quickly. Alternate between slow beats and quick beats as the other adult dances slowly and then quickly. Say “stop,” when you are finished with the demonstration.]

Now, let’s try it together!

[Beat the drum slowly, then pause and wait for children to dance slowly. Then beat the drum quickly, and pause and wait for children to dance quickly. Then say “stop” and pause and wait for children to stop. Continue alternating between slow and quick beats as the children dance slowly and then quickly. Say “stop” to indicate that children should stop dancing. Shorten or lengthen the frequency of prompts (slow beats and quick beats) depending on how quickly children change their actions.]

Let’s change the game one more time.

When I beat the drum slowly, we will dance quickly. Then when I beat the drum quickly, we will dance slowly.

  • How will we dance when I beat the drum slowly? (quickly)
  • How will we dance when I beat the drum quickly? (slowly) Let’s try it.

[Beat the drum slowly, then pause and wait as children dance quickly. Then beat the drum quickly and pause and wait as children dance slowly. Alternate between beating the drum quickly and slowly for several minutes. Say “stop” to indicate that children should stop dancing.]

RECAP:

Today we practiced listening carefully so we would know what to do. We also practiced remembering what to do. In our game, we listened for drum beats.

  • What did we need to pay attention to with the drum beats? (whether the beat continued or stopped, whether there were slow or quick beats)
  • What did the drum beats tell us to do? (walk slowly, walk quickly, dance slowly, dance quickly)
Scaffolding tips

Scaffolding Tips

Extra support

  • If children need an additional reminder of the action to be completed, say aloud the words “fast” or “slow” after you beat the drum slowly or quickly.
  • If children need an additional reminder of when to stop, say “stop” and do not resume beating the drum until all children have stopped.

Enrichment

  • Invite children to try additional rule changes for Drum Beats: Beat the drum slowly as children jog in place slowly, then beat the drum quickly as children jog in place quickly. Then do the opposite.

Self-Regulation

Center Activity

Provide the drum used during today’s activity. Invite children to play Drum Beats while taking turns beating the drum. As children play Drum Beats, guide the drummer and others, if necessary.

Family Child Care

Family Child Care

Encourage all children in your setting to continue practicing self-regulation skills while playing an outdoor game using a drum. Invite children to play as you beat the drum. When the drum stops, encourage children to stop what they are doing and freeze. Continue beating the drum for shorter periods of time and stopping as children freeze. Younger children will enjoy beating on boxes and bowls as older children listen for your drum cues.

Week 36:
Day 2

Creating Art

Creative Expression

Small Group

Skill and Goal

Knowledge of creative processes, Skills that support creative expression
Children will understand how to create art using shape stencils, including the process of planning shape placement on a piece of paper.

Materials
Needed

  • Pencils of different colors—1–2 per child
  • Stencils of basic shapes—1–2 per child
  • Paper—1 per child

Key
Concepts

Review:

  • Trace
  • Stencil

Also
Promotes

  • Mathematics
  • Physical / Health

BEGIN:

Yesterday we explored how shapes can be a part of art. Each of us made something with some shape cutouts.

Today we are going to make our own art with shape stencils. We can call this our “shape art.”

[Display and name stencils of basic shapes. Trace each shape with your finger as you describe it.]

EXPLAIN:

We can create art on our own piece of paper by tracing stencils. We know that trace means we draw the outline of something. Sometimes we trace things with our fingers. Today we will use pencils to trace shapes from a stencil. We know that a stencil is a tool that has a shape cut out of it.

Each of us can use two or more stencils to create our work of art on paper. We have several different colors of pencils we can use.

We need to hold a stencil on the paper when we use it to trace. The stencil may move around on our paper if we don’t hold it in place.

It works best to hold the stencil in place on our paper until we are done tracing. If we pick up the stencil before we are done tracing, it can be hard to put the stencil back where we want it on our paper.

[Demonstrate and describe holding a stencil on a paper while you trace. Remove the stencil before you are done to show the challenge of returning the stencil to its original location on the paper.]

ASK:
  • What could we create on our paper by tracing two stencils?
  • Would you want to trace with different colors of pencils or trace with the same color of pencil?

[Engage children in a discussion of how two or more stencils could be placed on the paper to create a work of art. Some children might want to repeat what they created yesterday with felt cutouts (example: a house with a square and triangle). In addition to putting shape stencils together to create something new, some children may prefer to trace shapes in separate locations on their paper. Some children may want to trace one shape only. Positively acknowledge all ideas. Avoid offering a preference or model for children to follow.]

EXPLAIN:

We will work on our own. We will need to share stencils and different colors of pencils.

I will hand out paper and put stencils on the table. Please try out your idea before you start tracing. Place stencils on your paper the way you want to trace them to make sure your plan will work. You may need to change your plan for what you create.

ACT:

[Distribute a piece of paper to each child. Put stencils in convenient locations for shared use. Encourage children to try out their plan by placing stencils on their paper before tracing. Emphasize the importance of looking carefully at the shapes in the stencils, not the entire stencil tool. Two stencil tools may overlap, however, their shapes may not overlap. Children may need to adjust their plan to accommodate the paper.

Invite children to create a work of “shape art” by tracing one or more stencils. Monitor and facilitate the sharing of materials. Describe what you see children doing without interrupting their process.]

RECAP:

We made “shape art” today by tracing stencils. What shapes did you use? What did you make?

Scaffolding tips

Scaffolding Tips

Extra support

  • Provide individualized support for children who are not familiar with tracing a stencil and/or arranging stencils on a piece of paper. Fine motor skills vary considerably at this age. A peer who is experienced in tracing a stencil may be willing to demonstrate the process.
  • When the stencil is on the paper, encourage the children to trace the shape with their finger before using a pencil.
  • Consider offering one color of pencils if you anticipate the activity will be challenging for most children.
  • Remind children to try out the placement of their stencils before they start tracing. The planning part of this activity promotes important cognitive development.

Enrichment

  • Encourage children to make their shape art without using the stencils. Encourage them to draw shapes on their own.

Creative Expression

Center Activity

Provide a second sheet of paper and other materials from the activity so children can create a second version of shape art. Another option is to provide trays of paint and items that make shapes when dipped in paint. Examples: Craft rolls can be used to make circle shapes and large Legos® can be used to make rectangle shapes when dipped in paint and pressed on paper.


Family Child Care

Family Child Care

Children in your setting may prefer to make shape art as a group, using a larger sheet of paper. Planning decisions about shapes and shape placement would be a valuable part of a group effort.