Week 46:
Day 4

Understanding Letters

Language / Literacy

Small Group

Skill and Goal

Letter knowledge
Children will strengthen their understanding of the name, shape, and sound of selected letters.

Materials
Needed

  • Tape
  • *Letter cards (see Be Prepared)
  • Beanbag
    *Printables provided

Key
Concepts

Review:

  • Letters

Also
Promotes

  • Physical / Health

Be Prepared: Consistent with this week’s Day 2 activity plan, select five letters that would be helpful for children to review. Use results of the Week 43 letter assessments and your understanding of children’s letter knowledge to inform your letter selections. You may wish to include some (or all) of the letters reviewed on Day 2, depending on children’s understanding of letters demonstrated in the Day 2 activity. Print provided cards of the letters you select. Tape the cards on the floor in random order, in a line or in a configuration of your design. Provide about 6–12 inches of spacing between letter cards.

If you anticipate the activity described below may be too challenging for children, offer activity plans that introduce several of the letters you selected. See the Sequence of Skills and Learning Goals chart in the ELM Curriculum User Guide: 3–5 Years for a quick reference to when specific letters were introduced.

Invite each child, one at a time, to toss the beanbag on or near a letter and then:

  • say the name of the letter,
  • say the sound the letter makes,
  • say a word that starts with the letter, and
  • lead children in writing the uppercase letter with their hand in the air.

Encourage children to throw the beanbag toward a letter that has not been described by a child taking an earlier turn. Continue the activity until each child has a turn to toss the beanbag and describe a letter.

Week 46:
Day 4

Counting Things

Mathematics

Small Group

Skill and Goal

Number knowledge
Children will practice making a group of items equal to the number of items in another collection.

Materials
Needed

  • *Star cards 1–10—4 per pair of children
  • Small counting items—10 per pair of children
    *Printables provided

Key
Concepts

Review:

  • Count
  • Equal

Option 1:

Offer the Week 7, Day 2 activity to review using one-to-one counting to make a group of items equal to another group.

Option 2:

Engage children in making groups of items equal to the number of stars on a star card. This option involves children saying how many there would be if there was one more in the group.

Explain that we will work with a partner to make a group of items that is equal to the number of stars on a card.

Display a star card. Lead children in together counting the stars on the card you display. Point to each star as you count. Make a group of small counting items equal to the stars on the card. Emphasize that we have ___ stars on our card and ___ items in our group. Our number of stars and our group of items are equal. If appropriate, remind children that two equal groups have the same number of items.

Arrange children in pairs. Give each pair four star cards and 10 small counting items. Invite children to take turns choosing a star card and making a group of items equal to the number of stars on the card. Add challenge by encouraging children to take turns asking their partner how many counters would be in a group if there was one more.

Week 46:
Day 4

Getting Along With Others

Social-Emotional

Large/Small Group

Skill and Goal

Relationship skills
Children will strengthen their problem-solving skills.

Materials
Needed

  • Talk and Work It Out by Cheri J. Meiners

Key
Concepts

Review:

  • Solution

Option 1:

Offer the Week 6, Day 2 activity to review possible solutions for typical classroom problems.

Option 2:

Engage children in a book-focused discussion of problem-solving steps and solutions.

Open the session by reminding children that we are talking about situations that may be difficult for people to deal with. We call these problems. We also are talking about ways to solve problems. We call these solutions. When we have a problem, we want to think of different solutions and use the solution that seems best. A good solution is fair and safe.

Talk and Work It Out book coverIntroduce the book. Explain that our book today describes some problems a boy tries to solve. Invite children to think about different solutions used by the boy in our book.

Read the book. At the conclusion of the book, review and discuss with children some ways the boy dealt with his problem. Some key points include the following:

  • pp. 4–5: shows the problem
  • pp. 16–17: the boy thinking of solutions
  • pp. 22–23: the boy thinking about what might happen
  • pp. 30–31: trying a solution

Also review and discuss with children some solutions to his problem:

  • pp. 16–17: taking turns and sharing
  • pp. 20–21: asking a grown-up for help
  • pp. 30–31: playing together
Week 46:
Day 4

Exploring Living Things

Science

Large/Small Group

Skill and Goal

Inquiry Skills, Knowledge of earth and space
Children will strengthen their understanding of dinosaur fossils.

Materials
Needed

  • *2 pictures as shown
  • Paper cup—1 per child
  • Ball of clay—1 per child
  • Craft stick—1 per child
  • Plaster of paris—½ cup per child
  • Container of water (easily pourable)
  • 1 Tablespoon measuring spoon
    *Printables provided

Key
Concepts

New:

  • Claw

Review:

  • Fossils

Be Prepared: Make a small ball of clay about the size of a golf ball for each child. Store the clay balls in an airtight container. Each child will push a clay ball into his/her cup as part of the activity described below. The clay should take up less than one-half of the cup when it is pushed flat. The size of the paper cup should offer sufficient room for a child to make a dinosaur footprint as described below. Avoid small cups. Write a child’s name on each paper cup. You may wish to ask an adult to help with today’s activity.

BEGIN:

We are learning that scientists use dinosaur bones and other fossils to learn about dinosaurs. Remember, some fossils are the remains of an animal like bones or teeth. Fossils are like clues that help scientists understand what dinosaurs looked like and how they lived.

Today each of us can make a pretend fossil.

EXPLAIN:

We know that some fossils are the marks of a dinosaur on a rock or hard soil. The footprint of a dinosaur is one of the marks a scientist may find.

feet of dinosaurs
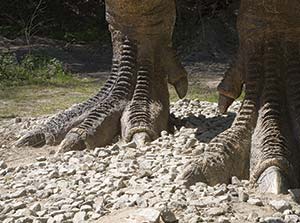
[Display picture of dinosaur foot. Point to each of the three claws as you describe them.]

Here is a picture of a dinosaur’s foot. This picture shows the claws of a dinosaur’s foot. A claw is a pointed and thin part of some animal’s feet. There is a nail at the end of the claw. The nail is something like our fingernails or toenails. Claws help an animal grab and hold on to something. There is a bone under the skin of a claw.

dinosaur footprint[Display picture of dinosaur footprint.]

Here is a picture of the footprint of a dinosaur. This picture shows how a dinosaur’s foot leaves a mark in the dirt. After many, many years this mark may become a fossil if the dirt gets hard.

Today each of us can make a pretend fossil of a dinosaur footprint. We will let our fossils dry tonight.

ACT:

[Give each child a paper cup with his/her name on it and a ball of clay. Encourage children to push the clay flat into the bottom of the cup. Explain that we are pretending the clay is dirt (the ground).

Display the picture of a dinosaur footprint for children to look at while working with the clay in their cup.

Encourage children to use their hand and fingers to make a “footprint” indentation. Children can use a finger to make an indentation for each of the claws.

Next pour ½ cup of plaster of paris on top of the dinosaur impression.

Add 2–3 tablespoons of water and invite each child to stir together the water and plaster of paris with the craft stick. The consistency should look like thick pancake batter. If it is too runny, add more plaster of paris and stir. Try not to poke the indentations in the clay.

Let the plaster of paris dry in the cup overnight.]

RECAP:

Today we made a fossil to help us understand how scientists get clues about dinosaurs. Making a pretend dinosaur footprint helped us pay attention to the claws on a dinosaur’s foot. Tomorrow we will look at our pretend footprints to see how they are the same and different.

Scaffolding tips

Scaffolding Tips

Extra support

  • Encourage children to feel the bone in one of their fingers to support their understanding that there is a bone under the skin of an animal’s claw.
  • Some children may need guidance on how to make indentations, including the claws. Remember that it is not important for a child to perfectly copy the picture of a footprint in his/her clay. The activity is a way for children to think about a dinosaur’s feet regardless of what the child’s indentation looks like.

Enrichment

  • Invite children to name other animals that have claws. (birds, cats, tigers, lions, bears)
  • Encourage children to think about how a heavier versus lighter dinosaur would make a deeper versus lighter mark (indentation) when the dinosaur steps on the dirt.
Science

Center Activity

Provide plastic bones, magnifying glasses, paper, markers, and books that show detailed drawings of bones of dinosaurs or other animals. Encourage children to look closely at the plastic bones and to draw the bones and/or draw what the bones might look like when several are put together.

Family Child Care

Family Child Care

Extend the opportunity to make indentations in clay to younger children and school-age children by providing play dough and toys or other safe items that children can push into play dough. Encourage children to compare the types of indentations (marks) left by different types of items.