Week 32:
Day 3

Understanding Words

Language / Literacy

Large Group

Skill and Goal

Oral language, Letter knowledge
Children will strengthen their comprehension of information presented in a book read aloud and increase the number of novel words they understand. Children will also say the sound of letter G.

Materials
Needed

  • *Letter G card
  • Chart paper
  • Marker
  • Book of your choice for this week’s repeated reading
  • Words We Understand chart from Day 1
    *Printables provided

Key
Concepts

New:

  • 4–6 words (see Be Prepared)

Review:

  • 1–2 words in book introduced on Day 1

Be Prepared: This is the second of three repeated readings of a book with children. Today’s session focuses on children’s comprehension of information presented in the book, especially connections to children’s experiences. The session also helps children understand more novel words. From the list of novel words you identified prior to your first reading of the book, select 4–6 words to define for children today. Remember, it is okay to select words that a few children may know if you anticipate most children do not understand the word’s meaning. See the Language/Literacy section of the ELM User Guide: 3–5 Years for additional information on how to select and define novel words.

BEGIN:

We are going to practice finding a letter we know by looking for it in a sentence. When we find the letter, we will also say the sound the letter makes.

ACT:

[Write the following sentence on a chart or whiteboard. Read each word as you write the sentence:

I have empathy for the sad girl.]

We want to find the lowercase letter g in our sentence.

Large Letter G Card[Display letter G card. Point to the lowercase g on the card.

Encourage a volunteer child to look for and point to the lowercase letter g in the sentence as you display the letter G card.]

What sound does the letter G make? Yes! Letter G says /g/. Let’s together say the sound of the letter G: /g/.

EXPLAIN:

Now let’s spend some time with our book.

[See Week 3, Day 3 of Language/Literacy for a description and examples of how to approach today’s book reading. Key aspects are summarized below: 

  • Display book cover and say book title. Engage children in describing what they remember about the book: 
    • What is our book about? 
    • Who were the main characters in our book? 
    • What happened first? What happened next? 
  • Remind children that reading a book is a good way to learn new words. Point to and say words introduced on Day 1 that are listed on the Words We Understand chart. Invite children to talk about what they recall about each of the words. Remind children of the meaning of each novel word.
  • Point to where to begin to read on the first text page of the book. Pause during reading to briefly define words identified for today’s session. Use the following approach:
    • Read the sentence with the novel word. Repeat the novel word.
    • Repeat the sentence in which the word is used. 
    • Define the novel word and connect the definition to the book. 
  • After the book reading, engage children in a discussion of each novel word targeted for today with one or more of the following strategies (plus writing the word on the chart): 
    • Ask children to describe a picture related to the word. 
    • Define a word without naming it and ask children to identify the word.
    • Encourage children to think about a novel word in another context.
  • Encourage children to connect the book information to their own experiences. Below are some examples:
    • “Our book today was about worms. Have you ever seen or touched a worm? What was it like?”
    • “Our book today talked about roots. Roots are part of a plant that grow into the dirt. Have you ever seen the root of a plant? What was it like?”
    • “Today we talked about the word squeeze. We squeeze something by pressing things very close together. What kinds of things have you squeezed? How about a tube of toothpaste? How about a package or bottle of ketchup? Show us how you squeeze something.”]
Week 32:
Day 3

Counting Things

Mathematics

Large Group

Skill and Goal

Number knowledge
Children will add two groups of counters by counting on.

Materials
Needed

  • *Large dot cards 1–5
  • Die
  • 11 counters
  • *Number list (see Extra Support tip)
    *Printables provided

Key
Concepts

Review:

  • Count on

BEGIN:

[Arrange children in a large circle on the floor. Invite children to hold up four fingers on one hand and three fingers on the other hand.]

We are holding up four fingers on one hand and three fingers on our other hand. Let’s add the two groups of fingers by counting on.

We will begin with our group of four fingers. Our group of four fingers is larger than our group of three fingers. We know that we begin counting on with our largest group.

We will begin with the number four and then count on to our other group of fingers.

[Hold your hand with four fingers higher than your hand with three fingers. As you count on, move each finger on the second hand as you say each number. Continue to hold up four fingers on your first hand.]

Please count with me. 4… 5, 6, 7. We are holding up seven fingers all together.

EXPLAIN:

Today we will practice counting on by playing a game with dot cards and a die. I will show you how to play.

[Display and describe several dot cards as a reminder. Shuffle the five dot cards and place them face down in a pile in front of you where all children can see them.]

We will begin by choosing a dot card from the pile.

ACT:

[Choose a dot card from the top of the pile. Display dots to children.]

How many dots are on this card?

I chose a card with ___ dots. I now need to count out the same number of circles (counters) and put the circles below the dot card. Please count aloud with me as I put circles below the dot card.

Dot card with die and markers
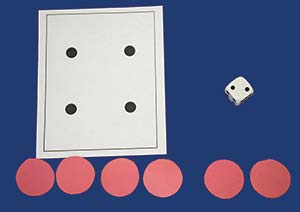
[Lead children in counting __ counters as you place one counter at a time below the dot card. Do not stack the counters.]

Now I will roll the die to find out how many circles we will place next to the first group of circles.

[Roll the die and lead children in counting aloud the number of spots rolled.]

I rolled a ___. Let’s count out the same number of circles and place them next to the first group of circles. Please count aloud with me as I place them next to the first group.

[Lead children in counting __ counters together as you place them one at a time next to the first group of counters.]

We will add the two groups of circles by counting on. Remember, when we count on we begin with the number of items in the largest group, and then count the number of items in the other group. Let’s begin by saying the number of circles in the largest group.

How many circles are in the largest group?

Let’s begin with that number.

[Demonstrate counting on by first saying the number of counters below the dot card, and then counting, one at a time, each counter lying next to the first group as you point to each one. Example: “We have five counters below the dot card. Let’s begin with five and count on. 5, 6, 7….”]

How many circles do we have all together?

Let’s try it again.

[Call on two volunteer children to help demonstrate counting on. Invite one child to pick a card place the corresponding number of counters below the card while counting aloud. Restate the final number. Then invite the second child to roll the die and count out the number of counters to place next to the first group. Finally add the counters by counting on from the group with the largest number of counters. Encourage all children to add by counting on together. Continue with different volunteer children as time permits.]

RECAP:

Today we practiced counting with two groups of circles. Let’s practice counting on with our fingers again.

[Invite children to hold up five fingers on one hand and four fingers on the other hand.]

We are holding up five fingers on one hand, and four fingers on the other hand. Let’s add the two groups of fingers by counting on. Let’s begin with our first group of five fingers.

[Hold your hand with five fingers higher than your hand with four fingers. As you count on, move each finger on the second hand as you say each number.]

Let’s start with five and count on to add our second group of fingers. Please count with me. 5… 6, 7, 8, 9. We have nine fingers all together.

Scaffolding tips

Scaffolding Tips

Extra support

  • Use another dot card instead of a die for determining the number of counters in the second group if you anticipate the use of both dot card and die may be too confusing.
  • Use a *number list to help children count on. Point to the number on the number list that corresponds to the number of dots on the dot card. Then point to each number on the number list as you count on to add the second group.

Enrichment

  • Use the large numeral cards rather than the dot cards. Cover the dots at the bottom of the card and invite children to determine the number of items based on the numeral pictured on the card.
Mathematics

Center Activity

Create counting sticks with craft sticks. On each stick, write a numeral from 1–5 and the corresponding number of dots. Place the sticks in a basket. Invite pairs of children to each choose a stick and then add the two amounts together by counting on.

Family Child Care

Family Child Care

Practice counting on by adding boys and girls. First begin with the group of boys and then count on to add the girls. Then begin with the group of girls and count on to add the group of boys.

Week 32:
Day 3

Being Responsible

Social-Emotional

Large Group

Skill and Goal

Personal responsibility
Children will understand some ways to reach their goals.

Materials
Needed

  • *4 pictures as shown (from Day 2)
    *Printables provided

Key
Concepts

Review:

  • Goal
  • Concentrate

BEGIN:

Yesterday we learned that a goal is something we want to do.

EXPLAIN:

Sometimes we are able to reach our goals quickly and sometimes it takes us longer to reach our goals. We say we have reached our goal when we can do what we want to do.

[Display picture of girl writing on chalkboard.]

The girl in our picture reached her goal when she wrote her name so someone else was able to read it.

[Display picture of boy walking on balance beam.]

The boy on the balance beam reached his goal when he walked all the way across the beam without falling off.

[Display pictures of boy with bat and girl with shoe.]

ASK:
  • What does the boy with the bat and the ball on top of the tee need to do to reach his goal? (hit the ball)
  • What does the girl wiggling her foot into the shoe need to do to reach her goal? (put on her shoes all by herself )
EXPLAIN:

We know that usually we need to practice in order to reach a goal. Practice helps us concentrate on what we are learning to do. Remember, when we concentrate on something, we pay close attention to it. The girl who learned to write her first name paid close attention to how each of the letters in her name is written.

Sometimes another person can help us reach a goal. If our goal was to be able to catch a ball with a mitt, we might practice with a friend or our parent to help us reach our goal.

ASK:

Has someone ever helped you practice to reach a goal? Tell us about it.

EXPLAIN:

Sometimes we need to change our goal when something is really hard to do or learn. The girl learning to write her name could decide to write the first part of her name. The boy on the balance beam could decide to walk halfway across the beam without falling off.

ASK:

Let’s imagine the boy on the balance beam learns how to walk halfway across the beam without falling off. What should he do next? (set a new goal, walk all the way across the beam)

EXPLAIN:

When we reach a goal, we can set a new goal for ourselves. The girl who learned to write her first name might set a new goal of writing her last name, too.

ASK:

Let’s think about the boy with the bat. What new goal could he set for himself if he reaches his goal of hitting the ball off the tee? (hit the ball when someone pitches it to him)

RECAP:

Today we talked about ways we can reach a goal. We say we have reached our goal when we are able to do what we want to do. Some goals are harder to reach than other goals. We can reach a goal by practicing and by asking someone to help us. Sometimes it helps to change our goal so we do part of what we want to do. When we reach our goal, we can set a new goal.

Scaffolding tips

Scaffolding Tips

Extra support

  • If children seem uncertain about the concept of a goal, describe someone in your room meeting a goal. Example: “Samantha has been learning to zip up her coat. Last week I saw her zip up her coat without anyone helping her. Samantha met her goal of zipping up her coat by herself!”
  • Follow up the example of someone meeting a goal by asking children to tell about something they have learned to do. Emphasize this is a goal.

Enrichment

  • Invite children to draw a picture of themselves working on their goal.
Social-Emotional

Center Activity

Invite children to work on reaching goals during center time, if appropriate. Example: If a child sets a goal of drawing a picture of his/her family, invite the child to practice by drawing during center time.

Family Child Care

Family Child Care

Invite children to set a small goal that can be reached outdoors. Example: “What goal can you set as we play outdoors today?” Encourage children to try to practice or reach their goal during outdoor playtime. Examples: play with a friend in the sandbox, slide down the slide without help.

Week 32:
Day 3

Exploring Habitats

Science

Large Group

Skill and Goal

Knowledge of habitats
Children will understand how animals and scientists keep warm in the South Pole.

Materials
Needed

  • Globe
  • *4 pictures as shown
  • Clothing items for cold and hot weather (see Be Prepared)
    *Printables provided

Key
Concepts

New:

  • South Pole

Review:

  • North Pole

Be Prepared: Gather clothing items for both cold and hot weather. Examples: wool hat, gloves, flip flops, shorts, coat, tank top, boots, swimsuit.

BEGIN:

We are learning about a habitat called the polar regions. We have learned how people and polar bears stay warm in the cold North Pole. Remember, the North Pole is the polar region at the top of the earth.

EXPLAIN:

Today we will learn about the polar region at the bottom of the earth. It is called the South Pole. Let’s find the South Pole on our globe.

[Point to this area on a globe.]

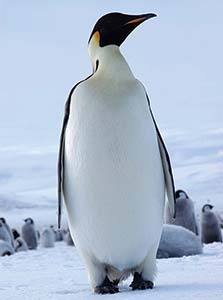
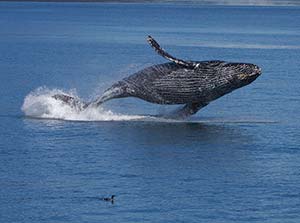
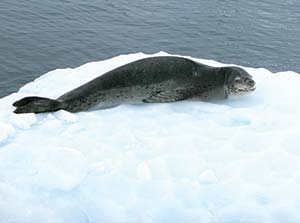
Very few people or animals live in the South Pole. The South Pole is the coldest and windiest place on the earth. Some scientists live in the South Pole. Scientists study things in the South Pole like the types of animals that live there. Some of the animals that live in the South Pole are penguins, whales, and seals.

[Display pictures of an emperor penguin, blue whale, and leopard seal. Name each animal as you display its picture.]

ASK:

Have you ever seen one of these animals at a zoo or on TV? Tell us about it.

EXPLAIN:

Animals and people who live in the South Pole need to keep warm in the cold windy air.

ASK:

How do you think these animals keep warm in the coldest place on the earth?

EXPLAIN:

Some animals that live in the South Pole have fur, just like polar bears, to keep them warm. Animals that live in the South Pole also have extra fat on their bodies that helps keep them warm.

ASK:
  • Four scientists conducting research in the snow
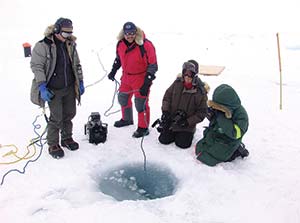
How do you think scientists in the South Pole keep warm when they are outside? (warm clothing)
    [Display picture of scientists working in the South Pole.]
  • What kinds of warm clothing are these scientists wearing?
EXPLAIN:

Scientists who work in the South Pole wear coats, snow pants, gloves, hats, and other special clothing that helps keep them warm. The clothing covers most parts of their bodies.

ASK:

Is this clothing different from what we wear when we go outside in the cold?

[Encourage children to compare what they wear with what scientists in the South Pole wear to stay warm.]

EXPLAIN:

Living in the South Pole can be very difficult for scientists because it is so cold and windy. Scientists who work in the South Pole do not stay there for a long time. Some scientists live and work in the same building for several months without going outside because the weather is so cold!

Let’s imagine we are scientists who are moving to the South Pole to work for a while. We need to take warm clothing to keep warm.

ASK:

What types of clothes should we take to stay warm?

ACT:

[Hold up items of clothing one at a time and ask children if each item would keep a scientist warm when working in the South Pole. Ask children to explain why or why not each item of clothing would keep a scientist warm.]

RECAP:

Today we learned about how animals and people stay warm in the South Pole. What do scientists do to stay warm in the South Pole? (work and live in same building without going outside, wear warm clothes) Would you like to be a scientist in the South Pole? Why?

Scaffolding tips

Scaffolding Tips

Extra support

  • Children may need a reminder of what a scientist does (Week 3, Day 1): A scientist tries to understand things by asking a question and then answering the question by describing what was observed.
  • Ask children if they have ever been in a really cold place and, if so, to describe what it was like.

Enrichment

  • Ask children what types of things scientists might study about penguins, whales, or seals in the South Pole. (the things they eat, their life cycles, how they keep warm)
  • You may wish to share with children that the South Pole is also called Antarctica.
Science

Center Activity

Supply warm clothing and *pictures of animals from the South Pole. Encourage children to pretend they are scientists in the South Pole.
*Printables provided

Family Child Care

Family Child Care

Invite children to pretend that they live in a polar region. Supply warm clothing items they can wear. If possible, secure The March of the Penguins for children to watch. It is a documentary about the life of emperor penguins.