Week 23:
Day 3

Understanding Words

Language / Literacy

Large Group

Skill and Goal

Oral language, Letter knowledge
Children will interpret information presented in a book read aloud and increase the number of novel words they understand. Children will also identify the name of the letter M.

Materials
Needed

  • *Letter M card
  • Book of your choice for this week’s repeated reading
  • Words We Understand chart from Day 1
    *Printables provided

Key
Concepts

New:

  • 4–6 words (see Be Prepared)

Review:

  • 1–2 words in book introduced on Day 1

Be Prepared: This is the second of three repeated readings of a book with children. Today’s session focuses on children’s comprehension of information presented in the book, especially connections to children’s experiences. The session also helps children understand more novel words. From the list of novel words you identified prior to your first reading of the book, select 4–6 words to define for children today. Remember, it is okay to select words that a few children may know if you anticipate most children do not understand the word’s meaning. See the Language/Literacy section of the ELM User Guide: 3–5 Years for additional information on how to select and define novel words.

BEGIN:

Large Letter M Card[Display letter M card.]

  • What is the name of this letter?
  • Pop up if you have the letter M in your name!
EXPLAIN:

Now let’s spend some time with our book.

[See Week 3, Day 3 of Language/Literacy for a description and examples of how to approach today’s book reading. Key aspects are summarized below:

  • Display book cover and say book title. Engage children in describing what they remember about the book:
    • What is our book about?
    • Who were the main characters in our book?
    • What happened first? What happened next?
  • Remind children that reading a book is a good way to learn new words. Point to and say words introduced on Day 1 that are listed on the Words We Understand chart. Invite children to talk about what they recall about each of the words. Remind children of the meaning of each novel word.
  • Point to where to begin to read on the first text page of the book. Pause during reading to briefly define words identified for today’s session. Use the following approach:
    • Read the sentence with the novel word. Repeat the novel word.
    • Repeat the sentence in which the word is used.
    • Define the novel word and connect the definition to the book.
  • After the book reading, engage children in a discussion of each novel word targeted for today with one or more of the following strategies (plus writing the word on the chart):
    • Ask children to describe a picture related to the word.
    • Define a word without naming it and ask children to identify the word.
    • Encourage children to think about a novel word in another context.
  • Encourage children to connect the book information to their own experiences. Below are some examples:
    • “Our book today was about worms. Have you ever seen or touched a worm? What was it like?”
    • “Our book today talked about roots. Roots are part of a plant that grow into the dirt. Have you ever seen the root of a plant? What was it like?”
    • “Today we talked about the word squeeze. We squeeze something by pressing things very close together. What kinds of things have you squeezed? How about a tube of toothpaste? How about a package or bottle of ketchup? Show us how you squeeze something.”]
Week 23:
Day 3

Counting Things

Mathematics

Small Group

Skill and Goal

Number knowledge
Children will determine the price of an item when it costs one more penny.

Materials
Needed

  • 20 play food items tagged with prices (see Be Prepared)
  • Brown paper bag
  • Toy pennies—10 per child
  • *Number list (Extra Support tip)
    *Printables provided

Key
Concepts

Review:

  • Price

Optional
Reading

  • A Chair for My Mother by Vera B. Williams

Be Prepared: Gather 20 play food items. Tape a piece of paper (or dot sticker) with a price from 1–10 cents on each item. If children in your classroom find the “one more” concept challenging, use prices from 1–5 cents. You may also wish to place the corresponding number of dots on each price sticker and use a number list to help children determine the numeral, if appropriate. Place the items in a paper bag. Use only play pennies for this activity not nickels and dimes.

BEGIN:

Today we will pretend to go grocery shopping again. Our bag has many of the items we used yesterday. Each item has a price on it. Remember, the price tells us how much an item costs.

This time we will shop a little differently. Each of us will pull an item out of the bag and look at the price sticker. Then we will figure out the price when it costs one more penny.

[Pull out one item from the bag. Point to the price sticker on the item.]

ASK:

What number is on this price sticker?

EXPLAIN:

The number on the price sticker is ___. This item will cost one more penny than the number on the price sticker.

ASK:

What number is one more than the price on this sticker?

EXPLAIN:

I am going to pretend to buy this (item). Please count my pennies with me.

ACT:

Pear with price tag and pennies
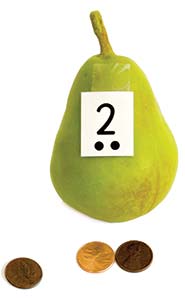
[Count out the number of pennies that is one more than the numeral on the price sticker. Encourage children to count with you as you point to each penny counted and put it in a separate group as it is counted. Emphasize the “one more” penny as you count it.]

Now we have the correct number of toy pennies to buy the item!

[Give each child 10 toy pennies. Ask children to count the pennies to be sure they have 10. Observe as they count.]

EXPLAIN:

Now we are going to take turns pretending to buy the items in the bag. We each have 10 pennies. We will each have a turn to reach in the bag and pull out a grocery item. After we’ve pulled out the item, we will look at the price sticker on the item and then determine the price with one more penny. Then we will count out that many pennies to pay for it.

Remember, when we are done with the activity, we will need to return the items and the toy pennies.

ACT:

[Invite each child to pull out and “pay” for an item. Provide verbal guidance as appropriate. Make sure each child has a turn. Repeat if time and child interest permit.]

RECAP:

Today we pretended to go grocery shopping again. Each item cost one more penny than the number on the price tag.

Scaffolding tips

Scaffolding Tips

Extra support

  • Use a number list to help children identify one more penny (the number immediately after the number on the price tag).
  • To demonstrate the addition of one more penny, point to and count again each penny you set aside in a price matching group. Explain this is the same as the price on the sticker. Then add one more penny to the group set aside for purchase of the item.
  • If children need additional experience with counting the same number of pennies listed on the price sticker, omit the “one more” portion of the activity.

Enrichment

  • Ask children to figure out the price of an item if it cost two more pennies. If children are unsure, use a number list to demonstrate. Point to the numeral listed on the price sticker and the corresponding numeral on the number list. Count two more to find the price of the item with an additional two more pennies.
Mathematics

Center Activity

Supply the housekeeping center with the priced food items used in today’s activity and a toy cash register. Encourage children to “buy” and pay for the items with the number of toy pennies that is one more.

Family Child Care

Family Child Care

Encourage school-age children to read a counting book to younger children. Invite younger children to use manipulatives to count out the corresponding number of items as each page is read. Examples: My Granny Went to Market by Stella Blackstone or Ten Red Apples by Pat Hutchins.

Week 23:
Day 3

Understanding Feelings

Social-Emotional

Large Group

Skill and Goal

Emotion knowledge
Children will understand the concept of apologizing.

Materials
Needed

  • *2 pictures as shown
  • I’m Sorry by Sam McBratney
    *Printables provided

Key
Concepts

New:

  • Apologize

Review:

  • Guilty

BEGIN:

We are learning about feeling guilty. Yesterday we listened to a story about two friends named Stella and Brigette.

ASK:
Stella
Stella
Brigette
Brigetta

[Display pictures of Stella and Brigette.]

  • What happened in the story?
  • What does it mean to feel guilty? (when we did something that we knew was wrong, when we did something that made someone else upset and feel bad about it)
EXPLAIN:

In the story, Stella felt guilty about yelling at her friend. Stella felt bad because she did something that she wished she had not done.

One thing we can do when we feel guilty is to say we are sorry. Saying we are sorry is called an apology. When we apologize, we let someone know we feel bad about something we’ve done or for causing a problem.

We might tell someone we will act differently next time. We could say something like “I’m sorry, I will try to share my paint next time.” Or, if we’ve done something that was an accident we could say “I’m sorry, it was an accident” or “I’m sorry, I didn’t mean to step on your toe.”

ASK:
  • Has anyone ever told you he/she was sorry?
  • Do you think it was hard for the other person to say “sorry”?
  • Have you ever said “I’m sorry”?
ACT:

I'm Sorry book cover[Display book cover.]

We are going to read a book called I’m Sorry. The author of the book is Sam McBratney. The book is about two friends who like to play together just like Stella and Brigette.

[After you have finished reading the book, use questions, such as the following, to promote children’s understanding of feeling guilty and apologizing:]

  • What happened right after the two friends in our book shouted at each other? (wouldn’t speak to each other; wouldn’t play together anymore; pretended friend was not there; pretended to not care about friend)
  • Why did the two friends decide to say “I’m sorry” to each other? (because they were friends who cared about each other)
    [Point to children’s faces on the two pages where each says “I’m sorry.”]
  • Let’s look at the faces of the two friends. What do you think the two friends might be feeling? (happy)
    [Point to children’s faces on the two prior pages.]
  • The two friends were feeling sad in these pictures. Why were the two friends feeling sad? (because they weren’t playing together; they felt guilty about shouting at each other)
RECAP:

We usually feel guilty when we do something that hurts or upsets someone else. We feel bad inside when we feel guilty. When we apologize for something we have done, it can help people feel better. We can also feel better if we apologize. What can we say when we apologize? (“I’m sorry”)

Scaffolding tips

Scaffolding Tips

Extra support

  • To help children connect the content of the book to yesterday’s story about Stella and Brigette, point out how the experience of two friends shouting at each other (described in the book) is similar to the story of Stella yelling at Brigette.
  • If children have difficulty recalling what happened right after the two friends shouted at each other, display and discuss the pertinent pages of the book.

Enrichment

  • Ask children if they can think of a time when they felt sorry but didn’t want to apologize. Ask if they can explain why they didn’t want to apologize.
Social-Emotional

Center Activity

Feeling facesProvide two bags. Place in one bag 5–6 classroom items, such as a toy, book, play food item, block, crayon, and doll. Place in the second bag the sad and happy Feeling Faces from Week 11, Day 2. Also make and include Feeling Faces for scared and guilty (see adjacent picture). Introduce the guilty and scared Feeling Faces to children before center time. Invite children, one at a time, to choose one item from the first bag and one Feeling Face from the second bag. Invite children to use the item and the Feeling Face to tell a story. Example: “Once there was a little doll that was sad . . .” Encourage children to make up a story that includes the item, a feeling word, and some resolution through apology. Example: “Jerry said he was sorry for taking the crayon from Josie, and it made her feel happy.” Consider inviting children to think about how the story might end using an apology.

Family Child Care

Family Child Care

Encourage older children to draw two sets of pictures, with two faces in each: (1) the faces of Stella and Brigette after Stella yells at Brigette, and (2) the faces of Stella and Brigette if Stella said “I’m sorry for yelling at you” to Brigette. Invite children to use the pictures to retell the story.

Week 23:
Day 3

Exploring Life Cycles

Science

Large Group

Skill and Goal

Knowledge of life cycles
Children will deepen their understanding of what seeds need in order to grow by planting seeds.

Materials
Needed

  • Clear plastic cups—1 per child
  • Spoon or scoop—1 per child
  • Soil
  • Bean seeds—2–3 per child
  • Small watering can

Key
Concepts

Review:

  • Seed

Be Prepared: Write each child’s name on his/her cup. Ask another adult to help with today’s activity. Beginning next week, as the bean seeds begin to sprout and grow, invite children to record the changes they observe in their science journals. Date each drawing to keep track of how long it takes for the plant to mature. Other observations can be made by measuring the height of the plant each day.

BEGIN:

This week we are learning about the life cycle of a bean plant. We know that the life cycle of a bean plant has four stages.

EXPLAIN:

Today we will plant our own bean seeds, so we can learn more about the life cycle of a bean plant by watching our plant grow!

ACT:

bean plant in cup[Invite children to sit at a table. Give each child a clear plastic cup. Make sure each child’s name is on his/her own cup.]

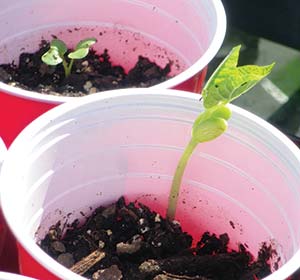
We know that the seed is the first stage in the life cycle of a bean plant. Remember, a seed is a small part of a plant that can grow into a new plant.

What does a seed need in order to grow? (soil, water, sunlight, nutrients)

The first thing we need to do is put soil in our cups. Soil will help our seeds to grow.

[Invite children to add soil to their cups with a spoon or scoop.]

Now we can place our seeds in the soil.

[Demonstrate how to gently put bean seeds on top of the soil. Give each child 2–3 bean seeds, and invite children to put their bean seeds on top of the soil in their cup.]

Now we need to cover the bean seeds by putting a little more soil on top of them.

[Invite children to add a little more soil to their cups with a spoon or scoop.]

What should we put on our bean seeds to help them grow? (water)

We know that living things need water in order to grow. We will put a little water on the soil to help our bean seeds grow.

[Demonstrate how to carefully sprinkle water. Help children with this step to ensure they don’t add too much water.]

There is one more thing we need to do to help our bean seeds grow.

What is another thing our bean seeds need? (sunlight)

We will put our bean seeds on the windowsill (or under a lamp) to make sure they get enough sunlight.

RECAP:

Today we planted our own bean seeds, so we can watch them change and grow. It will take several days for our bean seeds to begin to grow. What should we do to help them grow? (water them each day, keep them in the sunlight)

Scaffolding tips

Scaffolding Tips

Extra support

  • Encourage children to describe each step as they plant their seeds.

Enrichment

  • Ask children if they think the cup will be big enough as the bean seed begins to grow. Why or why not?
Science

Center Activity

Provide watercolor paints, paper, and *pictures of the four stages in the life cycle of a bean plant. Invite children to represent one, several, or all stages using the watercolor paints.
*Printables provided

Family Child Care

Family Child Care

Invite school-age children to begin making a book that depicts the changes that take place with younger children’s bean plants. Invite them to draw the plants several times a week and place the drawings in the book. Place the book near the bean plants for all children to enjoy.