Week 11:
Day 3

Understanding Words

Language / Literacy

Large Group

Skill and Goal

Oral language, Letter knowledge
Children will understand basic information, including the meaning of several novel words, presented in a book read aloud. Children will also identify the name of the letter O.

Materials
Needed

  • *Letter O card
  • Book of your choice for this week’s repeated reading
  • Words We Understand chart from Day 1
    *Printables provided

Key
Concepts

New:

  • 4–6 words (see Be Prepared)

Review:

  • 1–2 words in book introduced on Day 1

Be Prepared: This is the second of three repeated readings of a book with children. Today’s session focuses on children’s comprehension of information presented in the book, especially connections to children’s experiences. The session also helps children understand more novel words. From the list of novel words you identified prior to your first reading of the book, select 4–6 words to define for children today. Remember, it is okay to select words that a few children may know if you anticipate most children do not understand the word’s meaning. See the Language/Literacy section of the ELM User Guide: 3–5 Years for additional information on how to select and define novel words.

BEGIN:

Large Letter O Card[Display the letter O card.]

  • What is the name of this letter?
  • Pop up if you have the letter O in your name!

[See Week 3, Day 3 of Language/Literacy for a description and examples of how to approach today’s book reading. Key aspects are summarized below: 

  • Display book cover and say book title. Engage children in describing what they remember about the book: 
    • What is our book about? 
    • Who were the main characters in our book? 
    • What happened first? What happened next? 
  • Remind children that reading a book is a good way to learn new words. Point to and say words introduced on Day 1 that are listed on the Words We Understand chart. Invite children to talk about what they recall about each of the words. Remind children of the meaning of each novel word. 
  • Point to where to begin to read on the first text page of the book. Pause during reading to briefly define words identified for today’s session. Use the following approach: 
    • Read the sentence with the novel word. Repeat the novel word. 
    • Repeat the sentence in which the word is used. 
    • Define the novel word and connect the definition to the book. 
  • After the book reading, engage children in a discussion of each novel word targeted for today with one or more of the following strategies (plus writing the word on the chart):
    • Ask children to describe a picture related to the word. 
    • Define a word without naming it and ask children to identify the word. 
    • Encourage children to think about a novel word in another context. 
  • Encourage children to connect the book information to their own experiences. Below are some examples: 
    • “Our book today was about worms. Have you ever seen or touched a worm? What was it like?”
    • “Our book today talked about roots. Roots are part of a plant that grow into the dirt. Have you ever seen the root of a plant? What was it like?” 
    • “Today we talked about the word squeeze. We squeeze something by pressing things very close together. What kinds of things have you squeezed? How about a tube of toothpaste? How about a package or bottle of ketchup? Show us how you squeeze something.”]
Week 11:
Day 3

Counting Things

Mathematics

Large Group

Skill and Goal

Number knowledge
Children will understand how to sort items into groups and identify the total number of items in each group.

Materials
Needed

  • Crayons, pencils, scissors, glue —4 of each
  • Basket

Key
Concepts

Review:

  • Last number counted
  • Sort

BEGIN:

We are learning that when we count, the last number we count tells how many we have. Let’s count our fingers.

[Lead children as you count your fingers, moving each finger as you count.]

How many fingers do we have? How do we know?

EXPLAIN:

Today we are going to sort some things. Remember, when we sort things, we put them into different groups. Let’s look at some items in our basket. There are crayons, pencils, scissors, and glue.

Let’s put each item into a group.

ACT:

[Demonstrate how to sort one or two items. Pass the basket from child to child. Invite each child to take one item out of the basket and say where (which group) the item should be placed. Encourage the child to put the item in its appropriate group. Occasionally offer a reminder of the sorting process. Example: “Treshawn picked a pencil. He put the pencil in the group with all of the other pencils.”]

EXPLAIN:

Now let’s count how many are in each of the four groups we have made. We know the last number we count tells us how many items are in a group.

Sorting Crayons, Pencils and Glue
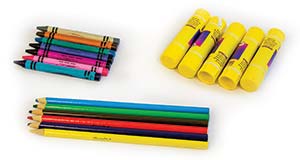
[Invite children to join you in counting the number of items in each group. Touch or hold up each item as you count. After you’ve counted each group, ask “How many?”]

Remember, the last number we say is the number of items that are in the group.

I am going to hold up some fingers on my hand. Please say how many fingers I am holding up.

[Count each finger as you hold up 1–10 fingers. Ask children to tell “how many.” Repeat several times with different amounts. Be sure to count out loud as you hold up each finger.]

ACT:

How do we know how many fingers I held up? (last number counted tells how many)

RECAP:

Today we practiced sorting items and counting to find out how many items were in each group. We know that the last number we say when we count tells us how many are in the group.

Scaffolding tips

Scaffolding Tips

Extra support

  • Invite children to hold up the items in a group as children count the items out loud (one child per group of items).
  • The sorting task may be simplified by using two or three groups and items of high contrast. Example: crayons and scissors.

Enrichment

  • Can children think of other ways to sort the items? (by color, size, etc.)
Mathematics

Center Activity

Supply a basket of small items, such as play food, manipulatives, small toys, etc. Encourage children to sort the items by color and then count how many are in each group.

Family Child Care

Family Child Care

For mixed-aged groups use two baskets of items. One basket can contain 1–5 of each item, and the other basket can contain larger numbers of items. Invite each group to take turns sorting and counting.

Week 11:
Day 3

Understanding Feelings

Social-Emotional

Large Group

Skill and Goal

Emotion knowledge
Children will understand ways to feel better when they are sad, including when a family member or loved one is away for a while.

Materials
Needed

  • *Things That Make Us Feel Better poster
  • Sad Feeling Face prepared for Day 2
    *Printables provided

Key
Concepts

Review:

  • Sad

Optional
Reading

  • Countdown ‘til Daddy Comes Home by Kristin Ayyar

BEGIN:

[Display sad Feeling Face.]

Yesterday we made Feeling Faces and talked about what it means to feel sad. Can you make a sad face?

EXPLAIN:

Things that make us feel better posterRemember, when we are sad we sometimes have a frown on our face, or we may cry.

Our body might hurt inside when we are sad. Sometimes we get a stomachache when we are sad. Sometimes we have a hard time calming our mind or relaxing our body when we are sad.

We can feel sad for many different reasons. One of the times we may feel really sad is when a parent or family member goes away for a while. It’s hard to wait for our family member to come home. But there are things we can do to help us feel better.

Today we are going to talk about some ways we can feel better when a parent or family member is away for a while. I have a poster that shows us some things that might help us when we are feeling sad. Notice there is a friendly fox on our poster.

[Display Things That Make Us Feel Better poster.]

Let’s look at the things the fox is doing on this poster and talk about how they can make us feel better when we are sad.

Our friendly fox is doing things with its body to feel better.

ACT:

[Point to each “move our body” picture and ask the following questions.]

  • What is the fox doing in this picture?
  • Have you ever done what the fox is doing in the picture to help you feel better when you were sad? Tell us about it.

Our friendly fox is doing quiet things to feel better.

[Point to “do quiet things” pictures and ask the following questions.]

  • What kinds of quiet things is the fox doing?
  • Have you ever done what the fox is doing in the picture to help you feel better when you were sad? Tell us about it.

[Point to “be with others” pictures.]

  • What is the fox doing in these pictures?
  • Have you ever done what the fox is doing in the picture to help you feel better when you were sad? Tell us about it.
RECAP:

There are different reasons we may feel sad. We can be very sad when a parent or family member is away for a while. The friendly fox on our poster showed us many things we can do to help us feel better when we are sad. I will hang this poster in the room to help us remember the kinds of things we can do to help us feel better when we are sad.

Scaffolding tips

Scaffolding Tips

Extra support

  • If children have difficulty expressing how an activity might make them feel better when they are sad, help with vocabulary if necessary.

Enrichment

  • Invite children to draw a picture of something they do to feel better when they feel sad.
Social-Emotional

Center Activity

Provide puppets or toy people figures and the *Things That Make Us Feel Better poster used in today’s activity. Invite children to role play what it is like to feel sad and then what to do to feel better, using one or more strategies shown on the poster.
*Printables provided

Family Child Care

Family Child Care

If a child or children in your care are experiencing the deployment of a family member, read ageappropriate books related to this situation. Some include: When I Miss You by Cornelia Maude Spelman and Brave Like Me by Barbara Kerley. Invite children to role play the different ways to feel better listed on the poster. School-age children may enjoy making up short stories about feeling sad and using one of the suggestions on the poster. Example: “Once upon a time there was a little boy who missed his mom. She went on a long trip and he was sad. He liked to sit on his bed and look at books that his mom liked to read to him. This made him feel better.”

Week 11:
Day 3

Creating Dance

Creative Expression

Small Group

Skill and Goal

Skills that support creative expression
Children will strengthen their understanding of movements in dance.

Materials
Needed

  • *Activity cube (see Be Prepared)
    *Printables provided

Key
Concepts

New:

  • Jump
  • Glide
  • Spin

Review:

  • Movement
  • Hop

Also
Promotes

  • Physical / Health
  • Self-Regulation

Be Prepared: Cut out and fold the provided printable activity cube. You may wish to make a second cube for use in a suggested Enrichment tip. Sturdier cubes with pockets for pictures may be available commercially.

Looking Ahead: Inviting a person who plays a musical instrument to visit your classroom for the Creative Expression activity in Week 16, Day 3 will enrich children’s experiences. Also, consider securing a musical instrument(s) for enhancing the Creative Expression activities in Week 16, Day 3 and Week 17, Days 1, 2, and 3.

BEGIN:

We are learning many different movements that can be used in dance. What is a movement? (something we do with our body to make it move)

EXPLAIN:

Active CubeToday we will play a game with an activity cube to learn some new movements.

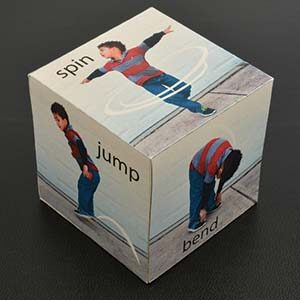
[Display activity cube.]

This is called an activity cube. The cube has pictures of different movements. There also is a word next to the picture that tells the name of the movement. I can help you figure out what the word says, if you want.

Let’s look at each of the pictures on our activity cube. We already know some of the movements.

ACT:

Activity Cube Illustration
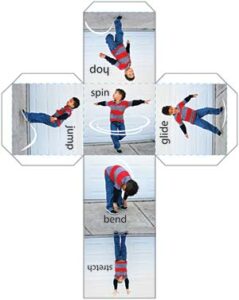
[Display the cube’s illustration of bend.]

We know this movement. What is this movement? (bend) Everyone show us how to bend.

[Display the cube’s illustration of stretch.]

This shows another movement we know. What is the movement? (stretch) Let’s all stretch.

Let’s look at some other pictures on our cube.

[Display the cube’s illustration of jump.]

This picture shows a jump movement. Watch me as I jump.

[Demonstrate jump.]

When we jump, we use both feet to go up and then down in the air. We land on both feet. Now let’s all jump!

[Encourage children to join you as you jump several times.

Display the cube’s illustration of hop.]

This is a picture of a hop movement. Watch me as I hop.

[Demonstrate hop.]

We know that when we hop, we use one foot at a time and go up and down in the air. We can also change feet while we hop. Now let’s all hop!

[Encourage children to join you as you hop.

Display the cube’s illustration of glide.]

This is a picture of a glide movement. Watch me as I glide.

[Demonstrate glide.]

When we glide, we move our bodies to the side slowly and smoothly. Now let’s all glide!

[Encourage children to join you as you glide.

Display the cube’s illustration of spin.]

This is a picture of a spin movement. Watch me as I spin.

[Demonstrate spin.]

When we spin, we turn our bodies around and around, but not too fast! Now let’s all spin!

[Encourage children to join you as you spin.]

EXPLAIN:

We will take turns rolling the cube when we play our game. When the cube stops, a picture of one of the movements will be on top of the cube. Whoever rolled the cube will tell us the name of the movement and then remind us of how to do the movement. Then we will do the movement together! I’ll roll first and show you how we play.

ACT:

[Demonstrate how to roll the cube and wait for it to stop. Look at the picture that is on top of the cube. Say the name of the movement and show the picture to children. Then demonstrate the movement as you encourage children to join you.

Invite children to take turns rolling the cube and demonstrating the movement that is on the top of the cube. Encourage all children to do the movement.]

RECAP:

Today we learned more movements. Artists use movements to move their bodies when they dance. Let’s all take a bow to celebrate all of the movements we have learned and practiced this week!

Scaffolding tips

Scaffolding Tips

Extra support

  • Children may need your assistance in identifying the movement that landed on top of the cube and/or demonstrating it.
  • Point to and describe the position of body parts shown in an illustration, especially those directly involved in the movement. You also may want to point to and name other parts, such as head and arms.

Enrichment

  • Encourage children to roll the cube two times in a row and then do the two movements in sequence. Example: Child rolls “spin” and then rolls “bend.” Child will spin and then bend.
  • Provide a cube to each of two children to roll at the same time (two cubes required). Invite children to choose which movement they want to do.
Creative Expression

Center Activity

Provide a CD player and music along with the *activity cube. Encourage children to continue playing with the cube. Invite children to do the movements to the music. Some children may wish to put together a brief dance routine using some of the movements represented on the cube.
*Printables provided

Family Child Care

Family Child Care

Encourage school-age children to teach younger children dance movements they may know. Invite all children to have a dance party!