Week 35:
Day 1

Understanding Words

Language / Literacy

Large Group

Skill and Goal

Oral language, Letter knowledge
Children will understand basic information, including the meaning of several novel words, presented in a book read aloud. Children will also identify the name and sound of the letter J.

Materials
Needed

  • *Letter J card
  • Book of your choice for this week’s repeated reading
  • Chart paper
  • Marker
    *Printables provided

Key
Concepts

New:

  • 1–2 words (see Be Prepared)

Be Prepared: This is the first of three repeated readings of a book with children. Today’s reading focuses on children’s understanding of basic information presented in the book. In advance of the session, identify all novel words in the book you intend to define for children across three days of reading the book. Select one or two important words to define for children today, especially words that are essential to understanding the book. See the Language/Literacy section of the ELM User Guide: 3–5 Years for additional information. Write the following at the top of the chart paper: Words We Understand.

BEGIN:

[Display letter J card.]Letter J

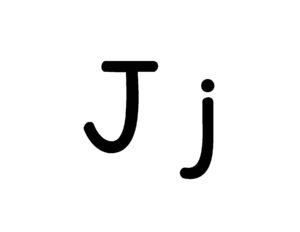
The word “jungle” begins with this letter. What is the name of this letter?

Letter J says /j/, just like in the word “jungle.” /j/, /j/, jungle. Let’s together say /j/, /j/, jungle.

Who would like to tell us another word that begins with the letter J?

EXPLAIN:

Now let’s read a book!

[See Week 3, Day 1 of Language/Literacy for a description and examples of how to approach today’s book reading. Key aspects are summarized below:

  • Display book cover and encourage children to discuss what the book might be about.
  • Explain that reading a book is a good way to learn new words. We will talk about some words each time we read the book this week. Remind children of the Words We Understand chart.
  • Read title of book as you point to each word. Point to and say the names of the author and illustrator.
  • Introduce and provide child-friendly descriptions of two novel words included in today’s book. Write words on the chart as you point to and say each again.
  • Point to the first text word and explain this is where we begin reading the book. Read the book verbatim. Pause to discuss words, events, or characters that seem confusing to children. Point to and describe illustrations directly related to book text.
  • After reading the book, engage children in recalling main parts of the book and novel words emphasized today:
    • What is our book about?
    • Who were the main characters?
    • What happened first? What happened next?
  • Engage children in a brief discussion of novel words emphasized today. Display and discuss book pictures that pertain to each word.
    • What does each word mean?
    • How was each word used in today’s book?]
Week 35:
Day 1

Working with Shapes

Mathematics

Large Group

Skill and Goal

Geometric and spatial knowledge
Children will identify basic shapes and their characteristics.

Materials
Needed

  • Basket
  • *Wiggle Worm Shapes game cards—1 shape card per child
  • *6 Wiggle Worm cards
    *Printables provided

Key
Concepts

Review:

  • Characteristic

BEGIN:

Let’s sing the song “This Old Man.” Let’s hold up our fingers for each number in the song.

[Lead children in singing “This Old Man.” Hold up the appropriate number of fingers for each number in the song.]

EXPLAIN:

We are learning many things about shapes. Today we will do an activity with shapes called Wiggle Worm Shapes.

We will use a basket and shape cards to play our game. Let’s look at our shape cards before we play the game.

[Display each kind of shape card (square, triangle,Shape Cards 
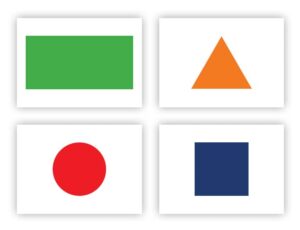
rectangle, circle). Review the name and characteristics of each shape. Remind children that a characteristic is something special about a living thing or a thing that is not living.]

I will place our shape cards in the basket. Each one of us will have a chance to pick a shape card. After we pick a shape card, we can say the name of the shape on the card and some of its characteristics. We can say how many sides our shape has, how many corners our shape has, and if our shape’s sides are straight or curved.

In our basket there are also cards with a wiggle worm on them.

[Display wiggle worm card.]Wiggle Worm

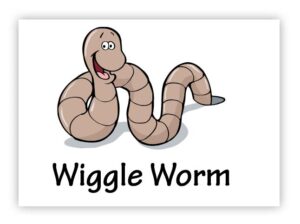
If we pick a wiggle worm card, we will say, “Wiggle worm!” Then we will all stand and wiggle like a worm! Let’s try the game!

ACT:

[Invite each child, one at a time, to choose a card. Encourage each child to say the name of the shape and a special characteristic of that shape. If the child needs help, encourage him/her to ask a friend to help. If a child chooses a wiggle worm card, encourage all of the children to stand and wiggle like a worm. Then invite the child who chose the wiggle worm card to choose another card. After a child names his/her shape and shares a characteristic, encourage the child to return the shape to the basket and re-sort the shapes. Continue as long as time permits.]

RECAP:

Today we did an activity with shapes. Each of us chose a card from a basket and named the shape and a characteristic of the shape. What happened if one of us chose a wiggle worm card? We all wiggled like a worm! Let’s all stand and wiggle like worms while we count to 10. We will need to wiggle 10 times!

Scaffolding tips

Scaffolding Tips

Extra support

  • If children are unsure of the characteristics of the shape they chose, ask questions about the shape. Examples: “How many sides does it have?” “Are the sides straight or curved?”

Enrichment

  • For children who have mastered the four basic shapes, affix other shapes children may know (diamond, star, oval, heart) to colored cards and ask those children to choose a colored card.

Mathematics

Center Activity

Supply craft sticks and *large basic shape cutouts. Invite children to make shapes with the craft sticks using the cutouts as a reference.
*Printables provided

Family Child Care

Family Child Care

Try a numeral version of the game called Wiggle Worm Numbers. Invite children to choose a card with a numeral rather than a shape.

Week 35:
Day 1

Paying Attention

Self-Regulation

Large Group

Skill and Goal

Concentrate
Children will strengthen their understanding of how to use yoga to concentrate on their breathing and bodies.

Materials
Needed

  • Feather
  • The ABCs of Yoga for Kids by Teresa Power
  • Yoga mats—1 per child (see Be Prepared)

Key
Concepts

Review:

  • Patient
  • Yoga
  • Pose

Be Prepared: Today’s activity will involve children trying two yoga poses. If possible, provide children with yoga mats.

BEGIN:

Let’s have some quiet time together so we can concentrate on our breathing and body. This will help our mind to calm down and help us with our self-control.

ACT:

[Spread out children so each child has personal space. When all children are arranged, turn out the lights in the classroom.]

Let’s begin by concentrating on our breathing. As we breathe in and out, let’s put our hand on our stomach to feel how it moves as we breathe. Let’s practice breathing while feeling our stomach move in and out.

Let’s take a deep breath.

In, 1, 2, 3, out, 1, 2, 3.

If you want, you can close your eyes to help you relax.

Breathe in through your nose, and breathe out through your mouth.

In, 1, 2, 3, out, 1, 2, 3.

In, 1, 2, 3, out, 1, 2, 3.

When you breathe in, bring the air all the way down to your stomach.

In, 1, 2, 3, out, 1, 2, 3.

Your hand on your stomach should move up and down as you breathe.

In, 1, 2, 3, out, 1, 2, 3.

Please keep breathing in slowly and breathing out slowly.

Feel your body starting to relax. Your eyes are feeling heavier and heavier as you keep breathing all the way to your stomach.

In, 1, 2, 3, out, 1, 2, 3.

Now we are going to focus on our hands and arms. Pretend that you have two small oranges, one in each hand. Pretend you are squeezing the oranges to make orange juice. Tighten your fists as much as possible. Pretend you are squeezing the oranges as hard as you can. Okay, there’s no more juice left in the oranges. Now please relax your hands.

Now I will use a feather to pretend there is a butterfly landing on our nose. We will need to wait patiently for the butterfly to land on our nose. Remember, when we are patient, we wait our turn without talking or moving around or getting upset.

[As you talk about the butterfly, gently move around the room and touch each child’s nose with a feather.]

Oh! Wow! Here comes a beautiful butterfly. The imaginary butterfly will visit each of us. We need to be patient. Our imaginary butterfly will fly around your head and land on your nose. Don’t touch our imaginary butterfly with your hands, because we might hurt him. Instead, try to get the butterfly to move off of your nose by scrunching up your nose and face.

Wrinkle up your face really hard when our imaginary butterfly lands on your face. Then relax your face when the butterfly moves away. You will feel the muscles in your face relax.

[At the conclusion of the breathing activity, ask children to stay in their own personal space.]

EXPLAIN:

Let’s use some of our quiet time to practice some yoga. Remember, when people do yoga, they concentrate on their breathing while stretching their bodies into different poses.

Let’s do the yoga poses we learned several weeks ago. We know that a pose is a way of holding our body. Here are the two yoga poses we have done.

ACT:

[Display photos in the book of yoga poses done in Week 29, Day 1. Invite children to try each pose. Demonstrate each. Encourage children to take three deep breaths as they hold each pose.]

Now let’s look at the pictures of other poses in our book about yoga. We will try some different yoga poses in the book and concentrate on our breathing while we do them.the ABCs of Yoga for Kids Book Cover

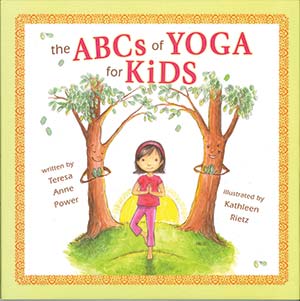
[Choose two poses from the book to demonstrate to children. Read sections of the book that focus on the two poses. Discuss how the child’s body is posed in each picture. Example: “This is called the lion pose. How does the boy’s body look like a lion?”

Show children the picture of the first chosen pose from the book. Demonstrate the pose, and then invite children to try it. Remind children to take three deep breaths as they hold the pose. Repeat the pose with three deep breaths. Then show children the picture (from the book) of the second chosen pose, and use the same approach for children. Repeat the pose with three deep breaths.]

RECAP:

We are learning to calm our minds and use good self-control by concentrating on our breathing and our bodies. We did some yoga poses. Yoga helps us concentrate on our breathing while stretching our bodies. Which yoga pose helped you the most in calming your mind?

Scaffolding tips

Scaffolding Tips

Extra support

  • If children have difficulty with the yoga poses you demonstrate, help by gently placing their bodies in the desired position.

Enrichment

  • If children are comfortably holding a pose while taking three deep breaths, invite them to take more deep breaths (up to five, if they wish).

  • Invite children to demonstrate a pose in the book. Encourage others to try the pose also.

Self-Regulation

Center Activity

Place one or two yoga mats in an area of the room, plus pictures (from the book) of the two yoga poses practiced in today’s activity. Also encourage children to practice poses done previously (Week 11, Day 1; Week 14, Day 1; Week 23, Day 1; Week 29, Day 1). If you do not have access to yoga mats, use a blanket. Play quiet, peaceful music and invite children to practice the poses.

Family Child Care

Family Child Care

Invite children in your setting to do partner yoga. Encourage one child to do a yoga pose and the other child to mimic the pose of the first child. Encourage children to take turns being the first to do a yoga pose. Provide The ABCs of Yoga for Kids by Teresa Power for children to use as a reference.

Week 35:
Day 1

Creating Art

Creative Expression

Large Group

Skill and Goal

Knowledge of creative processes, Skills that support creative expression

Children will understand that artists may use different types of lines to create art.

Materials
Needed

  • Chart of straight, curvy, and zigzag lines (see Be Prepared)
  • *3 pictures as shown
  • Marker
  • Tape (See Extra Support tip)
    *Printables provided

Key
Concepts

New:

  • Straight
  • Curvy
  • Zigzag

Also
Promotes

  • Physical / Health

Be Prepared: Create a chart similar to the one pictured below.

BEGIN:

We know that artists use different kinds of things to create art. Some of the things artists use are paint, chalk, pencil, and clay.

ASK:

What have you used to create art?

EXPLAIN:

Today we are going to learn how lines are used to create art. A line can be made with paint, chalk, a pencil, or with clay.

ACT:

[Display chart. Point to and trace with a finger each lineLine Type Examples 
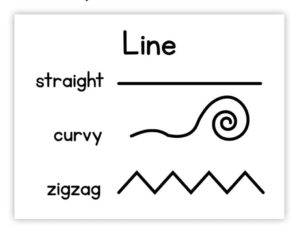
as you describe it. Demonstrate how to make each type of line when you ask children to make it in the air.]

Our chart shows different kinds of lines that an artist may use to create art.

A straight line does not have any curves, bends, or corners.

Let’s pretend we have a paintbrush in our hands and make a straight line in the air.

A curvy line is rounded.

Let’s use our pretend paintbrushes to make a curvy line in the air.

A zigzag line has short, sharp turns or corners.

Let’s use our pretend paintbrushes to make a zigzag line.

EXPLAIN:

[Display three pictures of paintings.]

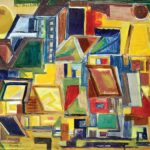
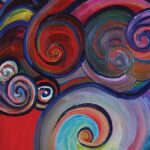
Here are pictures of three different paintings. The artists used lines in their paintings. Let’s look carefully at each of these paintings to find lines.

ACT:

[Discuss one picture at a time. Invite children to point to lines in the painting. Engage children in a discussion of how lines are used in each painting.

ASK:

[After children identify and describe lines in each painting, display the three pictures for ease of comparison and ask questions such as the following:]

  • What type of line was the easiest for us to find in the paintings?
  • What type of line was the hardest for us to find in the paintings? Why?
  • What did each artist create by using lines?
  • How are the lines different from each other?
RECAP:

Artists may use lines to create art. Today we talked about three different types of lines in pictures of paintings. We found straight lines, curvy lines, and zigzag lines. Have you ever used a line in art you created? How did you use a line?

Scaffolding tips

Scaffolding Tips

Extra support

  • If children need more experience with the three types of lines, invite them to make each of the three lines by briefly walking. You may wish to put tape on the floor to show each line, especially curvy and zigzag lines.
  • Invite children to use a finger to trace the lines on the chart and on the pictured paintings.

Enrichment

  • Children may be ready to learn about squiggly lines. A squiggly line has many curves. Invite children to use a pretend paintbrush to make a squiggly line, and then to find squiggly lines in one of the pictures of paintings used in today’s activity.
Creative Expression

Center Activity

In the art center, place the chart of lines next to the easel or other painting station. Encourage children to practice painting with the different types of lines.

Family Child Care

Family Child Care

Look at different works of art that may be in your setting. Encourage children to describe the lines they see.