Week 28:
Day 1

Understanding Words

Language / Literacy

Large Group

Skill and Goal

Oral language, Letter knowledge
Children will understand basic information, including the meaning of several novel words, presented in a book read aloud. Children will also identify the name and sound of the letter D.

Materials
Needed

  • *Letter D card
  • Book of your choice for this week’s repeated reading
  • Chart paper
  • Marker
    *Printables provided

Key
Concepts

New:

  • 1–2 words (see Be Prepared)

Be Prepared: This is the first of three repeated readings of a book with children. Today’s reading focuses on children’s understanding of basic information presented in the book. In advance of the session, identify all novel words in the book you intend to define for children across three days of reading the book. Select one or two important words to define for children today, especially words that are essential to understanding the book. See the Language/Literacy section of the ELM User Guide: 3–5 Years for additional information. Write the following at the top of the chart paper: Words We Understand.

BEGIN:

Large Letter D Card[Display letter D card.]

The word “dance” begins with this letter. What is the name of this letter?

Letter D says /d/, just like in the word “dance.” /d/, /d/, dance. Let’s together say /d/, /d/, dance.

Who would like to tell us another word that begins with the letter D?

EXPLAIN:

Now let’s read a book!

[See Week 3, Day 1 of Language/Literacy for a description and examples of how to approach today’s book reading. Key aspects are summarized below:

  • Display book cover and encourage children to discuss what the book might be about.
  • Explain that reading a book is a good way to learn new words. We will talk about some words each time we read the book this week. Remind children of the Words We Understand chart.
  • Read title of book as you point to each word. Point to and say the names of the author and illustrator.
  • Introduce and provide child-friendly descriptions of two novel words included in today’s book. Write words on the chart as you point to and say each again.
  • Point to the first text word and explain this is where we begin reading the book. Read the book verbatim. Pause to discuss words, events, or characters that seem confusing to children. Point to and describe illustrations directly related to book text.
  • Engage children in a brief discussion of novel words emphasized today. Display and discuss book pictures that pertain to each word.
    • What does each word mean?
    • How was each word used in today’s book?]
  • Engage children in a brief discussion of novel words emphasized today. Display and discuss book pictures that pertain to the word.
    • What does each word mean?
    • How was the word used in today’s book?]
Week 28:
Day 1

Counting Things

Mathematics

Large Group

Skill and Goal

Number knowledge
Children will practice splitting a group of magnets into two parts.

Materials
Needed

  • *Magnetic part-partwhole mat (see Be Prepared)
  • 1 set of numeral magnets 1–10
  • 8 smaller magnets
  • Basket
    *Printables provided

Key
Concepts

Review:

  • Split

Optional
Reading

One Duck Stuck: A Mucky Counting Book by Phyllis Root

Be Prepared: Make a magnetic part-part-whole mat by taping a part-part-whole mat to the front of a cookie sheet. A large cookie sheet from your center’s kitchen might be borrowed for this purpose. If you do not have access to a cookie sheet, a magnetic board can also be used. A magnetic mat is used for ease of holding up the mat for children to see. Place number magnets in the basket.

BEGIN:

Last week we split a group of items into two parts. When we split something, we divide it into smaller parts. We practiced splitting groups of items in different ways.

EXPLAIN:

Today we will use magnets with our special mat.

[Display a part-part-whole mat. Point to each section of the mat as you describe it.]

Our mat has a place for the whole group and sections for two parts.

We are going to practice splitting a group of items. We will use a number magnet to show how many are in the whole group.

Let’s put a group of five magnets in the section of our mat for the whole group.

ACT:

[Invite a volunteer child to place five magnets in the whole section of the mat. Lead children in counting the number of magnets as you or the volunteer child point to each one. Say again the number of magnets in the whole group.]

Now let’s find the number five in our basket of number magnets and place it in the section of our mat for the whole group. It will go next to our group of five magnets.

[Invite a different volunteer child to find the numeral five magnet and place it next to the group of five magnets.]

EXPLAIN:

[Point to the numeral five magnet and smaller magnets as you describe the following:]

We know that this is the number five. It is in the same section as our five smaller magnets. Let’s count our smaller magnets together. 1, 2, 3, 4, 5.

Now let’s decide how we can split our group of five magnets into two parts. There are different ways we can do this.

ASK:

How can we split the whole group of five?

ACT:

[Ask children to give suggestions for the part sections of the mat. For each suggestion, invite a different volunteer child to split the magnets in the whole group into each part of the mat.]

EXPLAIN:

Our number magnet is still in the whole group section of our mat.

ASK:

Where are the five smaller magnets?

EXPLAIN:

Part part whole mat
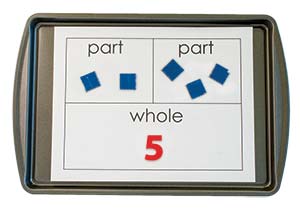
[Point to smaller magnets as you describe them.]

There are ___ smaller magnets in one part section of our mat and ___ smaller magnets in the other part section of our mat.

ASK:

Do we still have five magnets on our mat?

ACT:

Let’s count together our smaller magnets to make sure we have all five on our mat.

[Count on as you count the two parts together to ensure they equal the number of magnets in the whole group. Invite children to join you in counting. Then clear the part sections.]

Let’s try it again with another group of magnets. Let’s try it with a group of eight magnets.

[Invite a volunteer child to place the group of eight magnets in the section of the mat for the whole group. Encourage children or the volunteer child to count aloud as you point to and count eight magnets.

Invite a different volunteer child to find numeral eight in the basket of magnetic numerals and to place numeral eight next to the eight magnets.]

How can we split the whole group of eight?

[Ask children to give suggestions for the part sections of the mat. For each suggestion, invite a different volunteer child to split the magnets in the whole group into each part of the mat. Follow the procedure used for the group of five. Continue with different groups of magnets and different volunteer children as time allows.]

RECAP:

Today we practiced splitting a group of magnets into two smaller parts. Did our total number of magnets change when we moved magnets to the two parts of our mat? (no) We also used number magnets to show the number of magnets in the whole group.

Scaffolding tips

Scaffolding Tips

Extra support

  • Omit the use of the numeral magnet if this appears to be confusing to children.
  • Use groups of three and then six magnets for the first and second rounds of the activity if you anticipate groups of five and eight may be too challenging.

Enrichment

  • Invite children to find and place numeral magnets on each of the two parts.
  • Omit the use of smaller magnets. Use numeral magnets only.
Mathematics

Center Activity

Supply *part-part-whole mats and small manipulatives. Invite children to place a number of manipulatives in the whole section of the mat and then split the group into two smaller parts.
*Printables provided

Family Child Care

Family Child Care

Practice splitting groups into parts while outside. Invite children to find rocks or leaves to make a whole group of 10 or fewer items. Encourage children to find how many ways they can split the whole group into two parts.

Week 28:
Day 1

Focusing & Remembering

Self-Regulation

Large Group

Skill and Goal

Executive function
Children will understand how to modify their actions in response to aural cues.

Materials
Needed

  • Chart paper
  • Marker
  • Construction paper—1 per child
  • Crayons—1 per child
  • Music with both fast and slow tempos (see Be Prepared)
  • Music player

Key
Concepts

Review:

  • Quickly

Be Prepared: Suggested music with fast and slow tempos for this game: Greg and Steve’s Big Fun CD. This CD contains several songs that include both fast and slow tempos within the same song.

If time permits, offer Listening Bingo from Week 27, Day 2 as a second game. If the game described below is too challenging for a majority of children, stop at an appropriate place and offer Listening Bingo from Week 27, Day 2. The game for today may be less challenging when offered again at a later point.

BEGIN:

We are going to play a game we have played before called Music Marks. When we play the game, we will draw marks on a piece of paper while we listen to music.

EXPLAIN:

Today will play Music Marks in a different way. When the music moves slowly, we will draw bubbles on our paper. When the music moves quickly, we will draw squares on our paper. Remember, quickly means fast.

Let me show you first.

ACT:

Child Scribbling[Play a small excerpt from the music that demonstrates both a slow and a fast tempo. Point out to children which music segment is slow and which is fast. Then draw bubbles (circles) or squares on chart paper depending on the tempo of the music. When the tempo is slow, draw bubbles. When the tempo is fast, draw squares.]

EXPLAIN:

Now we will try it together. As we draw, we will listen carefully to the music. When the music moves slowly, we will draw bubbles on our paper. When the music moves quickly, we will draw squares on our paper. Let’s try to keep our marker/crayon on the paper the entire time we draw.

ACT:

[Play the music. Observe as children draw marks. Children are not expected to draw perfect circles or squares. Discuss the tempo of the music and how it gets fast in different parts. Encourage children to continue for about one minute, and then discuss their marks by asking the following questions:]

  • Where on your paper did the music begin to move slowly?
  • Where on your paper did the music begin to move quickly?
  • How can you tell? (circles compared to squares)

[If time permits, play the game again.]

RECAP:

Today we played a game with music. What did we do when the music played during the Music Marks game?

Scaffolding tips

Scaffolding Tips

Extra support

  • Model how to modify your drawing as the music is played, if necessary.

Enrichment

  • In place of the recorded music, invite children to sing a song while making music marks.
  • Invite children to try a rule change for Music Marks: Encourage children to draw slowly when the music is slow and make scribbles when the music is fast. Then do the opposite.
Self-Regulation

Center Activity

Provide different types of music as children continue making music marks.

Family Child Care

Family Child Care

Try Music Marks outdoors with sidewalk chalk. Encourage children to draw bubbles (circles) when the music moves slowly, and squares when the music moves quickly.

Week 28:
Day 1

Exploring Habitats

Science

Large Group

Skill and Goal

Knowledge of habitats
Children will understand basic characteristics of a forest habitat.

Materials
Needed

  • *3 pictures as shown
  • Forest items (see Be Prepared)
  • Shoebox
    *Printables provided

Key
Concepts

New:

  • Forest

Review:

  • Habitat
  • Clue

Optional
Reading

  • National Geographic Readers: Hop, Bunny!: Explore the Forest by Susan B. Neuman

Be Prepared: Place in a shoebox items that can be found in a forest. Examples: rocks, sticks, leaves, soil. Forest items (pine cones, silk leaves, moss) may be purchased if they are not available in your area. Use photos if forest items are not available.

BEGIN:

We are learning about places where animals and plants live. We know these are called habitats.

ASK:

[Display picture of a water habitat.]

  • What is this habitat called? (water)
    [Display picture of a desert habitat.]
  • What is this habitat called? (desert)
EXPLAIN:

[Display shoebox.]

Today we will begin learning about another habitat.

This box has some clues about the habitat we will talk about today. We know a clue is something that helps us find an answer to a question.

ACT:

[Remove items from box, one at a time. Invite children to touch, describe, and maybe identify each item.]

ASK:
  • What type of habitat would have the things we just talked about? (forest, woods)
  • Have you ever been in a forest or woods? What was it like?
EXPLAIN:

Forest Habitat
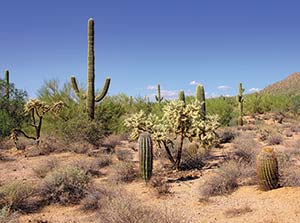
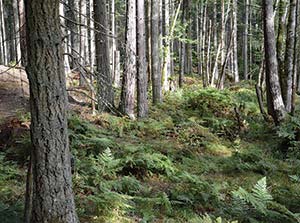
A forest is a habitat covered with trees and other plants. A forest is similar to a woods, but bigger. A forest is very different from a water habitat or a desert habitat.

Here is a picture of a forest habitat.

[Display picture of a forest habitat.]

ASK:
  • What do we see in this picture?
  • What colors do we see in this forest?
EXPLAIN:

A forest is full of things that are green and brown. There are other colors too, but green and brown are found in the forest more than any other colors. The floor of the forest has grass and other plants. Many kinds of animals live in a forest.

ASK:

What green and brown things do you see in our picture of a forest? (grass, trees, other plants, the ground, etc.)

RECAP:

A forest is full of animals, trees, and other plants. Do you think fish live in a forest? (only if there is a pond or lake in the forest; fish need water to survive) This week we will learn more about a forest habitat.

Scaffolding tips

Scaffolding Tips

Extra support

  • Point to other things in the classroom that are green and brown to provide a reminder of colors, if appropriate.
  • If children seem unclear about the floor of a forest, explain that the floor of a forest is the ground under the trees in a forest. People and animals walk on the forest floor.
  • To help children gain a better understanding of a forest, look for online videos of forest sights and sounds.

Enrichment

  • Invite children to think of animals that might live in a forest.
Science

Center Activity

Provide items from a forest (leaves, twigs, rocks, moss, soil, etc.). Encourage children to use a magnifying glass to look closely at the items. Invite children to draw some of the items in their science journals.

Family Child Care

Family Child Care

If you live near a forest, take the children for a walk to find things that are green and brown, and to learn more about what lives in a forest.