Week 20:
Day 1

Understanding Words

Language / Literacy

Large Group

Skill and Goal

Oral language, Letter knowledge
Children will understand basic information, including the meaning of several novel words, presented in a book read aloud. Children will also identify the name and sound of the letter H.

Materials
Needed

  • *Letter H card
  • Book of your choice for this week’s repeated reading
  • Chart paper
  • Marker
    *Printables provided

Key
Concepts

New:

  • 1–2 words (see Be Prepared)

Be Prepared: This is the first of three repeated readings of a book with children. Today’s reading focuses on children’s understanding of basic information presented in the book. In advance of the session, identify all novel words in the book you intend to define for children across three days of reading the book. Select one or two important words to define for children today, especially words that are essential to understanding the book. See the Language/Literacy section of the ELM User Guide: 3–5 Years for additional information. Write the following at the top of the chart paper: Words We Understand.

BEGIN:

Large Letter H Card
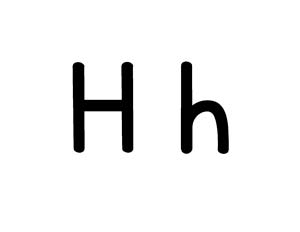
[Display letter H card.]

The word “home” begins with this letter. What is the name of this letter?

Letter H says /h/, just like in the word “home.” /h/, /h/, home. Let’s together say /h/, /h/, home.

Who would like to tell us another word that begins with the letter H?

EXPLAIN:

Now let’s read a book!

[See Week 3, Day 1 of Language/Literacy for a description and examples of how to approach today’s book reading. Key aspects are summarized below:

  • Display book cover and encourage children to discuss what the book might be about.
  • Explain that reading a book is a good way to learn new words. We will talk about some words each time we read the book this week. Remind children of the Words We Understand chart.
  • Read title of book as you point to each word. Point to and say the names of the author and illustrator.
  • Introduce and provide child-friendly descriptions of two novel words included in today’s book. Write words on the chart as you point to and say each again.
  • Point to the first text word and explain this is where we begin reading the book. Read the book verbatim. Pause to discuss words, events, or characters that seem confusing to children. Point to and describe illustrations directly related to book text.
  • After reading the book, engage children in recalling main parts of the book and novel words emphasized today:
    • What is our book about?
    • Who were the main characters?
    • What happened first? What happened next?
  • Engage children in a brief discussion of novel words emphasized today. Display and discuss book pictures that pertain to each word.
    • What does each word mean?
    • How was each word used in today’s book?]
Week 20:
Day 1

Making Patterns

Mathematics

Large Group

Skill and Goal

Pattern knowledge
Children will sort, count, and form patterns.

Materials
Needed

  • Box of multicolored fish crackers (see Be Prepared)
  • Paper plates—1 per child

Key
Concepts

Review:

  • Sort
  • Equal

Also
Promotes

  • Self-Regulation

Be Prepared: For this activity, each child will need one plate of three different colors of fish crackers (six of each color; total of 18 per child). Colored fish crackers are available in a box with four different colors. Use only three of the colors for the main activity: six red, six orange, and six green crackers per child. The fourth color (yellow) may be used as an Enrichment activity. Prepare plates ahead of time. If fish crackers are not an option, Unifix® cubes and pattern blocks can be used.

BEGIN:

Today we will do some activities with colored fish crackers. Each of us will get a plate with 18 fish crackers on it. Please don’t eat any of the crackers yet!

[Distribute plates of fish crackers.]

ASK:

Each of us has three different colors of crackers on our plate. What colors of crackers do you see? (red, orange, green)

EXPLAIN:

Let’s first sort the fish crackers by color. Remember, when we sort things, we put them in groups.

Let’s put all of the red fish in a pile, all of the orange fish in a pile, and all of the green fish in a pile. We will have three different piles of crackers. Let’s keep the three piles of crackers on our plate.

ACT:

[Observe children as they sort their crackers by color. Help as needed.

Omit the following counting practice if time is limited:]

Now let’s count together the number of crackers in each of our three piles. Let’s point to each cracker as we count. Let’s begin with our pile of red crackers.

[Remind children to point to each fish cracker as they count. If necessary, remind children to count crackers in each pile separately.]

How many fish crackers are in each group? (six)

Our groups are equal! They each have the same amount.

EXPLAIN:

Now we are going to make patterns with our fish crackers.

ASK:

What kind of pattern could we make with only red and green fish crackers?

ACT:

[Encourage children to offer ideas. Children may choose an ABAB pattern or an AABAAB pattern. Use your own set of crackers to make a pattern(s) suggested by children. Demonstrate the repeated placement of items if appropriate. If not suggested by children, make an ABAB pattern with the red and green crackers. Leave it in place as a model for children to observe. Emphasize that the orange cracker was not included.]

Let’s all use our fish crackers to make a red, green, red, green pattern.

[Observe and help children as they make a red, green, red, green pattern. Then lead children in pointing to each fish as they say the pattern together.

If time permits:]

Now we will include our orange crackers in making a pattern. Please watch carefully as I make a new kind of pattern with red, green, and orange crackers.

crackers in pattern

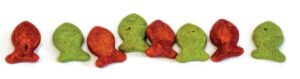
[Use your own set of crackers to make an ABCABC pattern. Point to each cracker as you say the color pattern. Leave it in place as a model for children to observe.]

This pattern uses three different colors. Let’s all make a pattern like this one using red, green, and orange fish crackers.

[Observe and help children as they make a red, green, orange pattern. Help if necessary. When all children have made the pattern, lead children in pointing to each cracker as they say the pattern together.]

RECAP:

Today we used fish crackers to sort, count, and make patterns. We can do so many things with our crackers. Now let’s eat them!

Scaffolding tips

Scaffolding Tips

Extra support

  • If children need additional experience with sorting, ask them to point to each cracker and say its color.
  • As children create their patterns, observe and help if necessary. Example: “You have two colors of crackers in your pattern. You have started a pattern with red, green, and then red. What color comes next? Remember, items in a pattern are repeated.”
  • If children seem tempted to eat one or more crackers, indicate that we will all enjoy eating our crackers at the end of our activity. If crackers are eaten now, there will be fewer crackers for making a fun pattern.

Enrichment

  • Provide each child with six yellow crackers from the box of multicolored crackers. Invite children to create a pattern using all four colors provided in the box of crackers (red, green, orange, yellow).
Mathematics

Center Activity

Provide various types of stickers. Encourage children to make patterns based on size, color, or kind of sticker.

Family Child Care

Family Child Care

Provide children with a variety of snack items and encourage them to make patterns. Examples: cereal, different kinds of crackers, pretzels.

Week 20:
Day 1

Paying Attention

Self-Regulation

Large Group

Skill and Goal

Concentrate
Children will practice concentrating by looking at the color of a peer’s eyes.

Materials
Needed

None

Key
Concepts

Review:

  • Concentrate

BEGIN:

[Arrange children sitting in a large circle, facing inward.]

We are learning how to concentrate on what we hear, see, and do. What does it mean to concentrate? (pay close attention to something)

EXPLAIN:

Children looking at each otherWe can understand something better when we concentrate on it.

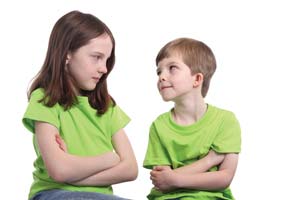
Today we will concentrate on the person sitting next to us. We will play a game called the Hello Game.

We play the Hello Game by turning toward a person sitting next to us and saying “Hello.” Then we look in our neighbor’s eyes and tell our neighbor what color his/her eyes look like.

Let me show you.

[Sit next to an adult helper. Turn to the adult helper and say “Hello (adult helper). Your eyes look (color) to me today.” Then the adult helper turns to you to say “hello” and tells you what color your eyes look.]

(Adult helper) said my eyes look (color). Someone else might tell me my eyes look (different color).

The color of our eyes can look different at different times. That’s why we say “your eyes look a certain color” and not “your eyes are a certain color.”

ACT:

Each of us will take a turn saying “hello” to our friend, and telling our friend what color his/her eyes look like. Let’s go around our circle in the order we are sitting.

[Begin with a volunteer child. Repeat the key words or offer prompts, if necessary. See Extra Support tips. Continue until each child has had a turn.

If time permits, reverse the direction—turn to friend sitting on the left—so each child has an opportunity to say “Hello” and look into the eyes of a different peer.

If time permits:]

EXPLAIN:

Now let’s quietly close our eyes and concentrate on our breathing for a few minutes.

ACT:

Let’s put our hand on our stomach and pay attention to how our breath goes in and out of our body. Our stomach goes out when we breathe in and in when we breathe out. We will take long deep breaths as we think about the air going in and out, in and out. Let’s let our body relax as we focus on our breathing. In and out… in and out…

[Continue taking deep breaths together for a couple of minutes as children relax and concentrate on their breathing. Talk slowly and quietly as you encourage children to think of the air going in and out, in and out.]

RECAP:

Today we played a game that helped us look closely at the color of someone’s eyes. Was it hard to look into your neighbor’s eyes? Why? What did you learn about your neighbor’s eyes?

We also concentrated on our breathing. How did you feel when you concentrated on the air going in and out of your body? (relaxed, sleepy)

Scaffolding tips

Scaffolding Tips

Extra support

  • Some children may have difficulty looking into another’s eyes. Gently encourage their efforts while respecting their hesitancy. Some children may wish to take a pass. You may return to them after other children have had a turn.
  • Some children may not want someone to look into their eyes. They may look away, look down, or cover their eyes with their hands. Again, respect their hesitancy. Encourage the child who is attempting to look into the eyes of a reluctant Hello Game participant to describe what he/she sees. Example: “Hello, _____. Your eyes look closed.”
  • Children may need a friendly reminder that the Hello Game is for practicing how to concentrate. We are looking closely at the color of someone’s eyes. There are other times for silliness.

Enrichment

  • Offer more information about why the color of our eyes can look different at different times. Explain that the amount of light around us and the color of our clothing can make the color of our eyes look different.
  • If children are easily able to describe the color of their neighbor’s eyes, ask them to describe their neighbor’s hair as well. Example: “Hello ___, your eyes look blue and your hair looks brown.”
Self-Regulation

Center Activity

In a quiet area of the room, provide several handheld mirrors for children to use. Encourage children to look at themselves in the mirror and describe what they see.

Family Child Care

Family Child Care

Invite children to greet family members at pickup time with an observation about the family member’s eyes. Example: “Hello Mommy, your eyes look blue to me today.”

Week 20:
Day 1

Exploring Life Cycles

Science

Large Group

Skill and Goal

Knowledge of life cycles
Children will understand basic characteristics of a chicken’s life cycle.

Materials
Needed

  • *4 pictures as shown
    *Printables provided

Key
Concepts

New:

  • Chick

Review:

  • Life cycle
  • Stage

Optional
Reading

  • A Nest Full of Eggs by Priscilla Belz Jenkins

BEGIN:

We are learning how living things grow and change over time. This is called a life cycle. All living things have a life cycle.

EXPLAIN:

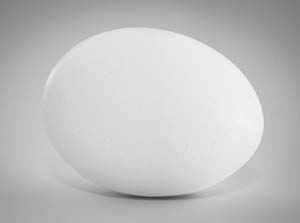
Today we will learn about a living thing that begins its life cycle in an egg.

[Display picture of adult chicken.]

hen
‏‏‎ ‎
egg
Patrik Nygren/flickr/(CC BY-SA 2.0)
ASK:
  • Have you ever seen a chicken?
  • What was it like?
    [Display picture of a chicken egg.]
  • What is this?
EXPLAIN:

An egg is the first stage in a chicken’s life cycle. Chickens lay eggs.

[Display the picture of an egg and the picture of an adult chicken some distance apart (approximately enough space for adding two more pictures). Point to each of the pictures and the “open” space between the two pictures as you explain the following:]

The first picture is an egg. A chicken begins its life cycle growing in an egg.

Our other picture shows an adult chicken. The chicken in this picture is “all grown up.” This is last stage of the chicken’s life cycle. We know that a stage in a life cycle has its own characteristics.

The adult chicken is much bigger than the small egg. The egg is too small for an adult chicken to live in.

ASK:

Do you think an adult chicken could pop out of (or fit in) this small egg?

EXPLAIN:
eggs hatching
Michael Sale/flickr/(CC BY-NC 2.0)

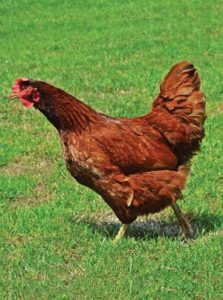
There is a space between our picture of an egg and our picture of an adult chicken. Our pictures show the first and last stages of a chicken’s life cycle. Something happens in the space between our two pictures. There are other stages between the first and last stages.

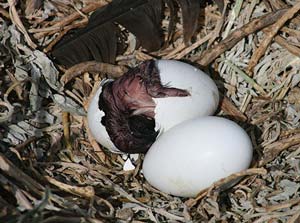
[Display picture of a chick hatching from an egg.]

This picture shows what happens when a chicken begins to hatch, or come out of its egg. This is the second stage of a chicken’s life cycle.

ASK:

What do you see in our picture? (feathers, a little wing, cracked egg, etc.)

EXPLAIN:
chick
Alex Star/flickr/(CC BY-SA 2.0)

A chicken that hatches from an egg is called a chick.

[Display picture of chick next to the picture of chick hatching from an egg.]

A chick is a baby chicken. This is the third stage in the life cycle of a chicken.

ASK:

What does the chick in our picture look like? (small, fluffy, etc.)

EXPLAIN:

We know that the last stage in the life cycle of a chicken is the adult chicken. It takes only a few weeks for a chick to grow into an adult chicken. This is a shorter time than it takes a kitten or puppy to become an adult.

ASK:

[Point to pictures involved in each of the following questions:]

  • How is the adult chicken different from the chick? (bigger, more feathers)
  • How is the adult chicken similar to the chick? (both have a beak, two feet, eyes, etc.)
ACT:

[Mix up the pictures of a chicken’s life cycle.]

Let’s practice putting our pictures of a chicken’s life cycle in order.

What comes first in the life cycle of a chicken? (egg)

[Invite volunteer children to help put the pictures of a chicken’s life cycle in order and describe how the chicken changes in each picture.]

RECAP:

Today we learned about the life cycle of a chicken. A chicken begins its life cycle in an egg and grows into an adult chicken in several weeks. What do we call a baby chicken? (chick)

Scaffolding tips

Scaffolding Tips

Extra support

  • Remind children that a characteristic is something special about a living thing or a thing that is not living.
  • Offer prompts to help children focus on picture details, if necessary. Example: “What can we see inside the egg in the picture of the hatching chick?”

Enrichment

  • Encourage children to describe how the life cycle begins again after a chicken is an adult. (chicken lays an egg)
Science

Center Activity

Supply *chicken life cycle sequencing cards. Encourage children to put the pictures in order. As children finish, invite them to draw or paint the life cycle stages (or some of the stages) on paper.
*Printables provided

Family Child Care

Family Child Care

At pickup time, encourage children to describe the life cycle of a chicken. Invite children to use the pictures if they’d like.