Week 14:
Day 1

Understanding Words

Language / Literacy

Large Group

Skill and Goal

Oral language, Letter knowledge
Children will understand basic information, including the meaning of several novel words, presented in a book read aloud. Children will also identify the name and sound of the letter X.

Materials
Needed

  • *Letter X card
  • Book of your choice for this week’s repeated reading
  • Chart paper
  • Marker
    *Printables provided

Key
Concepts

New:

  • 1–2 words (see Be Prepared)

Be Prepared: This is the first of three repeated readings of a book with children. Today’s reading focuses on children’s understanding of basic information presented in the book. In advance of the session, identify all novel words in the book you intend to define for children across three days of reading the book. Select one or two important words to define for children today, especially words that are essential to understanding the book. See the Language/Literacy section of the ELM User Guide: 3–5 Years for additional information. Write the following at the top of the chart paper: Words We Understand.

BEGIN:

Large Letter X Card[Display letter X card.]

The word “fox” ends with this letter. What is the name of this letter?

Letter X says /ks/, just like in the word “fox.” /ks/, / ks/, fox. Let’s together say /ks/, /ks/, fox.

Who would like to tell us another word that ends with the letter X?

EXPLAIN:

Now let’s read a book!

[See Week 3, Day 1 of Language/Literacy for a description and examples of how to approach today’s book reading. Key aspects are summarized below:

  • Display book cover and encourage children to discuss what the book might be about.
  • Explain that reading a book is a good way to learn new words. We will talk about some words each time we read the book this week. Remind children of the Words We Understand chart.
  • Read title of book as you point to each word. Point to and say the names of the author and illustrator.
  • Introduce and provide child-friendly descriptions of two novel words included in today’s book. Write words on the chart as you point to and say each again.
  • Point to the first text word and explain this is where we begin reading the book. Read the book verbatim. Pause to discuss words, events, or characters that seem confusing to children. Point to and describe illustrations directly related to book text.
  • After reading the book, engage children in recalling main parts of the book and novel words emphasized today:
    • What is our book about?
    • Who were the main characters?
    • What happened first? What happened next?
  • Engage children in a brief discussion of novel words emphasized today. Display and discuss book pictures that pertain to each word.
    • What does each word mean?
    • How was each word used in today’s book?]
Week 14:
Day 1

Making Patterns

Mathematics

Large Group

Skill and Goal

Pattern knowledge
Children will understand that a pattern is something that repeats itself.

Materials
Needed

  • Shirt or some other item with stripes that can be seen at a distance

Key
Concepts

Review:

  • Pattern
  • Stripes

BEGIN:

Today we are going to talk about patterns. A pattern is something that repeats itself. Sometimes our clothes have patterns.

EXPLAIN:

Let’s look at this striped shirt (item). The stripes are the lines on the shirt. These stripes are in a pattern.

[Point out how the stripes on the shirt (or other item) are in alternating colors. Example: “This shirt has stripes in a pattern. Please look at the pattern. Blue, white, blue, white, blue, white. This shirt has a blue, white, blue, white pattern.”]

ACT:

Child with striped shirtLet’s together say the pattern as I point to the stripes.

I wonder if any of us have a pattern on our clothes today.

[Point out different types of patterns on children’s clothing, if possible. Patterns may be in stripes, dots, etc.]

EXPLAIN:

We can make a pattern with children in our classroom. We can make a pattern with boys and girls.

ACT:

[Encourage children to line up in a boy-girl pattern in two separate lines so children can see the line they are not part of. When children have finished lining up in a pattern, point to each child as you lead children in saying “Boy, girl, boy, girl,” etc. If you have more boys or more girls, invite children who are not part of a pattern to point with you.]

RECAP:

Today we learned that a pattern is something that repeats itself. Let’s say the pattern on this shirt (item) again.

[Lead children in saying the shirt pattern as you point to each stripe.]

Scaffolding tips

Scaffolding Tips

Extra support

  • If you are able to describe a pattern on a child’s clothing, invite several children to help you point to each element of the pattern as you say it together.
  • There may be a pattern in carpeting in your classroom that can be used as an example of a pattern.

Enrichment

  • As you make the boy-girl pattern, invite children to tell what comes next in the pattern.
Mathematics

Center Activity

In the block center, encourage children to make patterns when building. Example: A road using two shapes of blocks—square, rectangle, square, rectangle, etc. Display the *large number one card and invite children to place blocks on the numeral in a pattern.
*Printables provided

Family Child Care

Family Child Care

Block Patterns Sheet with block on itInvite school-age children in your setting to make pattern puzzles for younger children. On a piece of white paper, encourage children to trace blocks or Legos® in a simple ABAB pattern. Invite younger children to match the correct block/Lego® as they recreate the pattern.

Week 14:
Day 1

Paying Attention

Self-Regulation

Large Group

Skill and Goal

Concentrate
Children will strengthen their understanding of how to use yoga to concentrate on their breathing and bodies.

Materials
Needed

  • Squeeze balls—1 per child
  • The ABCs of Yoga for Kids by Teresa Power
  • Yoga mats—1 per child (see Be Prepared)

Key
Concepts

Review:

  • Concentrate
  • Yoga
  • Pose

Be Prepared: Today’s activity will involve children trying two yoga poses. If possible, provide children with yoga mats.

BEGIN:

The ABCs of Yoga for Kids Book CoverLet’s have some quiet time together so we can concentrate on our breathing and body. This will help our mind to calm down and help us with our self-control.

ASK:

What does it mean to concentrate? (to pay close attention to something)

EXPLAIN:

Today each of us will use a squeeze ball to concentrate on our breathing and body. We will pretend the ball is an orange in our hand.

ACT:

[Give each child a squeeze ball. Encourage children to feel and squeeze it.

Spread out children so each child has personal space. Ask children to sit and place their squeeze ball between their legs. When all children are arranged, turn out the lights in the classroom.]

Let’s begin by concentrating on our breathing. As you breathe in and out, put your hand on your stomach to feel how it moves as you breathe. Let’s practice breathing while feeling our stomach move in and out.

Let’s take a deep breath.

In, 1, 2, 3, out, 1, 2, 3.

If you want you can close your eyes to help you relax.

Breathe in through your nose and out through your mouth.

In, 1, 2, 3, out, 1, 2, 3.

In, 1, 2, 3, out, 1, 2, 3.

When you breathe in, bring the air all the way down into your stomach.

In, 1, 2, 3, out, 1, 2, 3.

Your hand on your stomach should move up and down as you breathe.

In, 1, 2, 3, out, 1, 2, 3.

Keep breathing in slowly and breathing out slowly.

Feel your body starting to relax. Your eyes are feeling heavier and heavier as you keep breathing all the way into your stomach.

In, 1, 2, 3, out, 1, 2, 3.

Now we are going to focus on our hands and arms. Pick up your squeeze ball and hold it in your hand. Let’s pretend the squeeze ball is an orange. Pretend you are going to squeeze the orange to make orange juice. Tighten your fist as much as possible. Pretend you are squeezing the orange as hard as you can. Okay, there’s no more juice left in the orange. Relax your hands and place your squeeze ball between your legs.

Wow! Here comes a beautiful butterfly. He’s coming over to you. He’s flying around your head. Oh! He landed on your nose. Don’t touch our imaginary butterfly with your hands, because we might hurt him. Instead, try to get the butterfly to move off of your nose by scrunching up your nose and face.

Squeeze your face up and move your nose around. Wrinkle your face up really hard. Now relax. Our imaginary butterfly flew away. Feel the muscles in your face relax.

Now just relax and focus on how your body feels. Your face was tight but now it’s relaxed. Your fists were tight but now your hands feel open and free. Your stomach is now relaxed. Your whole body feels relaxed.

Now we will let go of our thoughts about how our body feels. Let’s pretend we are putting our thoughts on a big cloud in the sky. Let’s imagine we are watching our thoughts float away on a big cloud so our mind is quiet. Now we can think about our breathing again. Let’s breathe together again while we feel our stomachs go in and out.

[Gather children’s squeeze balls and place them to the side.]

EXPLAIN:

Let’s use some of our quiet time to practice some yoga. Remember, when people do yoga they concentrate on their breathing while stretching their bodies into different poses.

Let’s do the yoga poses we learned several weeks ago. We know that a pose is a way of holding our body. Here are the two yoga poses we have done.

ACT:

[Display photos in the book of yoga poses done in Week 11, Day 1. Invite children to try each pose. Demonstrate each. Encourage children to take three deep breaths as they hold each pose.]

Now let’s look at the pictures of other poses in our book about yoga. We will try some different yoga poses in the book and concentrate on our breathing while we do them.

[Choose two poses from the book to demonstrate to children. Read sections of the book that focus on the two poses. Discuss how the child’s body is posed in each picture. Example: “This is called the lion pose. How does the boy’s body look like a lion?”

Show children the picture of the first chosen pose from the book. Demonstrate the pose and then invite children to try it. Remind children to take three deep breaths as they hold the pose. Repeat the pose with three deep breaths. Then show children the picture from the book of the second chosen pose and use the same approach. Repeat the pose with three deep breaths.]

RECAP:

We are learning to calm our minds and use good self-control by concentrating on our breathing and our bodies. We did some yoga poses. Yoga helps us concentrate on our breathing while stretching our bodies. Which yoga pose helped you the most in calming your mind?

Scaffolding tips

Scaffolding Tips

Extra support

  • If children have difficulty with the yoga poses you demonstrate, help by gently placing their bodies in the desired position.

Enrichment

  • If children are comfortably holding a pose while taking three deep breaths, invite them to take more deep breaths (up to five, if they wish).
  • Invite children to demonstrate a pose in the book. Encourage others to try the pose also.
Self-Regulation

Center Activity

Place one or two yoga mats in an area of the room plus pictures (from the book) of the two yoga poses practiced in today’s activity. Also encourage children to practice poses done previously (Week 11, Day 1). If you do not have access to yoga mats, use a blanket. Play quiet, peaceful music and invite children to practice the poses.

Family Child Care

Family Child Care

Invite children in your setting to do partner yoga. Encourage one child to do a yoga pose and the other child to mimic the pose of the first child. Encourage children to take turns being the first to do a yoga pose. Provide The ABCs of Yoga for Kids by Teresa Power for children to use as a reference.

Week 14:
Day 1

Exploring Living Things

Science

Large Group

Skill and Goal

Knowledge of living things
Children will understand that an insect is an animal with six legs that can be used in different ways.

Materials
Needed

  • *5 pictures as shown
    *Printables provided

Key
Concepts

New:

  • Insect

Also
Promotes

  • Mathematics

BEGIN:

We are learning a lot about how animals are living things. Today we will learn about another kind of animal called an insect.

EXPLAIN:

An insect is an animal that has six legs. Insects are sometimes called bugs.

ACT:

Pop up if you like insects.

EXPLAIN:

We can tell if something is an insect by counting its legs.

Last week we learned about some other animals with legs.

ASK:
  • How many legs does a bear have? (four)
  • How many legs does a bird have? (two)
EXPLAIN:

Insects are much smaller than a bear or a bird but they have more legs!

Insects are all around us. Let’s look at some pictures of insects.

ACT:

[Display pictures of an ant, cockroach, mosquito, and praying mantis. State the name of each insect when you display its picture. Encourage children to count the legs on each picture.]

Ant, Cockroach, Mosquito, Praying Mantis

ASK:

How many legs does each insect have?

ACT:

They each have six legs. Let’s together count to six on our fingers.

EXPLAIN:

Insects use their legs to move around. There are other ways some insects can use their legs. Some insects can make sounds with their legs when they rub them together. Other insects use sticky parts of their legs to walk on walls or ceilings!

ASK:

Can we walk on walls or ceilings with our legs? (No!)

EXPLAIN:

WaspAn insect’s legs are attached to the middle part of its body. Some insects also have wings attached to the middle part of their body.

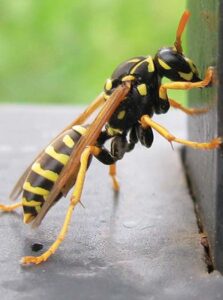
Let’s look at another picture of an insect. We can see how the legs and wings are attached to the middle part of the insect’s body.

[Display picture of a wasp. Point out the legs and wings and how they are attached to the middle part of the insect’s body.]

An insect uses the middle part of its body to help it move. Some insects can fly. Some can walk. Some can jump. And some insects can swim. Insects can move in many ways.

ACT:

Let’s move like an insect!

[Invite children to move like an insect in an open area of your classroom. Remind children that there are many different ways to move like an insect: fly, walk, jump, swim.]

RECAP:

Today we learned about an animal that has six legs. What is the animal called? Insects use parts of their bodies in many ways. How do insects use their legs? (move, make noise, climb on walls) An insect’s legs and wings are attached to the middle part of its body.

Scaffolding tips

Scaffolding Tips

Extra support

  • Point to each of a pictured insect’s legs as children count.

Enrichment

  • Some children may be interested in knowing that “thorax” is the name for the middle part of an insect.
  • Ask children to describe their favorite insect. Have they ever held one?
Science

Center Activity

Fill the sensory table or a tub with sand. Supply a variety of plastic insects as well as other plastic animals that can be used in the sand. Encourage children to find the animals and sort them into two groups: insects and non-insects. Provide magnifying glasses to help children learn more about each insect.

Family Child Care

Family Child Care

If possible, take a trip outside to look for insects. If children find an insect, invite them to draw a picture of what they remember about it.