Week 35:
Day 2

Understanding Letters

Language / Literacy

Large Group

Skill and Goal

Phonological awareness, Letter knowledge
Children will identify the final sounds of familiar words. Children also will understand the name and sound of the letter Y.

Materials
Needed

  • *Picture cards (see Be Prepared)
  • Chart paper
  • *Letter Y card
  • Children’s name cards
  • List of children’s first names for display to children *Printables provided

Key
Concepts

Review:

  • Concentrate

Be Prepared:Use the following picture cards for today’s activity:

D – bread, cloud, card F – chef, scarf, giraffe G – rug, flag, frog
M – swim, arm, comb P – lip, mop, sleep G – dog, rug, log
S – juice, clothes, fence S – house, necklace, octopus

Some of the words end with a sound that comes from combining letters (examples: comb, necklace), not a single letter alone. The goal of the activity is to strengthen children’s understanding of final sounds of words, not letter sounds only.

BEGIN:

We are learning how to concentrate on the sound we hear at the end of a word. We know that we pay close attention to something when we concentrate.

EXPLAIN:

[Place picture cards of a scarf, mop, and dog on the floor or table in front of children. Say the name of each picture card as you place it on the floor/ table. Emphasize the final sound.]

I am going to say a sound. We will find a picture card that ends with the sound I say. Let’s first try one together.

ACT:

Let’s find a picture card that ends with the sound /f/. Let’s say that sound together: /f/.

[Describe for children your thinking as you look for a card that ends with the sound /f/. Example: “I want to find a picture card that has the final sound /f/. /f-f-f/.” Choose the picture card of the mop. “This is a mop. /Mo/-/p/-/p/-/p/. No. This picture does not have the ending sound /f/, it has the ending sound /p/.” Choose the picture card of the dog. “This is a dog. /Do/-/g/-/g/-/g/. No. This picture does not have the ending sound /f/, it has the ending sound /g/.” Choose the picture card of the scarf. “This is a scarf. /Scar/-/f-f-f/. Yes! This picture ends with the /f/ sound. It is a scarf. It has the ending sound /f/.”]

Let’s together say the word “scarf” and then together say the sound we hear at the end of the word “scarf.” Scarf. /f/.

[Collect the picture cards used for your demonstration. Place another set of three cards of your choosing on the table or floor. The cards should have different final sounds. Say the name of each picture card as you put it down. Emphasize the final sound of each card.

Say the final sound of one of the cards. Ask a child to find a picture card that ends with the sound you say. Provide assistance as needed. After the child finds the card, ask the child to say the name of the picture card and the sound he/she hears at the end of the word. Ask the child to place the picture card in front of him/her until the end of the activity. If the child has difficulty, provide support by repeating the final sound and the names of the pictures while emphasizing the final sound. You can also ask whether the picture ends with the sound after naming each picture. Example: “We’re looking for a picture that ends with the sound /g/. Here are pictures of a rug, a mop, and a comb. Which one ends with the sound /g/?” If the child does not respond, say “This is a picture of a mop. /p/. Does it end with the sound /g/?”

Repeat the above procedure until each child has a turn. Be sure to set out a different set of three cards for each turn, and to say the name of each card as you put it down, emphasizing the final sound.

After all children have had a turn, say one of the final sounds included in the activity. Ask children to hold up their card if the name of their picture card ends with the final sound you say. Repeat for each of the final sounds included in the activity: /d/, /m/, /f/, /p/, /g/, and /s/.]

EXPLAIN:

Now we are going to learn a different letter of the alphabet.

[Display letter Y card.]

ASK:

Does anyone know the name of this letter?

ACT:

Alphabet-Cards---Large-YThis is the letter Y. We can write the letter Y in two ways. We can write the letter Y like this.

[Demonstrate writing an uppercase Y at the top of a chart paper.]

This is an uppercase Y.

We can also write the letter Y like this.

[Demonstrate writing a lowercase y at the top of a chart paper.]

This is a lowercase y.

We are learning how to calm our mind and relax our body by doing yoga. Remember, yoga is a way for us to concentrate on our breathing while stretching our bodies into different poses.

The word “yoga” begins with the letter y. I will write the word “yoga” on our chart. I am going to write “yoga”with a lowercase (small letter) y.

[Say each letter as you write the word. Emphasize y.]

Let’s all say the word “yoga.”

[Invite a volunteer child to point to the letter y in the word “yoga.”]

Let’s look at the very first letter of our name. Pop up if you have the letter Y at the beginning of your name. Remember, names begin with an uppercase (big) letter.

[Encourage children to look at their name cards. Say the first names of children who have a Y at the beginning of their name. If there are children whose name begins with the letter Y who do not stand, point to the letter Y on their name card. Compare the letter Y in their name as you hold the letter Y card next to their name card.

If no one in the group has a first name beginning with the letter Y, say “No one popped up because no one has a name that starts with the letter Y.” Encourage children to look at the list of children’s first names. Point to some first letters of names. Explain that no one’s name begins with the letter Y.

If a child indicates there is a letter Y in his/her name, but not at the beginning of the name, fully recognize the name and invite the child to pop up. Day 4 gives attention to the letter y that appears somewhere else in a child’s name.]

RECAP:

Today we listened carefully to the ending sounds of words. We found the picture card that had the ending sound I was saying.

We also learned about the letter Y. What word begins with the letter y? (yoga)

Scaffolding tips

Scaffolding Tips

Extra support

  • If children need assistance in identifying the picture on the card that ends in the sound that you say, focus on only two pictures—the correct one and the picture card with the same beginning sound.
  • If children need additional support in determining the final sound of a word, clap as you say the final sound. Example: fan; clap when you say the /n/ sound.
  • Use one or both of the remaining picture cards to help children understand and practice the sound of the target letter.

Enrichment

  • Ask children to name the picture on the card and then to identify the final sound (not letter).
  • Some children may be interested in your demonstrating and describing how to make a lowercase y. Example: “A lowercase y is made with one small slanted line and then a longer slanted line. ”

Center Activity

Provide *picture cards used in today’s activity. Encourage children to say the final sound of each word and sort the cards by final sound.

*Printables provided

Family Child Care

Family Child Care

Gather the following toy items and place them in a basket: bug, doll, flower, cat, duck, car, egg, hat, bell, bear, elephants, magnet, rabbit, pan, pig, rug, feather, book, mouse, horse. Invite children to sort the items by final sounds.

Week 35:
Day 2

Making Patterns

Mathematics

Small Group

Skill and Goal

Pattern knowledge
Children will make patterns with basic shapes.

Materials
Needed

  • Square and triangle shapes (pattern blocks)—6–10 per pair of children

Key
Concepts

Review:

  • Pattern

BEGIN:

Today we will use shapes to make patterns. Remember, a pattern is something that repeats itself. We will work with a partner to create shape patterns.

[Arrange children in pairs. Give each pair of children 6–10 pattern blocks.]

EXPLAIN:

Let’s think of a simple pattern we can make. We know that a simple pattern uses two things that repeat themselves.

ACT:

Martin 5274
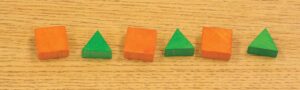
[Encourage children to think of an ABAB pattern. Encourage children to say the pattern out loud and to point to each shape as they say it. Example: square, triangle, square, triangle.]

EXPLAIN:

Now we can think of other kinds of patterns we can make with our partner. We should talk with our partner about the kinds of patterns we would like to make. When we finish the pattern, we can say it out loud together as we point to the shapes.

ACT:

[Invite children to work together to create patterns. Examples: AABAAB, ABBABB. Help, if necessary. Continue the activity as time permits.]

RECAP:

Today we practiced making patterns with shapes. We worked together with a partner to make our patterns.

Scaffolding tips

Scaffolding Tips

Extra support

  • If children need assistance with making a pattern, say the pattern out loud with them. Listening to the pattern may help children understand what comes next.

Enrichment

  • Pair children who have mastered more difficult patterns. Encourage them to make a pattern with three or four kinds of shapes.
Mathematics

Center Activity

Provide yarn and various colored beads. Invite children to make a pattern bracelet with the beads.

Family Child Care

Family Child Care

School-age children may wish to make patterns with other kinds of pattern blocks. Examples: diamonds, trapezoids, hexagons.

Week 35:
Day 2

Being Responsible

Social-Emotional

Large Group

Skill and Goal

Personal responsibility
Children will understand ways to stay safe at home or somewhere else.

Materials
Needed

  • Be Careful and Stay Safe by Cheri Meiners


Key
Concepts

Review:

  • Safe
  • Rule
  • Law
  • Emergency

Also
Promotes

  • Language / Literacy
  • Physical / Health
  • Social-Emotional

BEGIN:

We have learned many things about ways to stay safe. We know that safe means we do not get hurt or sick or get into danger.

EXPLAIN:

We have talked about how to say safe in our classroom or center. We know that we have rules that keep us safe. Remember, a rule tells us how to behave.


ASK:

What is one rule that helps us stay safe in our classroom or center? (use walking feet, do not throw toys, etc.)

EXPLAIN:

We also know that there are some rules called laws. Remember, a law is a rule made by people in charge of our community or country. Laws are made to keep people safe and to help us treat people fairly.

ASK:

What is one law that we follow when we ride in a car or truck? (wear our seatbelt)

EXPLAIN:

We have also learned how to stay safe when there is an emergency. We know that an emergency is a dangerous situation that needs action right away.

ASK:

How do we stay safe in our classroom if there is an emergency? (use our listening ears to listen to what an adult tells us to do)

EXPLAIN:

[Display book cover.]

Today we are going to read a book that can help us learn more ways to stay safe at home or somewhere else. The book is called Be Careful and Stay Safe. It was written by Cheri Meiners.

ACT:

[After reading the book, review important safety steps illustrated on the pages listed below:]

  • p. 1: How is the girl staying safe on her bicycle? (wearing a helmet)
  • p. 6: How are the children staying safe at the table? (staying away from the candles)
  • p. 10: How are the boys staying safe in the mall? (staying close to an adult they know)
  • p. 19: How can we stay safe if we want to play with children we don’t know? (don’t talk to strangers unless we are with a grown-up we trust)
  • p. 21: How can we stay safe if a stranger tries to talk to us? (ignore the person and walk away)
  • p. 23: What can we do if a person does something that doesn’t seem safe or right? (say no, get away to a safe place, tell someone we trust)


RECAP:

Today we read a book and talked about many ways we can stay safe at home or somewhere else. What is one way we can stay safe at the park? (stay with an adult, don’t talk to strangers, ask for help if we need it)

Scaffolding tips

Scaffolding Tips

Extra support

  • Give examples of things you’ve seen parents do to promote safety at your center. Example: holding a child’s hand when entering or leaving the center.

Enrichment

  • Invite children to think of community helpers who help us stay safe. Examples: police officers, firefighters.
  • How might people feel when they think they are not safe? (scared)
Social-Emotional

Center Activity

Provide the book used in today’s activity and puppets. Invite children to use the puppets to tell how they would stay safe as they look at the pictures. Encourage one child to take on an adult role with the puppet and offer suggestions of how to stay safe in different situations. For example, invite one child to be an adult cooking a meal. Encourage the child cooking to remind the other children that the stove is hot and should not be touched.

Family Child Care

Family Child Care

Encourage children and their families to think of ways they stay safe at home. Invite families to make a list that children can share with others in your setting.

Week 35:
Day 2

Creating Art

Creative Expression

Large/Small Group

Skill and Goal

Knowledge of creative processes, Skills that support creative expression
Children will understand that artists may use thick and thin lines to create art.

Materials
Needed

  • *1 picture as shown
  • Chart from Day 1 (see Be Prepared)
  • Pencils
  • Thick markers
  • Thin markers
  • Thick paintbrushes
  • Thin paintbrushes
  • Paint
  • Paper—1 per child
    *Printables provided

Key
Concepts

New:

  • Thick
  • Thin

Review:

  • Width

Also
Promotes

  • Physical / Health

Be Prepared:The activity plan suggests you add thick and thin lines and words to yesterday’s chart during the activity. This enables children to watch you make the lines and write two words. An alternative is to add the lines and words to the chart in advance of the activity and cover them up during the opening segment, which is a review of lines introduced yesterday.

The activity invites children to make thick and thin lines with different materials. Two possible arrangements are: (1) create three stations with one material in each station and invite children to rotate through the stations, or (2) arrange children into small groups and provide all materials to each small group.

BEGIN:

This week we are learning how artists can use lines to create their art. Yesterday we learned about some different types of lines and found some lines in pictures of paintings.

[Display Day 1 chart and point to and trace each line as you review it.]

We learned about straight lines, curvy lines, and zigzag lines in art.

ACT:

Let’s use our finger to pretend to draw each of the lines in the air. First we will make a straight line. Then a curvy line. And then a zigzag line.

[Demonstrate and describe each line as you encourage children to join you in drawing it in the air. A curvy line is rounded. A zigzag line has short, sharp turns or corners.]

EXPLAIN:

We are going to talk about thick lines and thin lines today. A thick line has a wide amount of space from one side to its other side. A thin line has a narrow amount of space from one side to its other side.

I am going to draw a thick straight line on our chart. I will write the word “thick” next to the line. Then I am going to draw a thin straight line on our chart. I will write the word “thin” next to the line.Line type examples

ACT:

[Draw and describe a thick straight line. Emphasize its width in your description. Make the thick line about the same length as the other straight line on the chart so children focus on its width and not its length. Next to the thick line write the word thick. Say the names of the letters as you write each.

Repeat the above process with a thin line.]

ASK:

[Point to and say the name of each thick and thin line as you ask the following questions:]

  • Which line is wider, the thin line or the thick line? (thick)
  • I drew a straight thick line and a straight thin line. Could we draw a curvy thick line? (yes) Could we draw a curvy thin line? (yes)
EXPLAIN:

We can draw any type of line so it is thick or thin. Any of the lines we talked about yesterday could be thick or thin. We know that the width of something means how wide or narrow it is. A thick line is wider than a thin line.

[Point to and describe the width of thick and thin lines you drew on the chart.]

ACT:

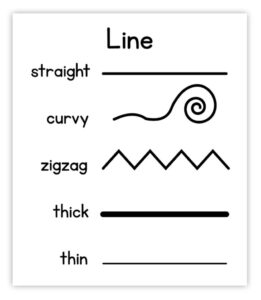
[Display picture of painting used on Day 1 to look at zigzag lines.]

Artwork with lines small
Raja Segar/wikimedia/(CC BY-SA 3.0)

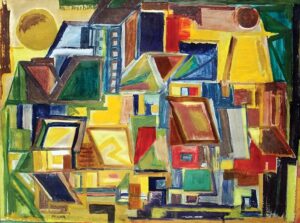
We looked for zigzag lines in the picture of this painting yesterday.

Are there thick and thin lines in this painting?

[Invite several volunteer children to point to thick and thin lines for all children to see. Help children identify each line they point to as thick or thin.]

EXPLAIN:

We are going to practice making thick and thin lines. We can use different types of artist tools to make thick and thin lines. We can practice making thick and thin straight lines or curvy lines or zigzag lines or any other type of line we want to make. What’s important today is to focus on making thick and thin lines.

ACT:

[Invite children to practice making thick and thin lines. Positively acknowledge children’s attempts. Offer demonstrations, if appropriate.]

RECAP:

Today we learned that artists can use thick or thin lines to create art. We practiced making thick and thin lines with different artist tools. Let’s look at the lines we made.

[If time permits, invite several children to point to thin and thick lines they made and describe how they are different.]

Scaffolding tips

Scaffolding Tips

Extra support

  • Provide thick and thin strips of paper for children to hold and compare.
  • When you point to and describe thick and thin lines, emphasize the two lines you drew are about the same length as the straight line discussed yesterday. What’s different is the width of the two lines. (Width was introduced in Math Week 24, Day 1.)

Enrichment

  • Invite children to think about and discuss what sorts of tools make thick lines and what tools make thin lines.
  • If children were introduced to squiggly lines yesterday (Enrichment tip), invite them to make thick squiggly lines and thin squiggly lines.
Creative Expression

Center Activity

In the art center, place the line chart and the artist tools used in today’s activity. Encourage children to practice making different types of thick and thin lines.

Family Child Care

Family Child Care

Using colored water and various sizes of paintbrushes, invite children to paint various lines on a sidewalk.