Children will identify uppercase letters of the alphabet. Children also will say the sound of a letter they correctly name.
Materials Needed
*Uppercase letter chart
*Letter knowledge record form
Pencil
*Printables provided
Key Concepts
Review:
Letter
Revised 1/31/2024
Be Prepared: Below are procedures for an individualized assessment of children’s progress in learning letter names and sounds. The assessment’s focus on uppercase letters is an efficient use of time. Children’s knowledge of uppercase letters is highly related to their understanding of lowercase letters. The main purpose of the assessment is to determine follow-up learning opportunities for promoting each child’s letter knowledge.
Begin the one-to-one assessments with half of the children in your class today (Week 43, Day 2), and continue assessments with the other half of the children in your class on Day 4 of this week. Invite a child to join you at a table in an area of the room with few or no distractions. The brief assessment session should occur during center time or some other period when children are not engaged in a small or large group activity.
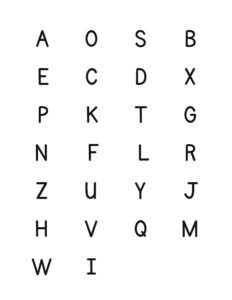
Use the provided uppercase letter chart. Laminate the chart for repeated use, if possible, or print several copies so each child works with a clean chart (no scribbles or other types of marks).
Use the provided form for recording each child’s responses. Use one form for each child. The form has uppercase letters in the same order as the chart used by each child, plus a space next to each letter for you to record the child’s letter name response. Examples: If a child points to T and says T, write the letter T on the child’s record form. If a child points to F and says T, write the letter T on the child’s record form. If a child says “I don’t know,” put DK next to the letter on the record form.
If a child says the wrong letter name but then corrects him/herself without your help, this should be counted as correct. Enter both letters on the record form.
The assessment also asks the child what sound a letter makes. Invite the child to say the sound of a letter the child correctly names. Do not ask the child to say the sound of a letter the child does not know. If the child says a correct letter sound, put an asterisk by the letter on the assessment record form.
If the child says a correct letter sound instead of a letter name when pointing to a letter, repeat the letter sound made by the child and ask: “What letter makes the ____ sound?” Put an asterisk (*) by the letter on the record form for the correct letter sound. Record the child’s letter name response; enter DK if the child does not know.
Do not provide any hints or clues of letter names or sounds. Do not say whether a child’s response is right or wrong. As the child works with the letter chart, say “thank you” or “I know you are working hard” if it appears a child would appreciate some acknowledgment of his/her efforts.
BEGIN:
We are learning a lot about letters. We know that a letter is a special mark used to make words. Today let’s see how many letters you know.
EXPLAIN:
[Display uppercase letter chart.]
Here are some letters of the alphabet. Please point to each letter and tell me its name. If you don’t know the name of the letter, you can say, “I don’t know.” Point to a letter that you know and tell me the name of the letter.
ACT:
[Encourage the child to point to a letter he/she knows and tell you the name of the letter.
If the child says the correct name of the letter, immediately ask: “What sound does the letter _____ make?”
If the child says the correct letter sound instead of a letter name when pointing to a letter, repeat the correct sound made by the child and ask: “What letter makes the _____ sound?”
Record the child’s responses as described in Be Prepared.
If the child seems distracted by all the letters on the page, use a sheet of paper to cover some rows of letters. Leave visible as many rows of letters as you anticipate the child will find manageable. Gradually move the sheet of paper so the child has an opportunity to look at all letters.
If the child does not point to any letters, ask the child which letter he/she wants to point to first.
If the child still does not point to a letter, point to a letter in the child’s name and invite the child to tell you the name of the letter.
If a child seems distracted or loses interest in the assessment activity, bring your session with the child to a close and offer another opportunity at a different time or day to continue to look at letters. Example: “We are learning about a lot of different letters. Let’s take a break now and look at our letters again on another day. Okay?”]
RECAP:
Today you said the names and sounds of letters that you know. Thank you for working hard with me.
DETERMINING A CHILD’S LEVEL OF UNDERSTANDING
After the assessment, count the number of letters correctly identified by the child. You may wish to circle correct responses for ease in counting.
Letter Names
Got It: The child correctly named 18 or more uppercase letters.
Getting It: The child correctly named 1–17 uppercase letters.
Not Yet: The child correctly named 0 letters.
Letter Sounds
Got It: The child said a correct letter sound for each letter name the child correctly identified.
Getting It: The child said a correct letter sound for 1 or more (but not all) letter names the child correctly identified.
Not Yet: The child did not say any correct letter sounds.
FOLLOW-UP LEARNING SUPPORTS
The daily plans for the Language/Literacy domain include a review of all letters beginning in Week 47. Below are suggestions of additional learning options to pursue with children.
Reinforce
The following activities are designed to support children who correctly named 18 or more letters and sounds (Assessment = Got It). The activities are also appropriate for children who correctly named 1–17 letters and sounds (Assessment = Getting It).
Invite children to go on a hunt to find specific letters on signs or posters in the classroom. Encourage children to say the sound of each letter they find.
Encourage children’s use of writing tools during free play. Examples: journals, sand trays (with letters to trace), whiteboards.
Invite children to help write a Morning Message or Words We Understand in a repeated book reading session (Days 1, 3, 5).
Prepare for one-to-one work with a child by reviewing the form used to record the child’s letter knowledge and securing a chart of uppercase letters that you can put marks on. One at a time, say the names of letters the child correctly identified during the assessment and invite the child to point to each letter on a chart of uppercase letters. When the child points to the letter, ask what sound the letter makes. Circle the letters the child correctly names, and then ask the child if there are any other letters on the chart that he/she knows. Also, if there is a letter(s) the child initially identified incorrectly, but then correctly identified, invite the child to identify both the “incorrect” and “correct” letters on a chart of uppercase letters. Example: if a child initially said F for the letter T and then corrected him/herself without your help during the assessment, invite the child to identify letters F and T on an uppercase letter chart during a follow-up session.
Use large letter cards in transition activities. What letter is this? What sound does it make?
In a small group, invite children to stand or wave their hands when they hear the sound of a letter in their name. Clearly say sounds of the first letter or a prominent letter in the first names of children in your group. Encourage all children in your group to say the letter sound and name after a child(ren) has identified the sound as part of his/her name.
Put a small collection of plastic letters on a table for a small group of children to identify and sort. Invite each child to pick up a letter, say its name and sound, and put it in one of several cups. One cup could be used for letters with straight lines, another cup for letters with curves, and a third cup for letters that have both curves and straight lines. Encourage children to use their finger to “trace” the shape of a letter. If available, use magnetic letters and a magnetic wand. You may wish to bury letters in the sand table for children to find.
Encourage family members to support children’s letter learning at home. Suggest that parents talk with their child about the letters in the child’s name and invite their child to point to letters named by the parent. Names of other family members or pets also may be used for talking about and pointing to letters. It is also helpful for a family member to work with a child in writing some or all letters in the child’s name.
Use the Week 12, Day 2; Week 19, Day 2; Week 26, Day 2; Week 32, Day 2; Week 36, Day 2; and Week 42, Day 2 plans to invite children to match letter cards with their letter mats.
Provide children with tactile materials (pipe cleaners, glue, and sand) and printed forms of letters. Encourage children to use the tactile materials to form letters, using the printed form of the letter as a model.
Reintroduce
The following activities are designed for children who did not name any letters and their sounds correctly (Assessment = Not Yet).
Use the child’s name card to review letters in the child’s name. Say a letter in the child’s name and invite the child to point to the letter named. Repeat the letter’s name and say the letter’s sound when the child points to the letter you name. Also, if name cards are used during the day (example: placed at a center occupied by a child), invite the child to point to a different letter in his/her name that you say.
Say a letter’s sound when you point to and say a letter’s name during shared book reading, writing a message with children, and supporting children in writing part or all of their first name.
Invite families to provide clean paper or cardboard items that have print, such as empty cereal boxes and juice containers. Invite children to use a marker to circle letters in their name or letters they know. Support children in saying the name and sound of each letter they circle.
Repeat Week 6, Day 2 to help children understand that letters make up words and uppercase and lowercase letters can be used in words.
Use the song “B-I-N-G-O,” from Week 6, Day 4. Invite one or more children to find the letter that you say as you begin singing the song. Encourage children to find the letter you say as you move through the letters in the song.
For one-to-one work with a child, use a chart with a list of children’s names. Begin by asking the child to find his/her name. Next ask the child to find another name that starts with the first letter of the child’s name. Then ask the child to find a name that starts with a different letter that you say. If the child cannot find a name that starts with the letter, describe how the letter looks. If the child still cannot find a name that starts with the letter, narrow the choices to two names that you point to. If the child still cannot find the name, point to the letter that you named and describe the letter.
SAMPLES OF PORTFOLIO ENTRIES
Got It
Children are learning the names of letters and sounds that letters make. Recently I assessed Koae’s progress in naming uppercase letters and letter sounds. Koae correctly named 18 letters and their sounds. The ability to identify 18 uppercase letters is an optimal benchmark for the end of preschool. We will offer follow-up learning opportunities to support Koae’s knowledge of letter names and letter sounds.
Getting It
Children are learning the names of the letters and sounds that letters make. Recently I assessed Ariel’s progress in naming uppercase letters and letter sounds. Ariel focused on each letter. He named five letters correctly and four letter sounds correctly. The ability to identify 18 uppercase letters is an optimal benchmark for the end of preschool. We will offer follow-up learning opportunities to support Ariel’s knowledge of letter names and letter sounds.
Not Yet
Children are learning the names of the letters and sounds that letters make. Recently I assessed Ana’s progress in naming uppercase letters and letter sounds. Ana listened carefully to the directions for the assessment and pointed to an “A” and said, “That letter is in my name.” She did not correctly name any letters. We will offer follow-up learning opportunities to support Ana’s knowledge of letter names and letter sounds.
Week 43:
Day 2
Working With Shapes
Mathematics
Small Group
Skill and Goal
Geometric and spatial knowledge
Children will strengthen their understanding of basic characteristics of a circle, triangle, square, and rectangle.
Materials Needed
*Small cutouts of the following 5 shapes: circle, square, triangle, rectangle, octagon—1 each per child
*Printables provided
Key Concepts
New:
Octagon
Review:
Circle
Square
Triangle
Rectangle
Corner
OPTION 1:
Offer Week 5, Day 4 to review basic characteristics of a circle, square, triangle, and rectangle.
OPTION 2:
Engage children in playing Shapes Simon Says by describing a shape, including an octagon, and inviting children to do a specific action with the shape.
Invite children to play Shapes Simon Says. Explain that Simon will describe a shape instead of saying the name of a shape in this game. Simon will tell us what to do with the shape. Example: “Simon says to pick up the shape that is round and place it on your head.”
Explain that our game includes a shape we may not know. Display the cutout of an octagon and describe its characteristics: eight straight sides and eight corners. Trace its outline. Then say its name and ask children to repeat the name with you, emphasizing its syllables (oct-a-gon).
Give each child a set of five shape cutouts. Invite children to place the shapes in front of them.
Play Shape Simon Says by describing (not naming) a shape and requesting children to do a specific action with the shape. Demonstrate the action with the shape if children seem uncertain. You may wish to ask a volunteer child to suggest an action with a shape that you first describe.
The following shape descriptions have been introduced to children:
a round shape; it has a curved edge that is not straight (circle)
four equal and straight sides (square)
three straight sides (triangle)
four straight sides and four corners (rectangle)
eight straight sides and eight corners (octagon)
It may be helpful to remind children that a corner is where two sides come together. Encourage children to trace the outline of shapes that seem challenging to identify without hearing a name.
Week 43:
Day 2
Exploring Where We Live
Social Studies
Large Group
Skill and Goal
Knowledge of social and physical environments
Children will understand how animals can provide transportation.
Materials Needed
*6 pictures as shown
*Printables provided
Key Concepts
New:
Pack animals
Load
BEGIN:
[Display picture of a hayride.]
What do you notice in this picture? (horse, wagon, people)
Have any of you been on a wagon pulled by a horse?
This picture shows a form of transportation. An animal is helping people get from one place to another.
EXPLAIN:
All over the world animals transport people and items from one place to another. People use different types of animals depending on where they are and what job they have to do. Some people use animals to travel long distances. Some people use animals to carry heavy things. Animals that carry or pull heavy loads are called pack animals. A load is something that is carried at one time.
I want to show you some pictures of different types of animals transporting people and items. Let’s try to identify the name of the animal that is carrying the people or cargo.
[Display pictures one at a time and ask questions, such as the following, about each picture:]
ASK:
What type of animal do you think is in this picture? (horse, donkey, camel, llama)
Is the animal carrying a person, items, or both?
What clues in the picture tell us where the people are? (in a forest, in a desert, in the mountains, etc.)
Why do you think people might use animals for transportation?
[Invite children to share their thoughts. Include the following information in your discussion as appropriate:]
EXPLAIN:
Difficult habitat: Some places are difficult for transportation. Some places are rocky or sandy. Other places have hills or mountains. Automobiles, trucks, bikes, and other types of transportation cannot go in places that are difficult for transportation. Donkeys and llamas can walk in rocky areas. Camels have special feet that allow them to walk on sand without sinking.
Heavy load: Pack animals can transport a heavy load of items that a person would not be able to carry.
Long distance: People cannot walk and carry heavy items for a long distance. A pack animal can carry a person or items for a long distance. Horses and camels are good animals for traveling long distances. In a hot and dry place, such as a desert, camels can go a long time without water.
Fun: Sometimes animals carry people for fun. The picture of horses pulling a wagon of people shows children and adults having fun. Some people may also ride a horse through hills or mountains for fun.
RECAP:
Today we learned that animals can be used to transport people and items. An animal that carries people or items is called a pack animal. Horses, donkeys, llamas, and camels can serve as pack animals by carrying people or heavy loads or both. A pack animal is used when another form of transportation is not available or cannot be used because the habitat is difficult for transportation. Hills, mountains, and rocky or sandy areas are examples of habitats that are difficult for transportation.
Scaffolding Tips
Extra support
To help children focus on specific features of each picture, ask questions such as: “What do you see on the animal’s back?” “Is there a person on the animal?”
If children’s interest or time is limited, display and discuss several pictures that would have the greatest appeal to children in your group.
Enrichment
Invite children to think of some of the things that the pack animals might be able to carry.
Center Activity
In the block center, provide toy animal figures that might be used for transportation. Encourage children’s use of the animals for transportation.
Family Child Care
Invite children to recall places where they might have seen animals shown in the pictures. Examples: on a farm, at the zoo, at the circus, in a movie, on TV. If possible, take a trip to a zoo or a petting farm. Encourage children to look for pack animals.
Week 43:
Day 2
Exploring Earth and Space
Science
Large Group
Skill and Goal
Knowledge of earth and space
Children will deepen their understanding of recycling.
Materials Needed
Box with recyclable items (see Be Prepared)
*4 bins with labeled pictures (see Be Prepared)
*3 pictures as shown (see Be Prepared)
*Printables provided
Key Concepts
Review:
Recycle
Be Prepared: Today’s activity promotes the important cognitive skillof sorting while helping children understand the kinds of things that can be made from different types of recyclable items.
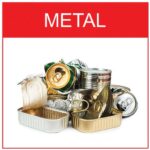
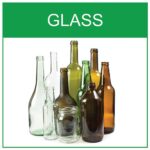
Fill a box with four types of recyclables: plastic, glass, paper, and metal. Provide at least one item for each child in your classroom. Include items that are commonly recycled, such as clean used paper, milk jugs, glass food containers, cereal boxes, food cans, and plastic detergent bottles. Three pictures of glass items are provided if your center’s policy prevents the use of glass. You may wish to ask families to contribute a recyclable item for the activity. Wash all items so they are clean for children to touch. Affix one provided picture to each bin: metal, glass, paper, plastic.
BEGIN:
Yesterday we learned how some things we no longer need can be made into something new. This is one way used things can be recycled. We know that when we recycle, we make a new item from something, or we use the item again.
EXPLAIN:
Today we will talk about four kinds of items that can be recycled. We also will look at pictures of some new things that have been made from items that were recycled.
[Display used paper or newspaper.]
We learned from the book we read yesterday that used paper and newspaper can be used to make new books and comics.
[Return used paper or newspaper to your box of recyclable items. Display used glass (or picture of glass).]
We also learned from the book we read yesterday that bottles can be made from glass that is recycled. I am holding a used piece of glass (or picture of glass) that is no longer needed. This piece of glass can be recycled into something new.
[Return used glass to your box of recyclable items. Display used plastic.]
We know that plastic things we no longer need can be recycled to make things like clothing. I am holding a used piece of plastic that is no longer needed. This used piece of plastic can be recycled into something new.
[Return used plastic item to your box of recyclable items. Display used metal item.]
I am holding a used can. It is made of metal. We know from the book we read yesterday that used metal can be made into something new, like parts of a bike.
I have a box of things that can be recycled. All of the things in the box are clean. It is important to make sure the things we recycle are clean.
[Point to the four recycle bins as you describe each. Use three pictures of glass items if you are unable to use glass.]
We also have four different bins. Each bin has the name and picture of one of the four kinds of things we can recycle. There is a bin for metal, a bin for plastic, a bin for paper, and a bin for glass. The things we put in each of these bins can be used to make something new.
Each of us can take something from our box of recyclable items and put it in the bin where it belongs. We will take turns.
ASK:
If we took a used newspaper from the box, which bin would we put it in? (paper)
ACT:
[Invite children in groups of 2, 3, or 4 to take an item from the box of recyclables and place it in the appropriate bin.]
RECAP:
Today we learned more about the kinds of things we can recycle. There are fewer things to throw away in a landfill when we recycle.
Scaffolding Tips
Extra support
As you sort through the items, talk about how you know what each item is made of. What are some of the characteristics of the item that help you to determine which bin to put it in?
Enrichment
Invite children to find things in the classroom that can be recycled after they are no longer being used. Examples: cardboard boxes, paper, food containers. Ask children which recycle bin each item would go in.
Center Activity
Provide children with items used in today’s activity. Invite children to practice sorting the items by the material they are made of (paper, plastic, glass, or metal).
Family Child Care
If possible, take children to see your local recycling center. Talk about the different areas for each type of recyclable.
 [Encourage the child to point to a letter he/she knows and tell you the name of the letter.

 Today we will talk about four kinds of items that can be recycled. We also will look at pictures of some new things that have been made from items that were recycled.
 [Return used plastic item to your box of recyclable items. Display used metal item.]
 We also have four different bins. Each bin has the name and picture of one of the four kinds of things we can recycle. There is a bin for metal, a bin for plastic, a bin for paper, and a bin for glass. The things we put in each of these bins can be used to make something new.
Exploring Where We Live
Social Studies
Skill and Goal
Knowledge of social and physical environments
Children will understand how animals can provide transportation.
Materials
Needed
*6 pictures as shown
*Printables provided
Key
Concepts
New:
This picture shows a form of transportation. An animal is helping people get from one place to another.
All over the world animals transport people and items from one place to another. People use different types of animals depending on where they are and what job they have to do. Some people use animals to travel long distances. Some people use animals to carry heavy things. Animals that carry or pull heavy loads are called pack animals. A load is something that is carried at one time.
I want to show you some pictures of different types of animals transporting people and items. Let’s try to identify the name of the animal that is carrying the people or cargo.
[Display pictures one at a time and ask questions, such as the following, about each picture:]
[Invite children to share their thoughts. Include the following information in your discussion as appropriate:]
Today we learned that animals can be used to transport people and items. An animal that carries people or items is called a pack animal. Horses, donkeys, llamas, and camels can serve as pack animals by carrying people or heavy loads or both. A pack animal is used when another form of transportation is not available or cannot be used because the habitat is difficult for transportation. Hills, mountains, and rocky or sandy areas are examples of habitats that are difficult for transportation.
Scaffolding Tips
Extra support
Enrichment
Center Activity
In the block center, provide toy animal figures that might be used for transportation. Encourage children’s use of the animals for transportation.
Family Child Care
Invite children to recall places where they might have seen animals shown in the pictures. Examples: on a farm, at the zoo, at the circus, in a movie, on TV. If possible, take a trip to a zoo or a petting farm. Encourage children to look for pack animals.